Table of Contents
This tutorial explains you how to integrate Zoom with the Appointment Booking plugin through the Video Conferencing add-on, allowing automatic creation of Zoom meetings for scheduled services and sending meeting details to admins and customers via email.
Requirements:
- MotoPress Appointment Booking plugin.
- Video Conferencing add-on.
- Zoom account.
Note:
1. Automated meeting details are created only for confirmed bookings.
2. The current version of Zoom integration in the add-on operates as a one-way sync, enabling only the creation of Zoom meetings for reservations. You can’t delete or change these meetings directly in Zoom.
Step 1. Obtain Zoom credentials
To integrate with Zoom, you’ll need to first create an application and obtain its credentials. Follow these steps:
- Go to Zoom.com.
- Sign up for an account if you don’t already have one.
- Go to Zoom Marketplace.
- Log in using your Zoom account credentials.
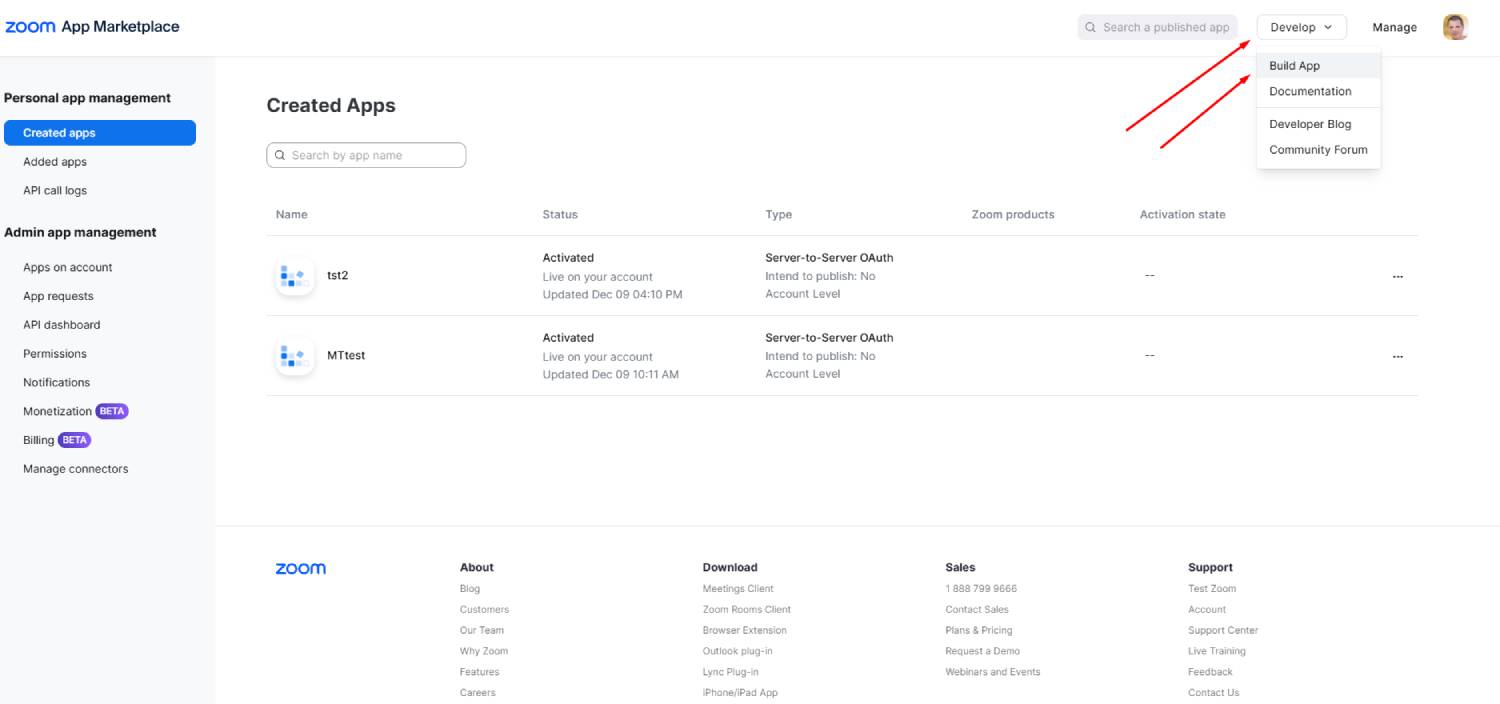
- From the top menu, click on Develop and select Build App from the dropdown. Note: if you already created an app, click ‘Manage’ next to ‘Develop’ and choose your app.
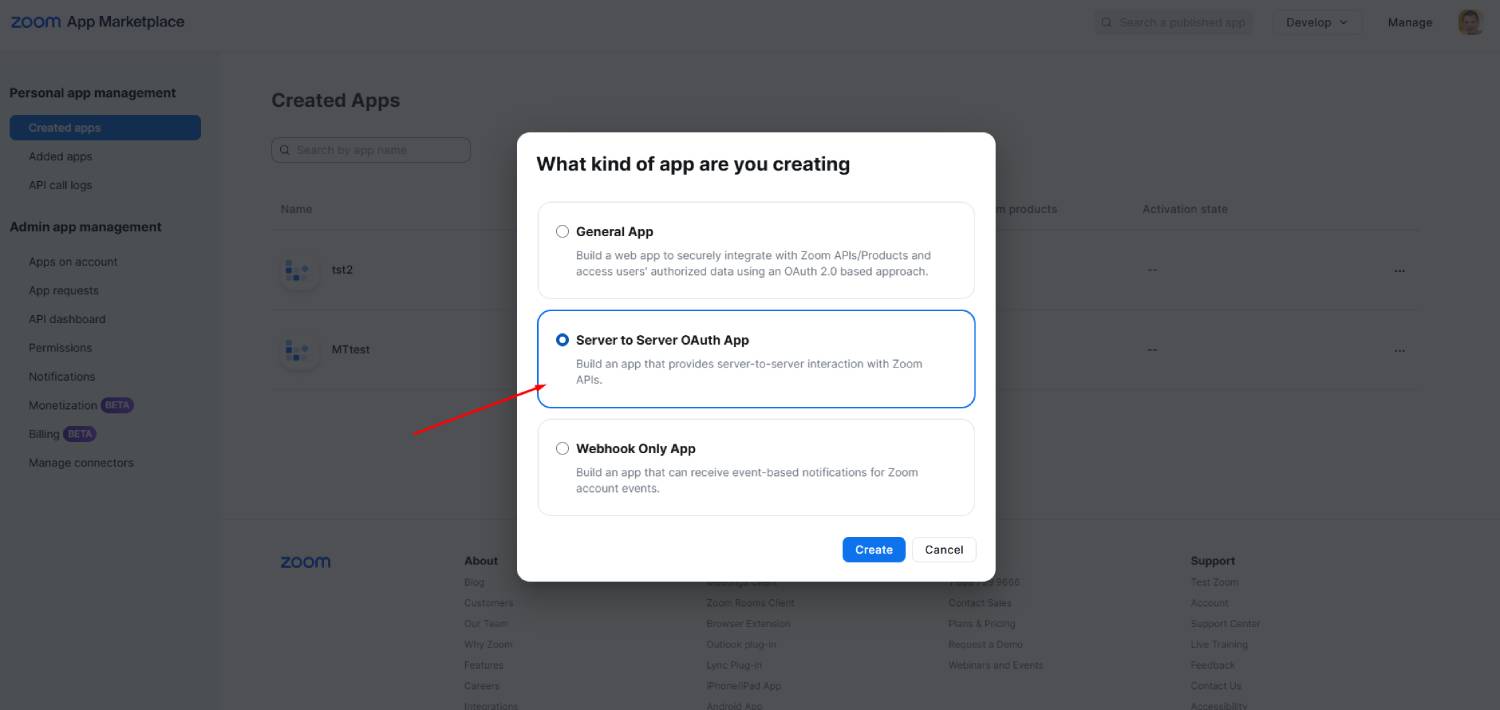
- Select Server-to-Server OAuth App as your app type.
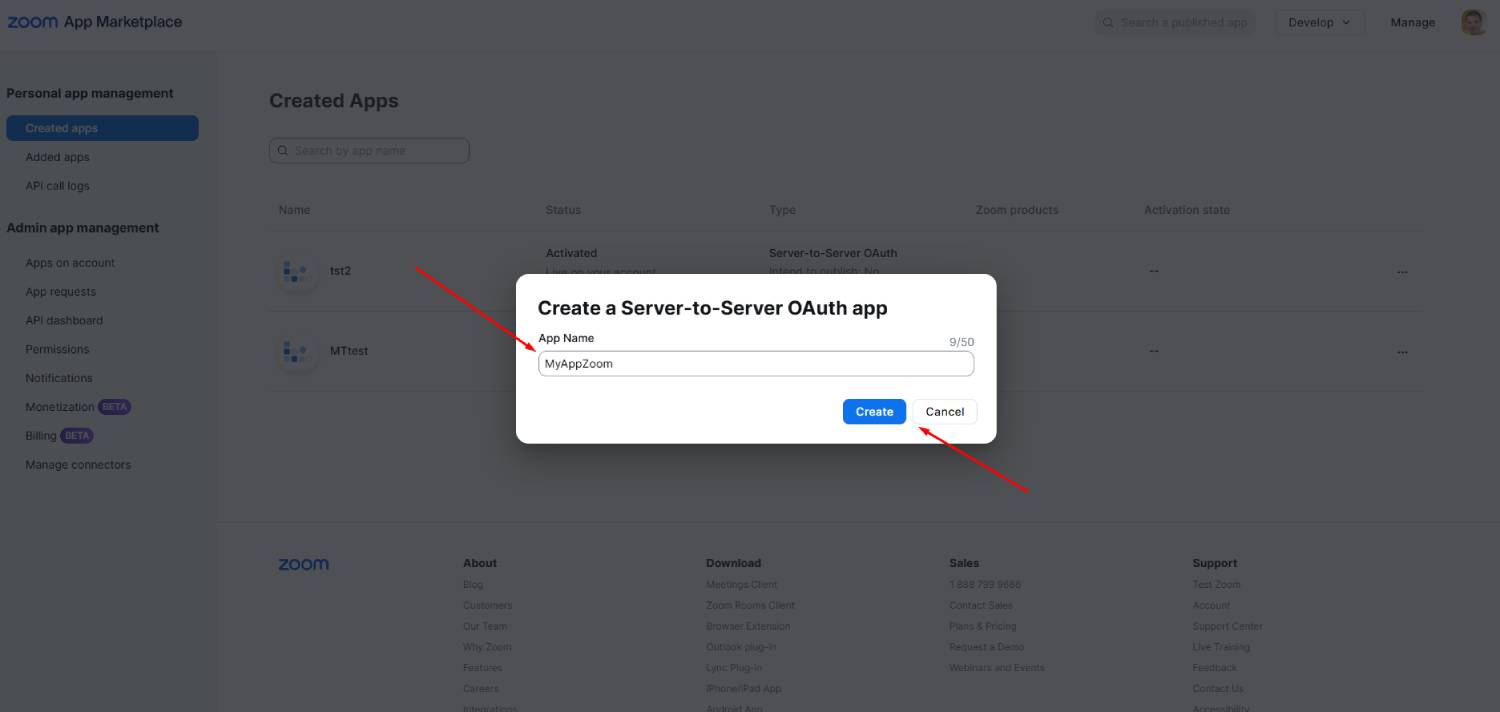
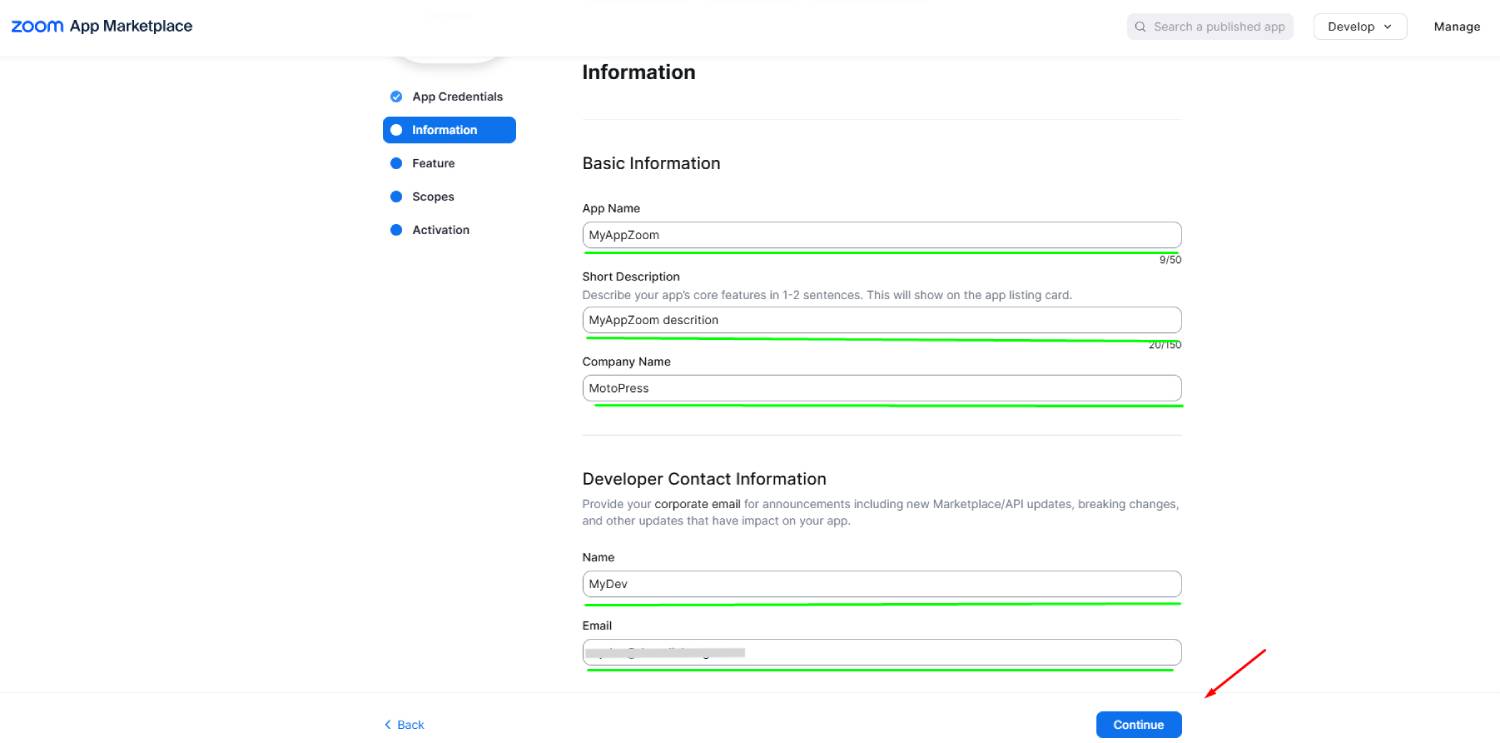
- Provide a name for your application and proceed. Once added, at this stage, you will see placeholders for your Account ID, Client ID, and Client Secret in the App Credentials section. These will become accessible after completing the setup.
- Fill out all required fields in the form and proceed to the next step.
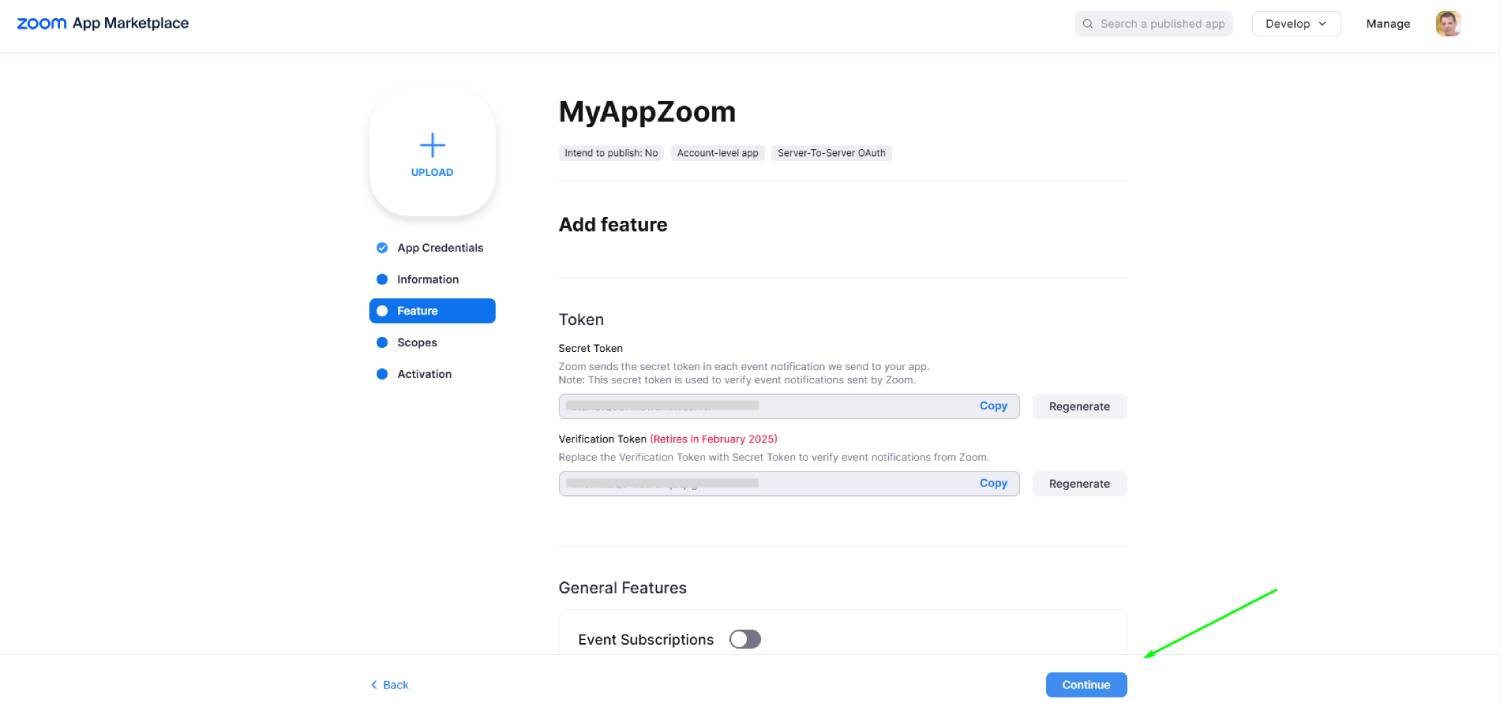
- For sections that are not needed for your integration, simply click “Continue” to skip.
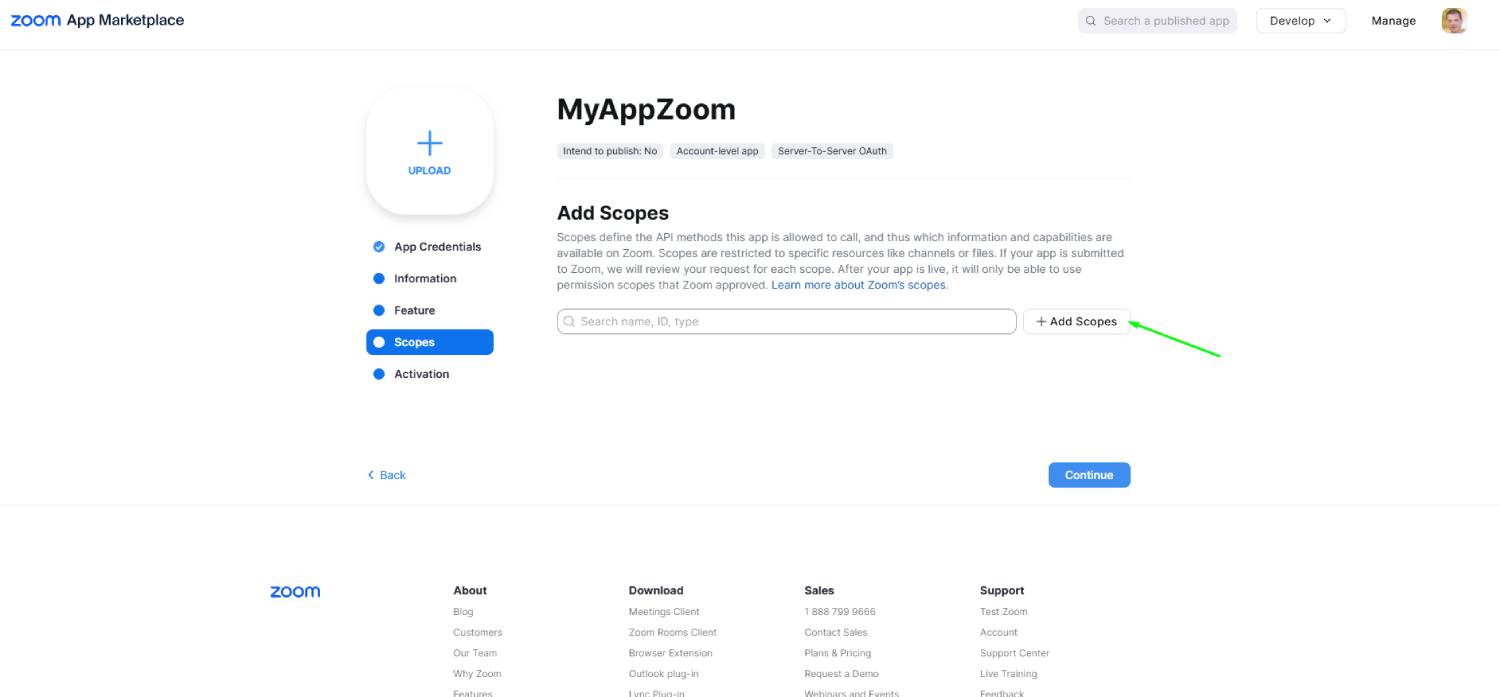
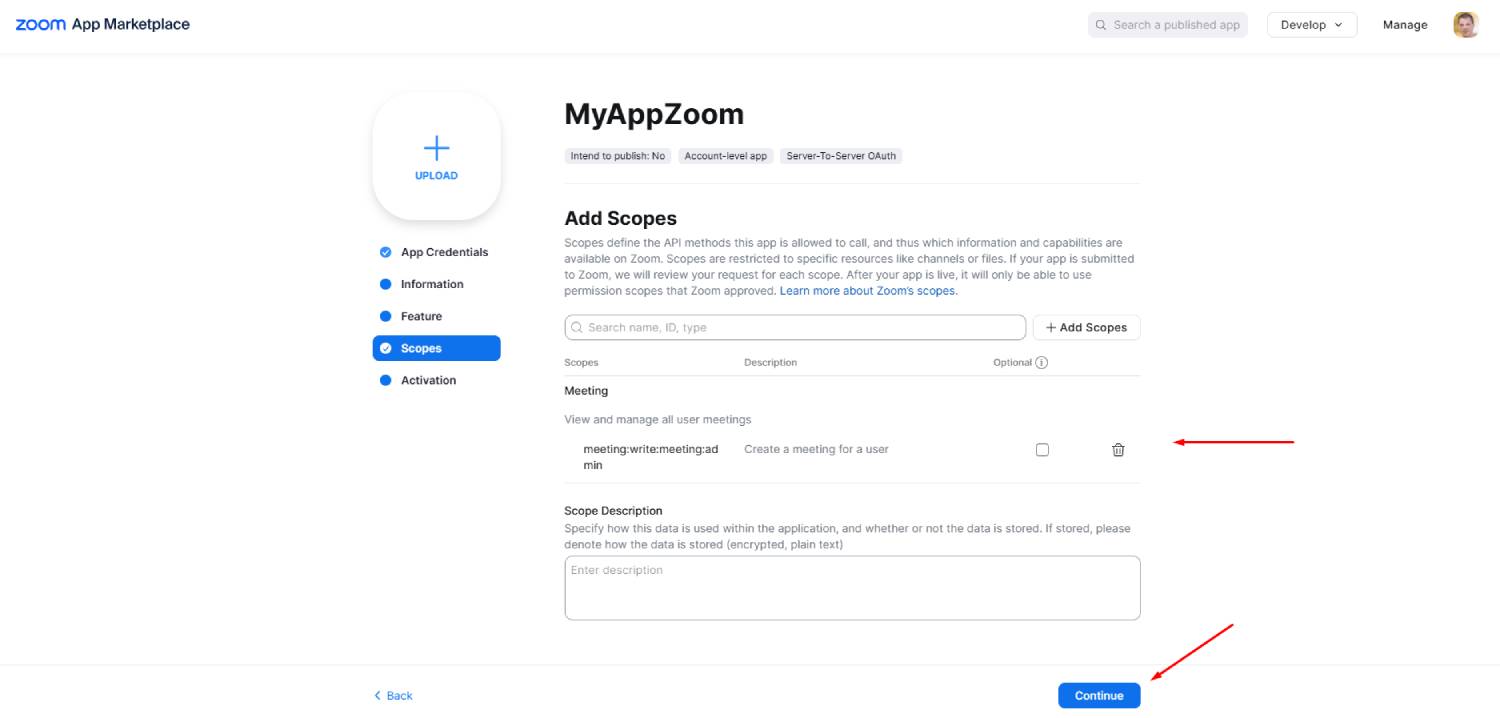
- In the Scopes section, click +Add Scopes.
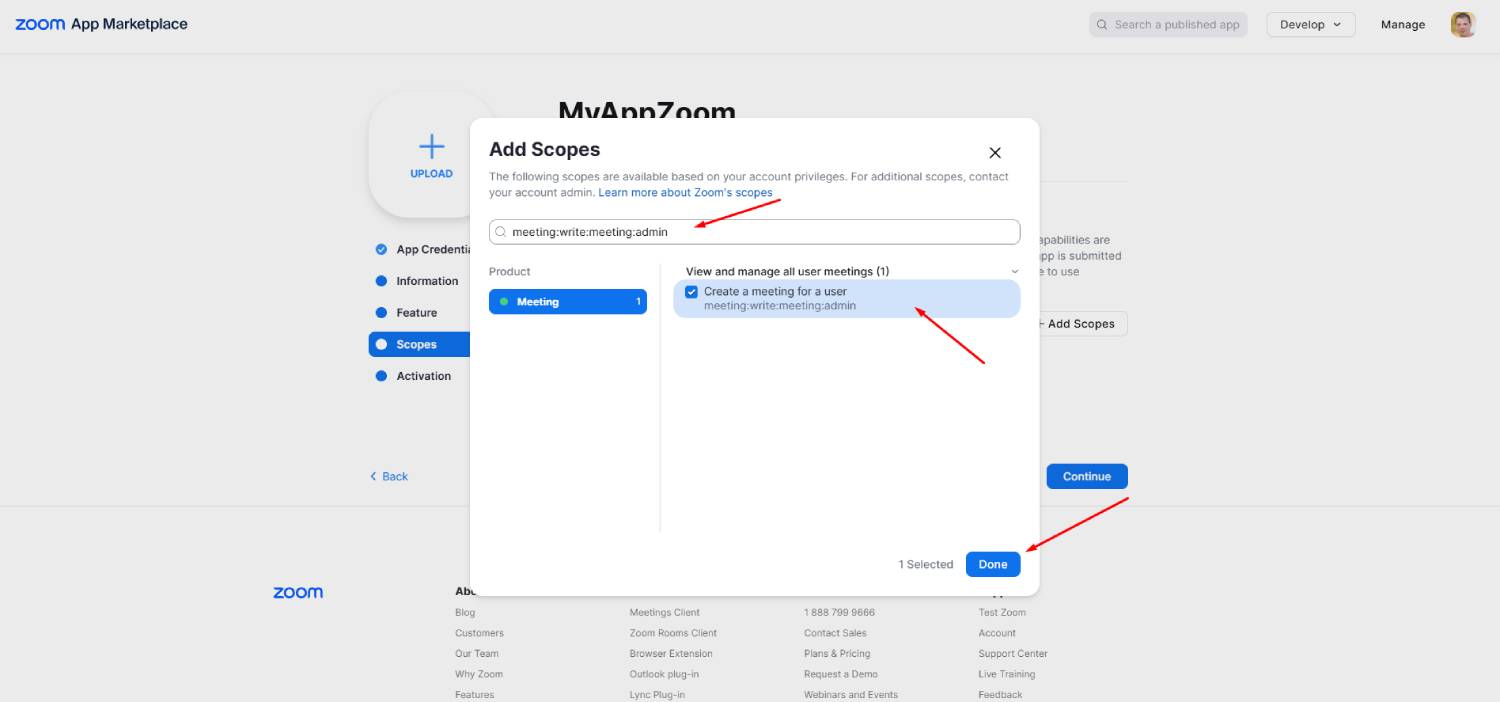
- In the search bar, type
meeting:write:meeting:admin. - From the results, select Create a meeting for a user and click Done to add this scope.
- After adding the necessary scopes, click “Continue” to proceed.
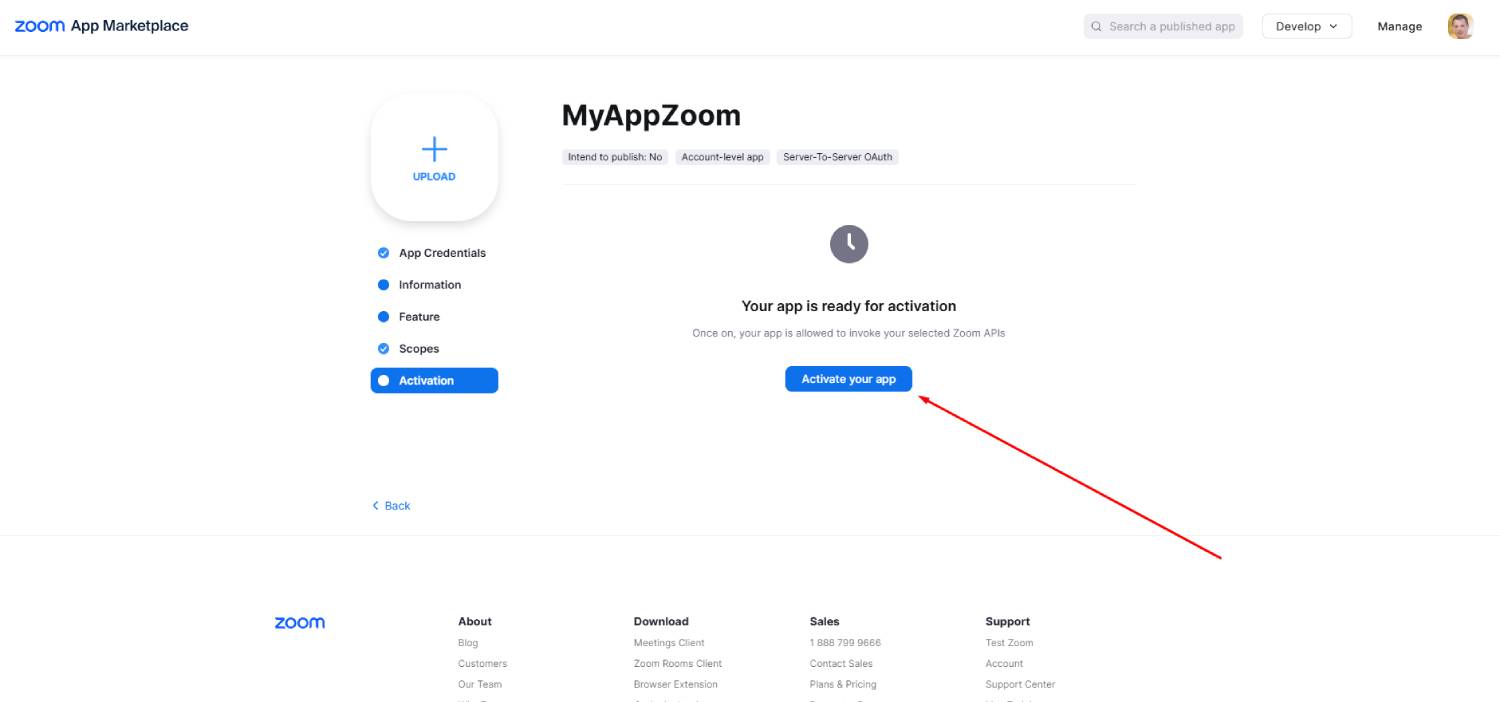
- Once all configurations are complete, click “Activate your app”.
- Navigate back to the App Credentials section.
- Copy your Account ID, Client ID, and Client Secret for use in your integration.
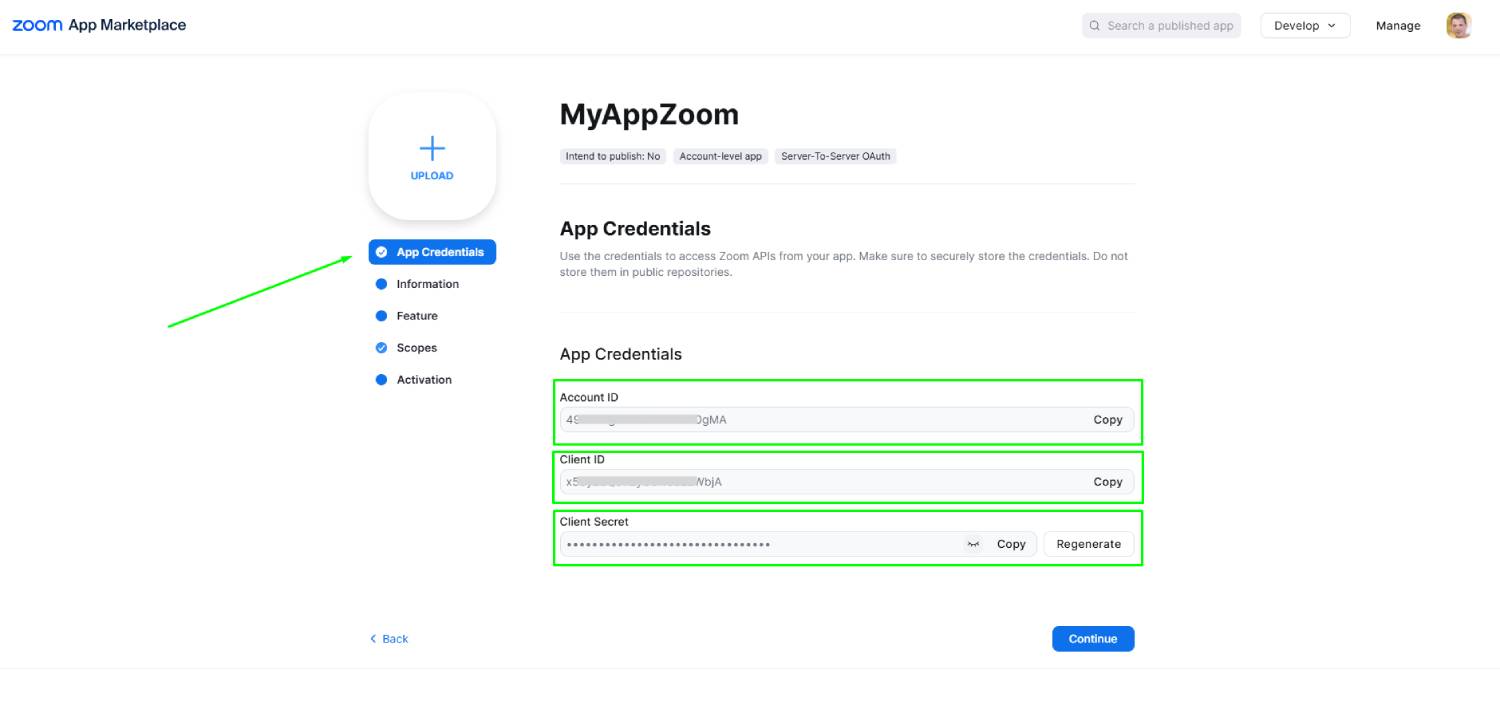
These credentials can now be used to authenticate your application with Zoom’s APIs when connecting to the Appointment Booking plugin.
Step 2. Activate Zoom in the Video Conferencing add-on
To activate the Zoom integration for your Appointment Booking plugin, follow these steps:
- Log in to your WordPress admin dashboard.
- Go to Appointments > Settings.
- Select the Integrations tab.
- Under Video Conferencing, find Zoom settings.
- In the Zoom settings section, enter the following credentials you’ve obtained from the app you created in the Zoom Marketplace (step #1).
– Account ID.
– Client ID.
– Client Secret. - Click Save.
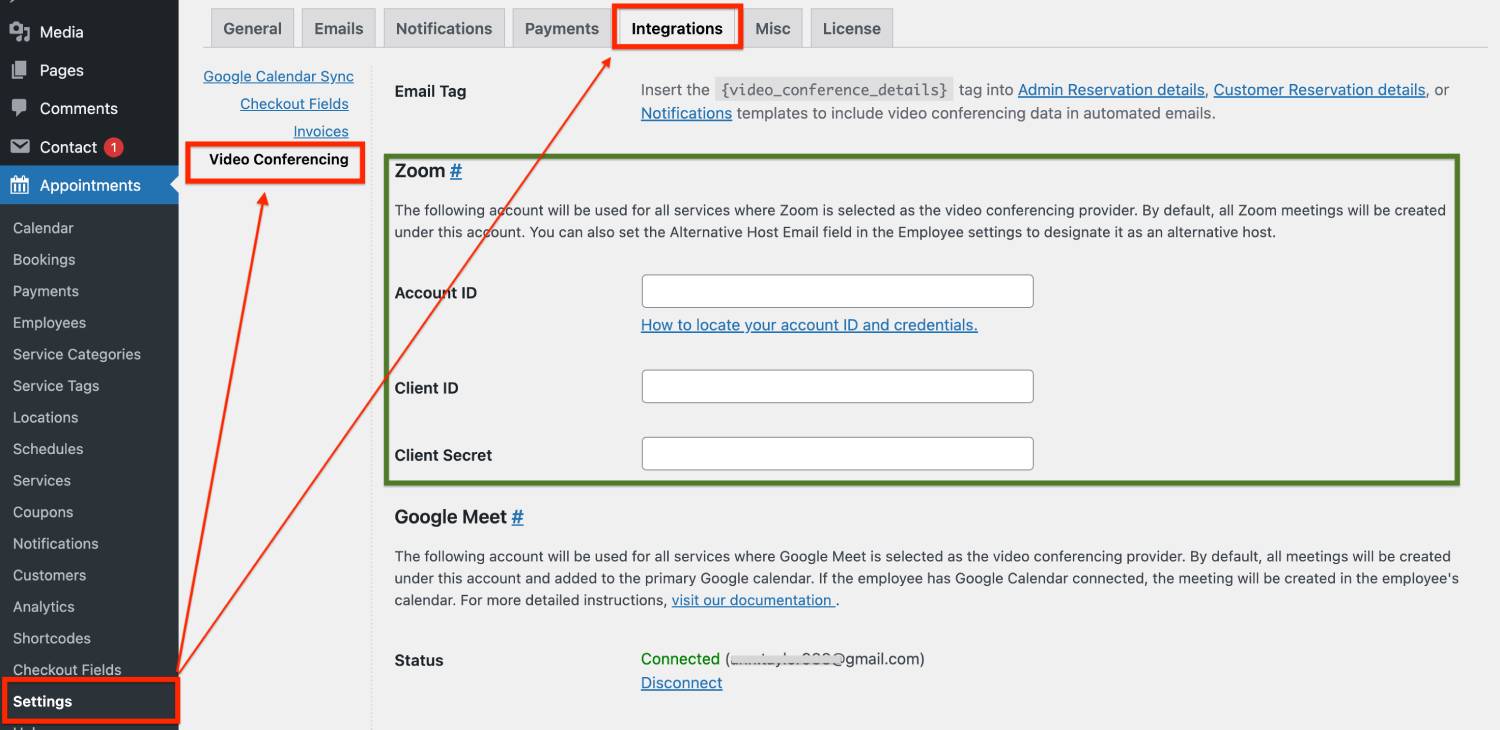
The Zoom account associated with the entered credentials will be used globally for all services where “Zoom” is selected as a meeting provider.
Once Zoom is activated, you can choose specific services that will use Zoom for meetings (view the next step below).
Step 3. Enable Zoom for specific services
To enable Zoom meeting link generation for particular services in your Appointment Booking plugin, follow these steps:
- Go to Appointments > Services.
- Choose the service you want to enable Zoom for.
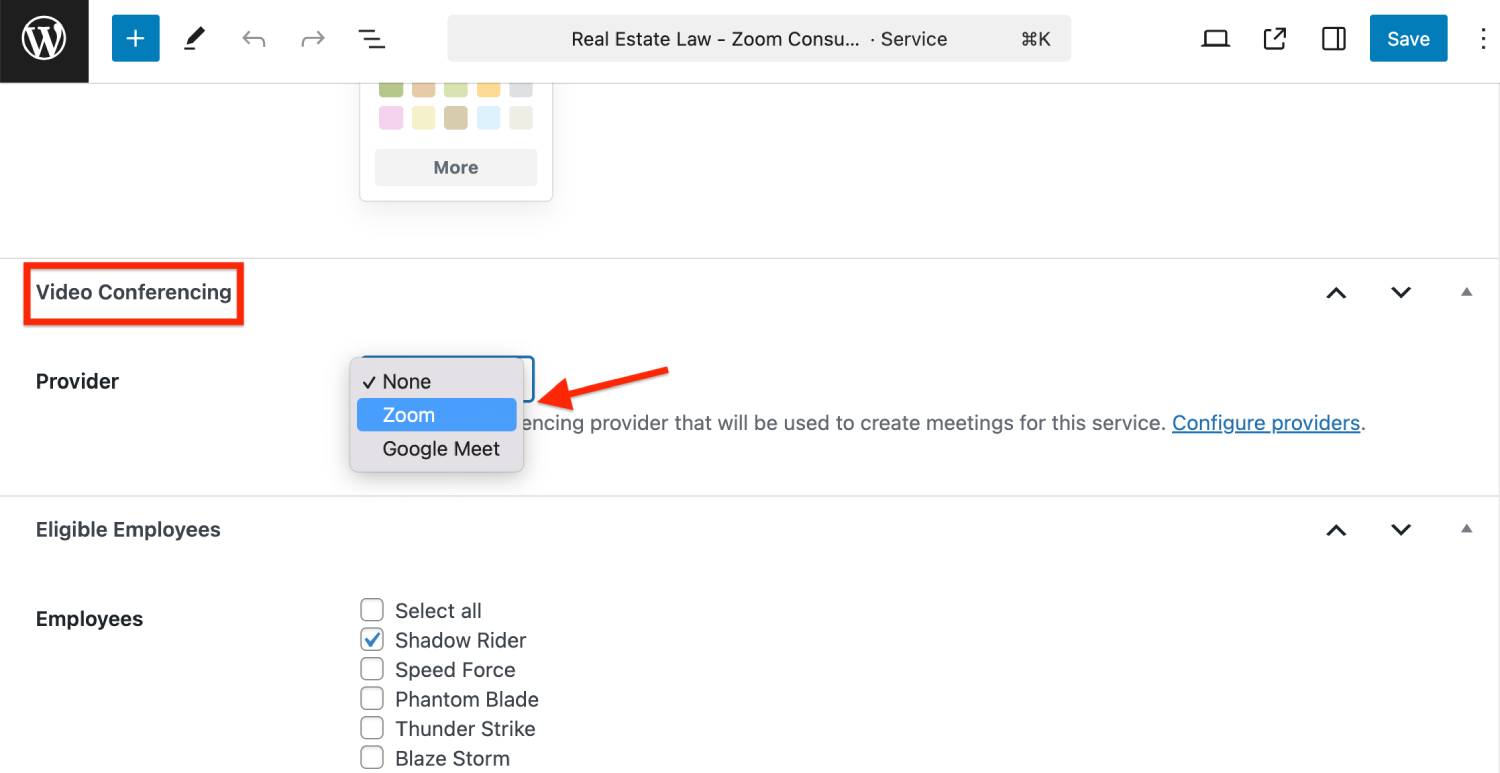
- Click to edit the selected service.
- In the service editing page, find the Video Conferencing metabox.
- In the dropdown menu of the “Provider” metabox, select Zoom as the video conferencing provider.
- Click Save.
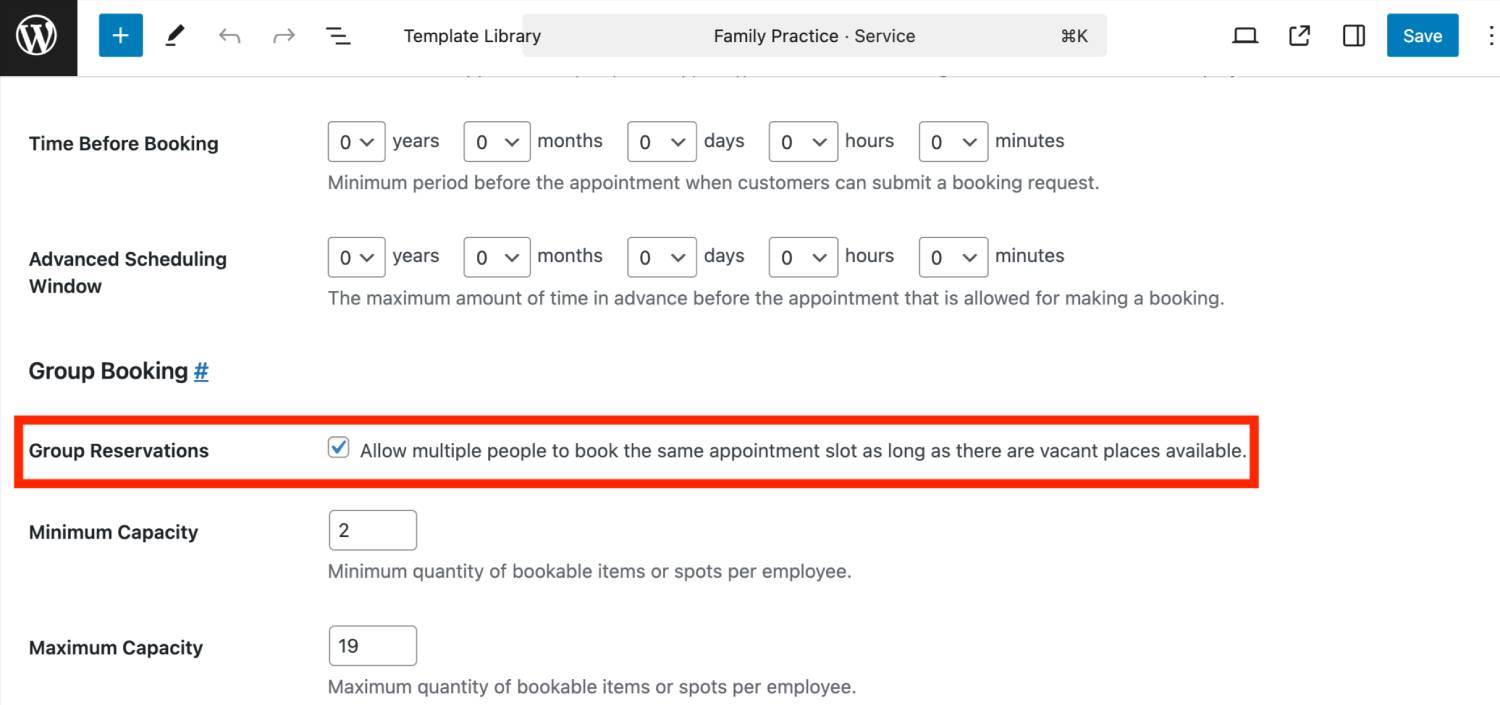
The Video Conferencing add-on also supports generating the same meeting details when the same time and date is booked by different people. This feature works for services where Group Reservations are enabled in the individual Service settings.
Step 4. Automate meeting links in emails
You can send meeting links automatically in emails when a service is booked and confirmed.
Normal emails
To ensure that meeting links for video conferencing appointments are included in emails automatically, follow this guide:
- Go to Appointments > Settings.
- Select the Emails tab from the menu.
- Scroll to the Template Parts section.
- Find the following templates:
– Admin Reservation Details: This template sends reservation details to the admin.
– Customer Reservation Details: This template sends reservation details to the customer.
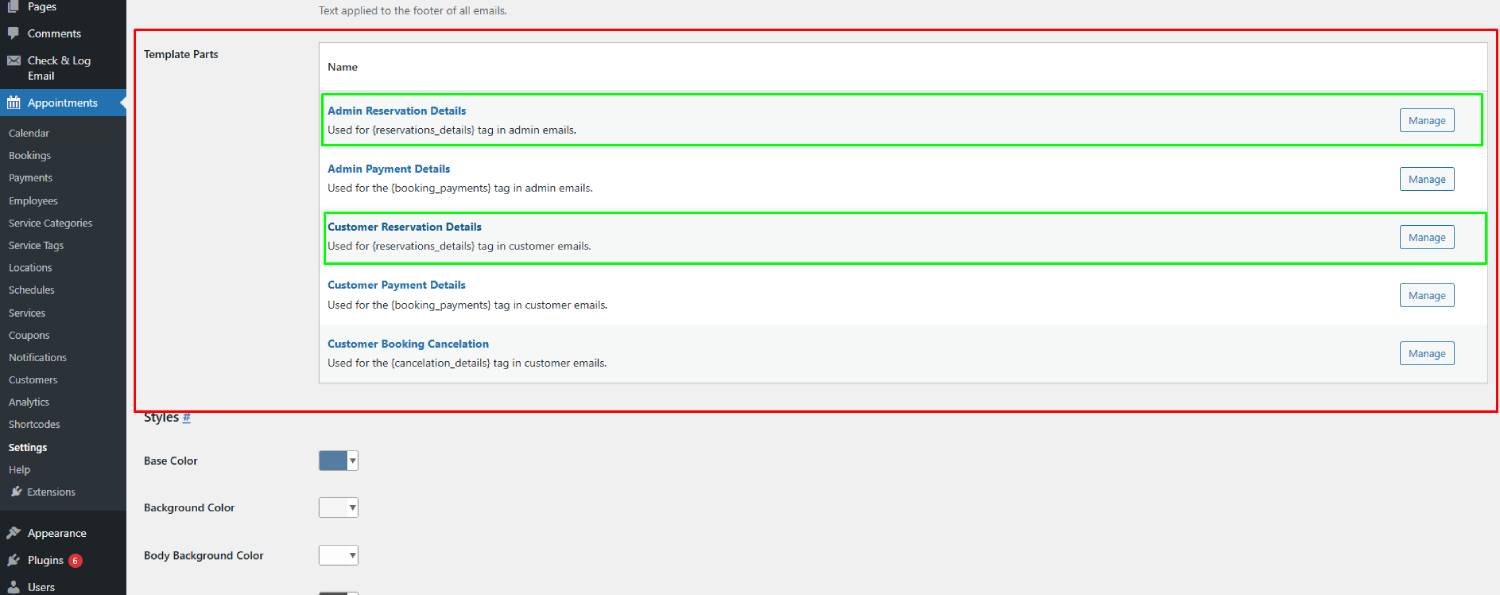

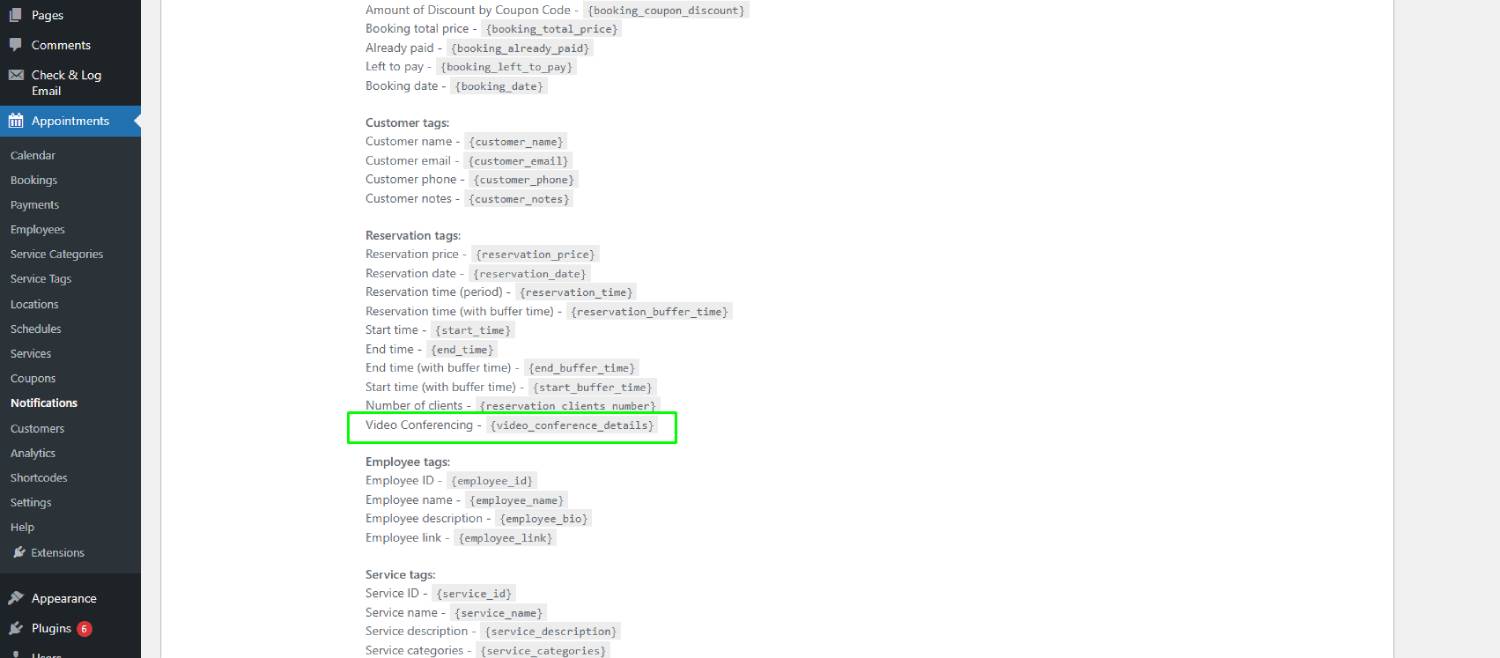
- Add the
{video_conference_details}tag to these templates.
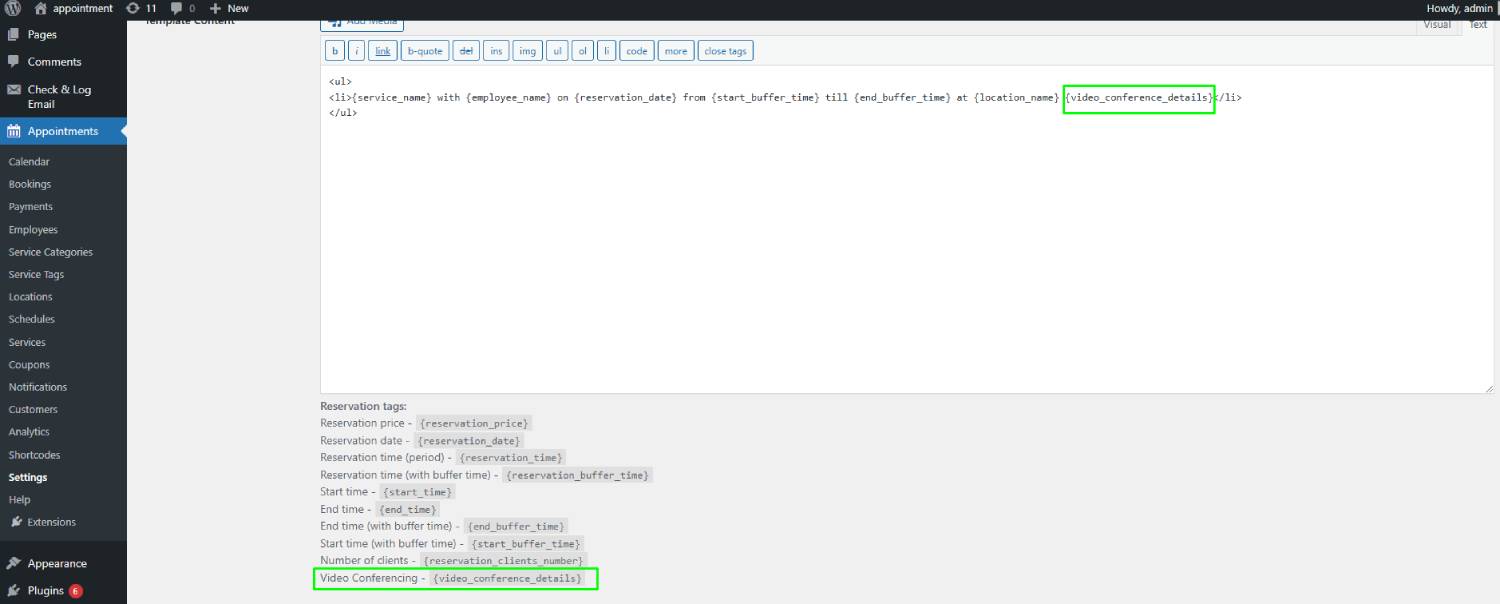

This tag will automatically include information about created video conferencing appointments in emails.
- Once the tag is added, save the changes.
Note: Confirmation emails containing video conferencing details will be sent based on the configured payment type (Appointments > Settings > General > Confirmation mode) and reservation status.
Custom email notifications
In Appointment Booking, you can also send custom email notifications via the Appointments > Notifications menu. You can also add the same {video_conference_details} tag to any of the chosen notifications that are set up via this menu.
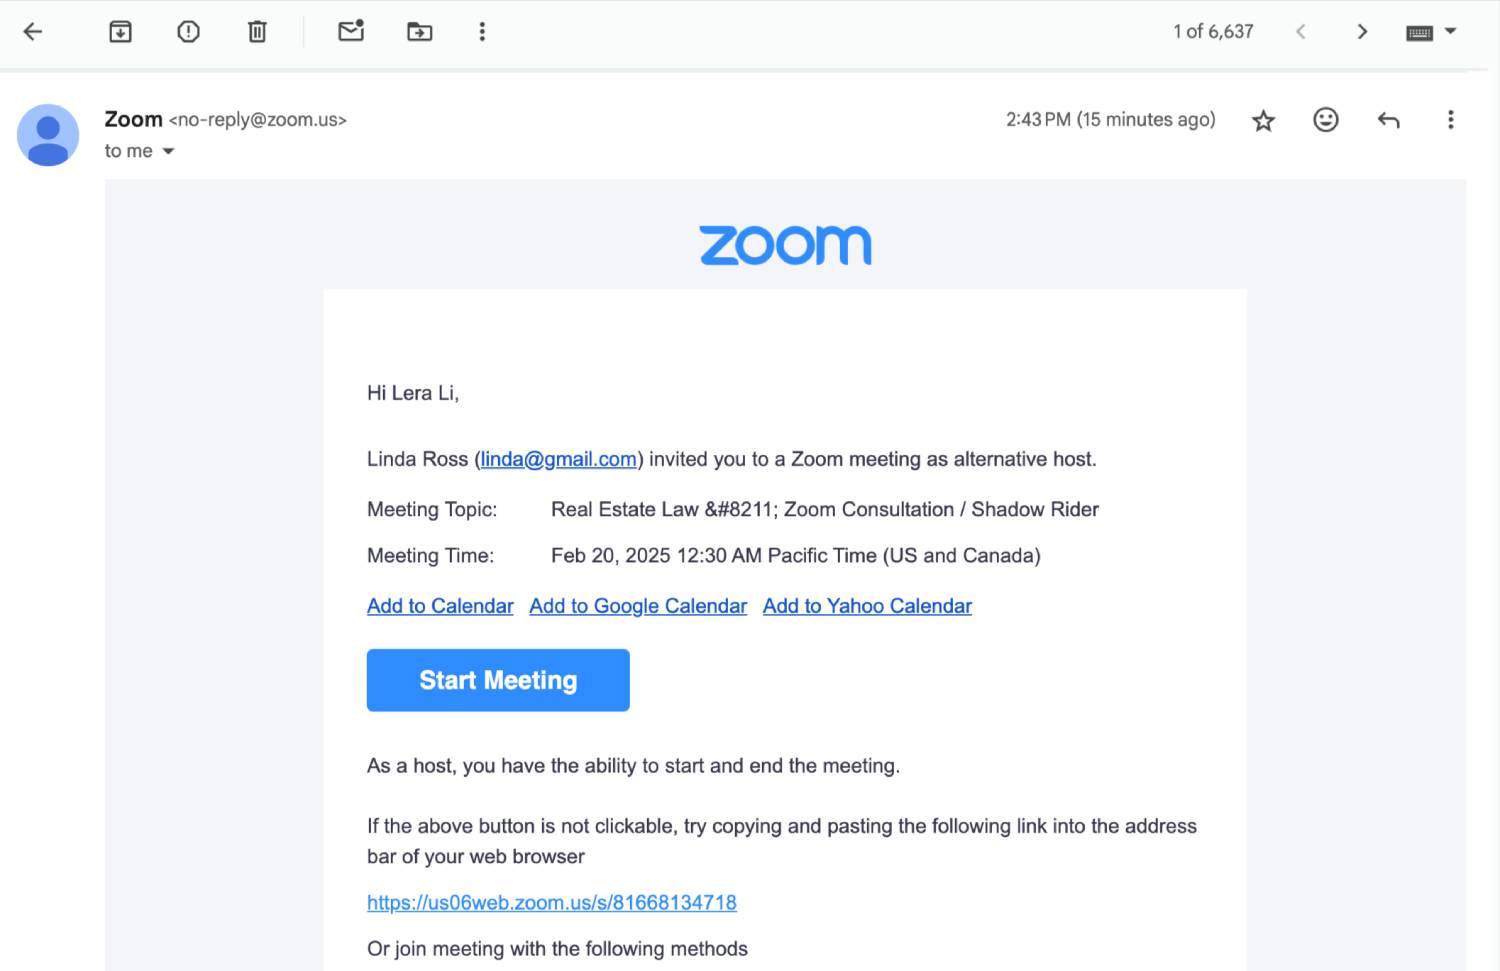
How Zoom links are sent to customers
When a customer books a service with Zoom connected, the Zoom meeting details will be included in the email as part of the reservation description.

The following information will be provided:
- Meeting Link: Direct URL to join the meeting.
- Meeting ID: Unique identifier for the meeting.
- Passcode: Security code for accessing the meeting.
If you use customer accounts, the customer will also see meeting details in their account.
Adding alternative hosts to Zoom meetings (optional)
By default, a Zoom account you connect via the app is the master account that receives all the meeting details for every booking.
If you need specific employees to host meetings and get automated meeting details instead of the main account, Zoom allows you to assign alternative hosts for this need, provided you have a Zoom Pro plan or higher.
If your Zoom account is on the Basic plan, you are limited to one user license for creating meetings. For the Pro or higher plans, you can add additional users to create meetings as alternative hosts. These users must be added by the Zoom account owner.
In short, to add users to your Zoom account, do the following:
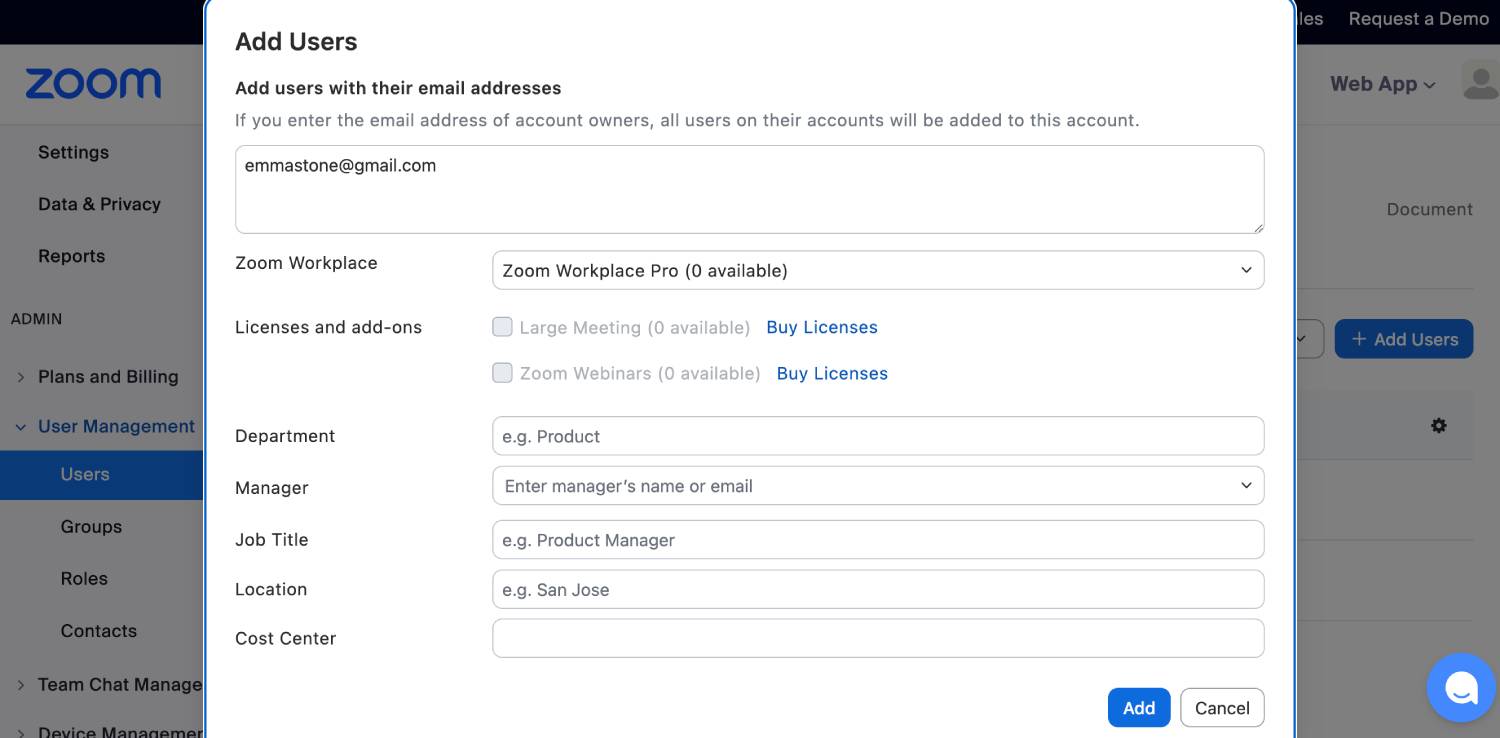
- Sign in to your Zoom account.
- Go to Admin > Users > Add Users.
- Add the email addresses of the employees and save the changes. You might be offered to buy additional licenses.
- Your employees will receive confirmation emails that will ask them to accept the request. After doing so, they will verify their addresses and you will see them in the list of users.

Refer to Zoom’s tutorial on adding users for detailed instructions.
Once you’ve added users to your Zoom account, you can assign a Zoom alternative email to an employee by following these steps:
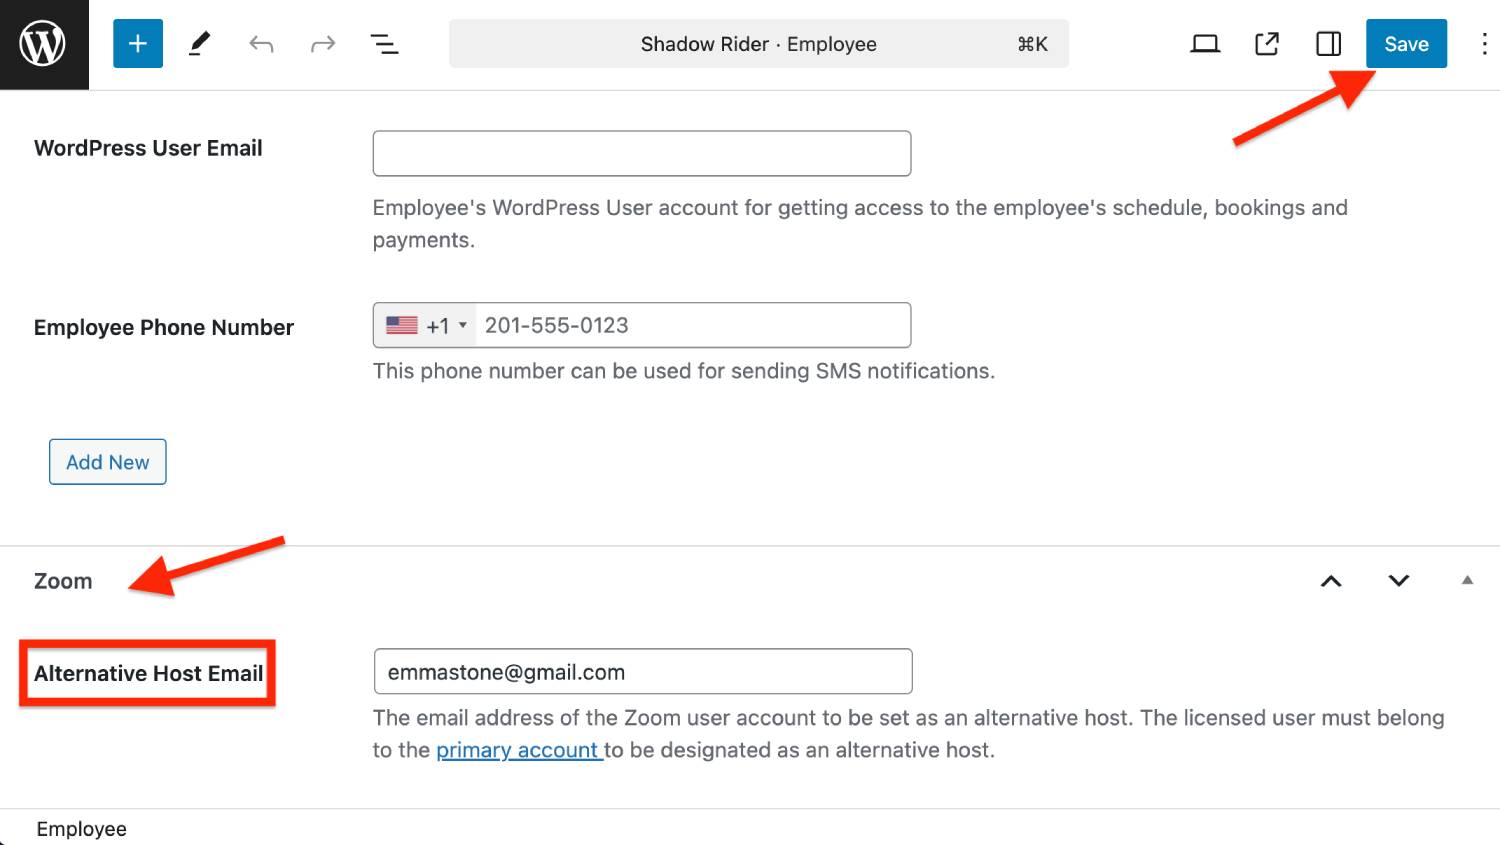
- Go to Appointments > Employees in your WordPress admin dashboard.
- Select the employee assigned to the service that uses Zoom as the video conferencing provider.
- In the employee’s settings, find Zoom > ‘Alternative Host Email’ field.
- Enter the email address of the user added to your Zoom account.
- Click Save.
If the provided alternative host email matches a user in your Zoom account, the meeting will be created for that user/employee. If no match is found, the meeting will default to the Zoom account owner. View booking logs for details.
To track who is the meeting host, navigate to the Logs metabox in the booking details (Appointments > Bookings > Choose Booking > Edit > Logs).
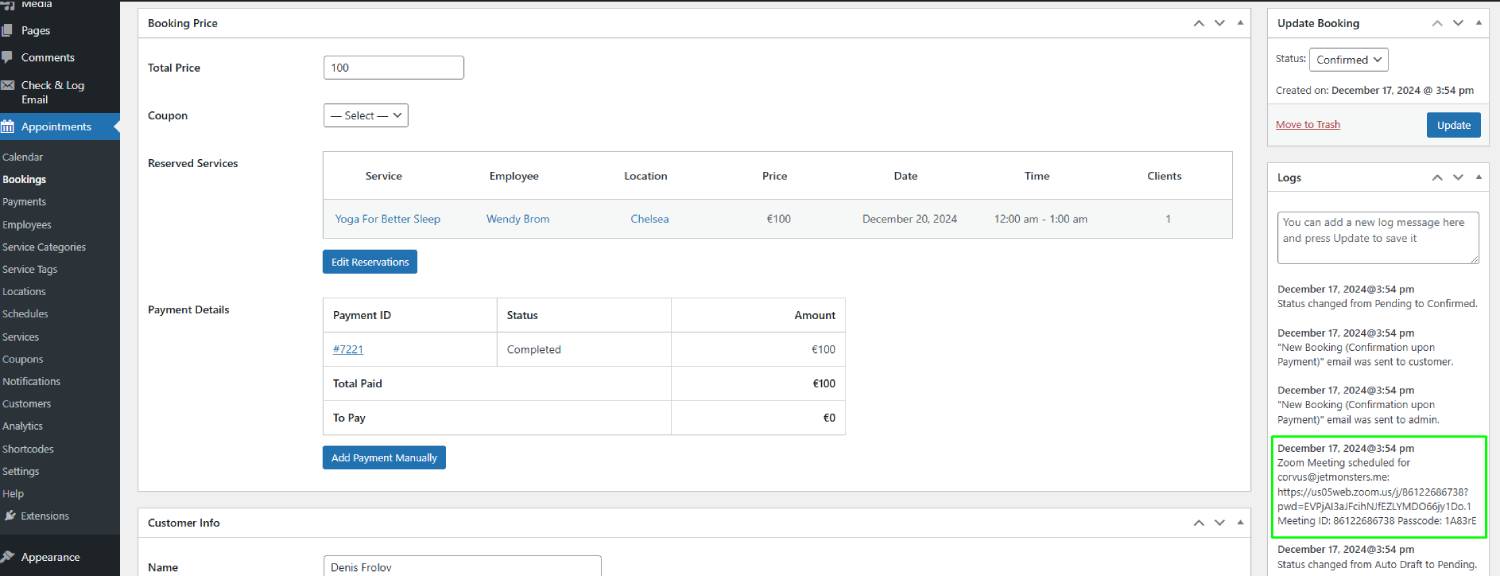
The log will display information about who the meeting was created for (associated Zoom email account). It will also contain information about:
- Meeting link.
- Meeting ID.
- Passcode.
- Any errors in meeting creation.
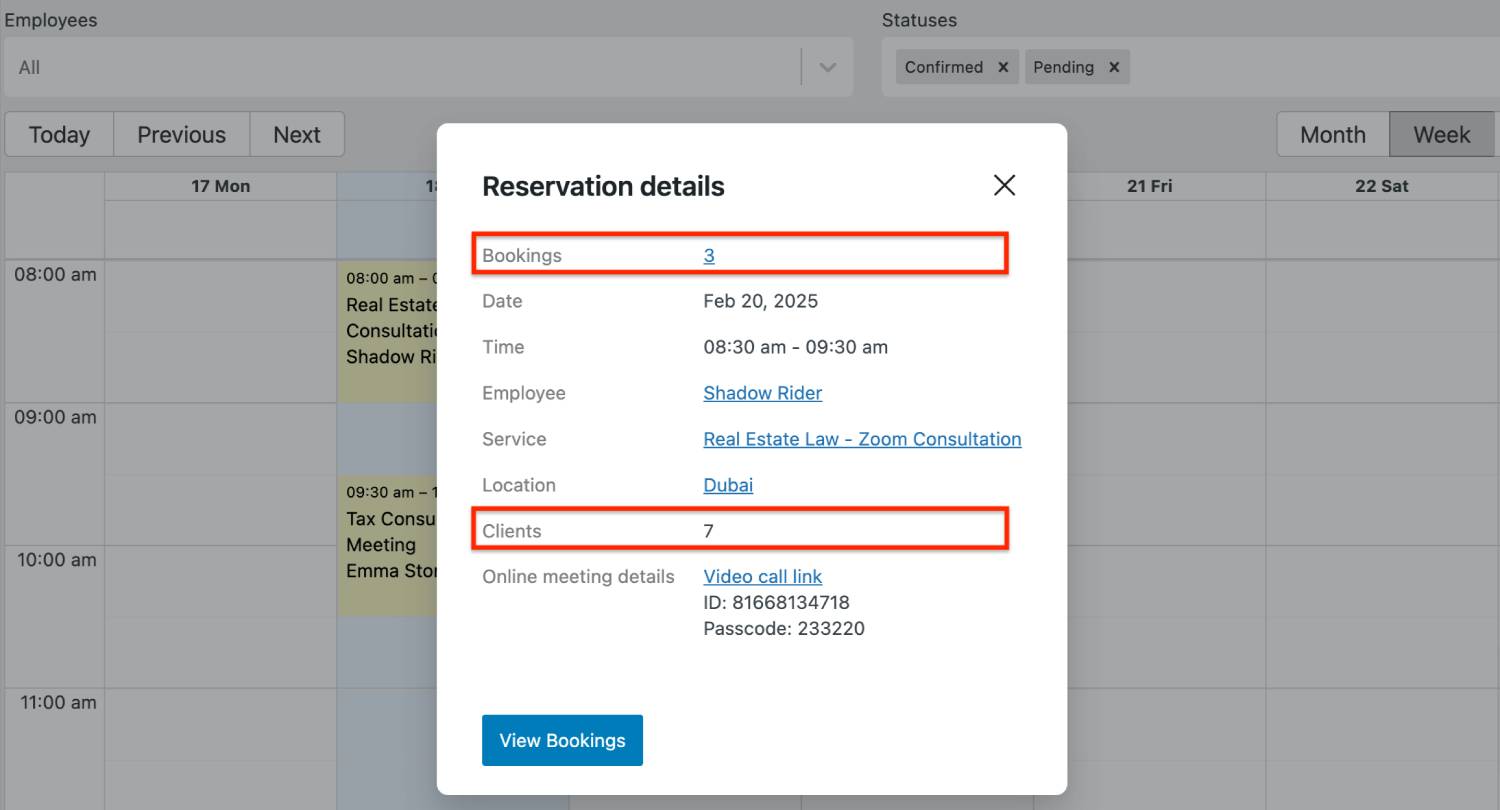
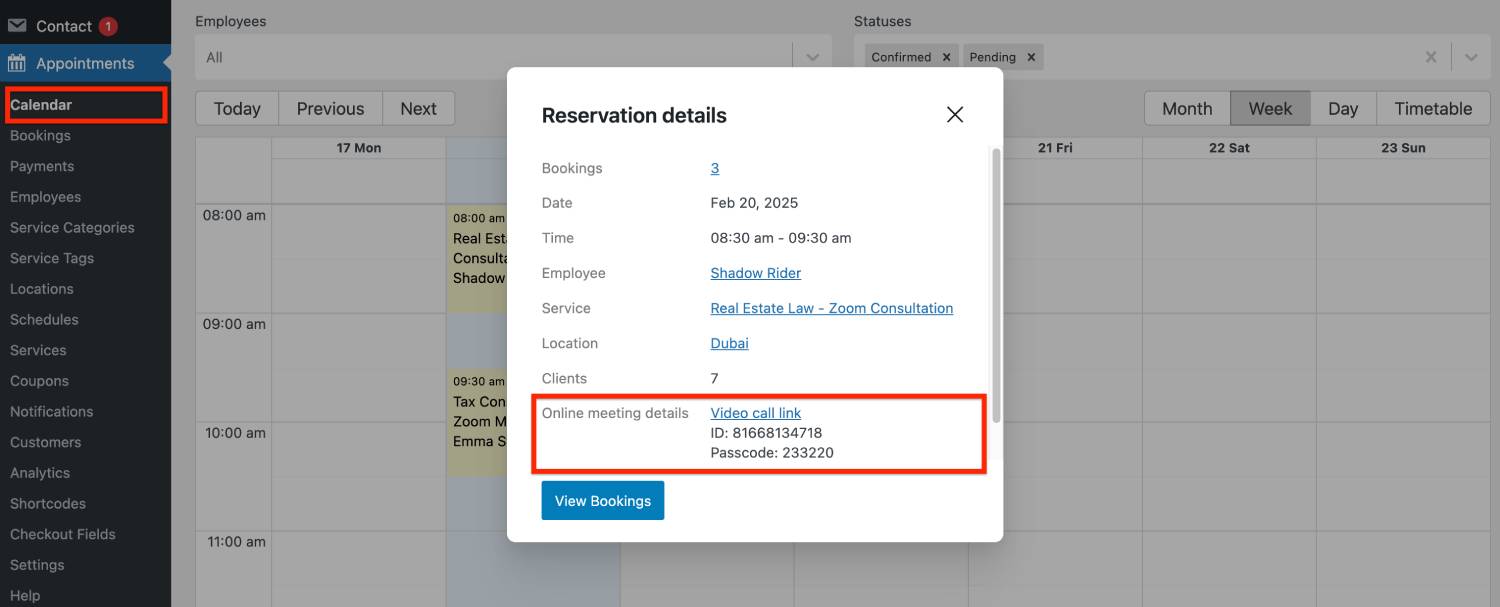
You can also view meeting details in individual bookings in the Calendar menu.
Locating your meetings in Zoom and Appointment Booking plugin
Meetings created via the Appointment Booking plugin will appear in the Meetings tab in your Zoom account.
Each meeting title will include reservation details such as Time and Assigned employee.
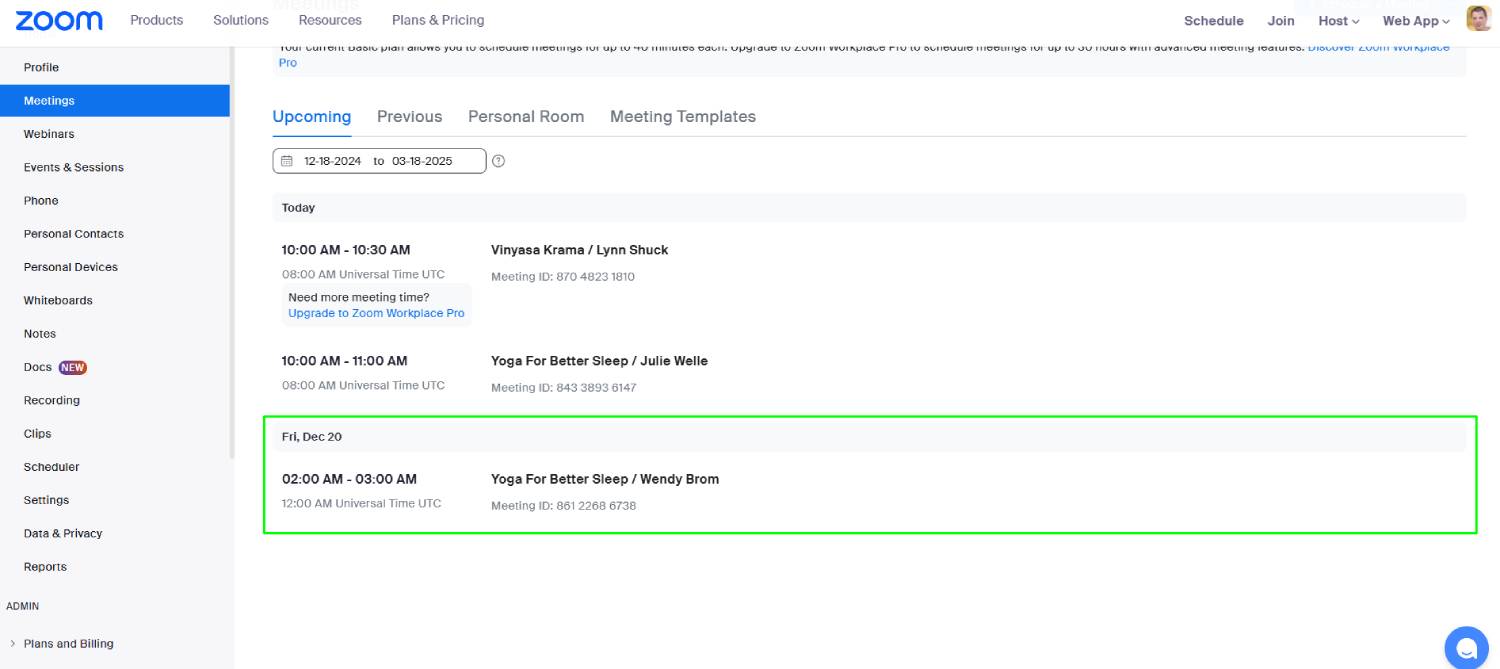
When clicking on the meeting for more details, the description will also include more details.
If you use alternative host emails, they will also receive email notifications on each booking and will be able to see their meetings in your Zoom account if you provide access to it.
All the meeting details can be also visible in the bookings calendar or booking details of the Appointment Booking plugin in WordPress.
If the same time and date is booked by multiple people, they will get the same meeting details. For group bookings, you will see the number of clients and bookings as usual in the Calendar menu/individual staff accounts/Bookings menu.