Table of Contents
Stripe is one of the top chosen payment gateways to accept online payments globally: it’s so far available for businesses in 34 countries, which allows you to meet widely varying customer preferences.
The Stripe payment gateway is by default built into the MotoPress Hotel Booking plugin; you may optionally turn it on at checkout in case you opt to confirm bookings upon payment. Since guests will be able to stay on the same website page during checkout, the booking and payment process should be more convenient and quick for them.
Benefits of using Stripe
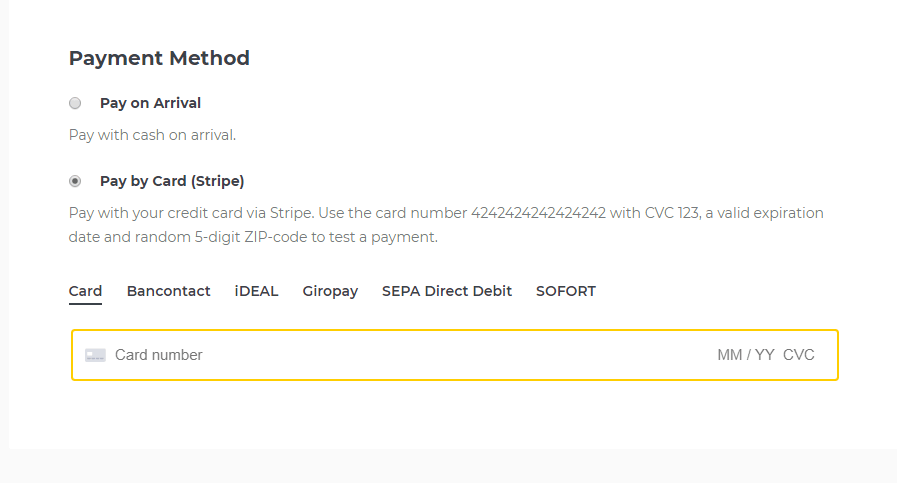
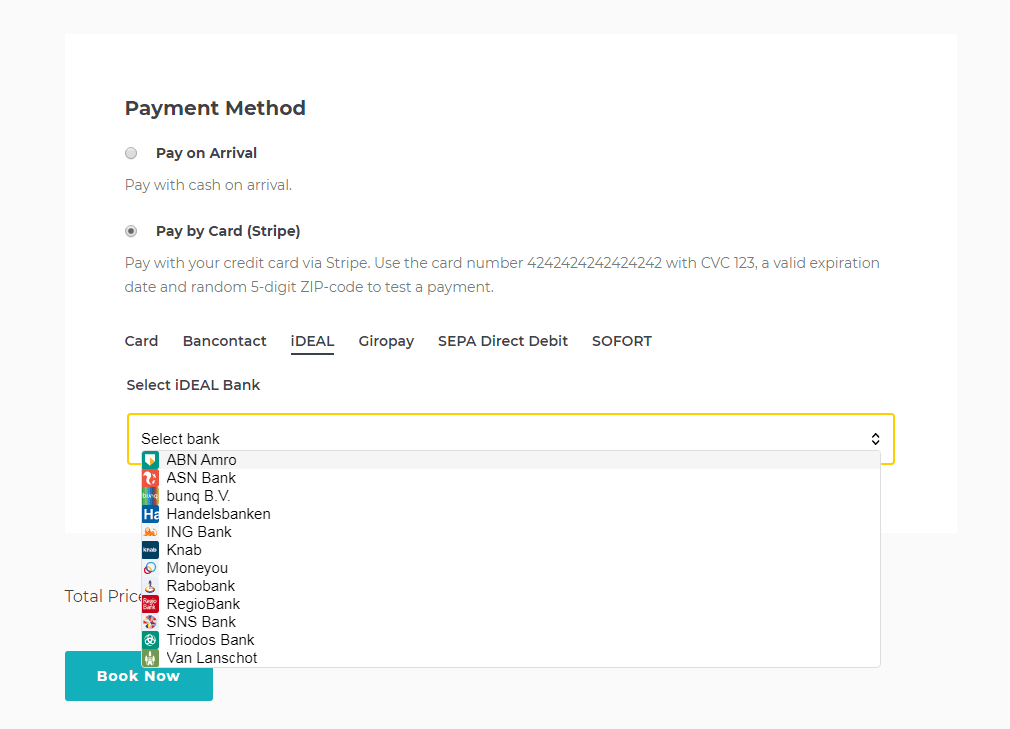
- In addition to Stripe card payments, in Hotel Booking, you can optionally enable such local payment methods as iDEAL, SOFORT, Bancontact, Giropay and SEPA Direct Debit. This option will definitely help you serve international travelers better.
- Stripe works with all major debit and credit cards.
- Stripe operates according to the EU’s second payment services directive (PSD2) and supports Strong Customer Authentication (SCA) to give you an extra fraud protection layer. This is required for safe transactions within the European Economic Area (EEA). Stipe made sure that the SCA mechanisms will require your customers to authenticate purchases when there’s a real need for it.
- Stripe is optimized for fast mobile checkout.
- Take advantage of free new innovative features as Stripe launches new updates.
- Stripe provides in-depth analytics on how and what payment methods are used across the world so you can better set up and optimize payment methods for different regions.
- Since you’ll have access to a centralized Stripe dashboard, you can perform easy payment monitoring and reporting.
How to enable Stripe
To start using Stripe for accepting online bookings, log into your WordPress dashboard → Accommodation → Settings → Payment gateways → Stripe tab. Before you set up Stripe, make sure that the booking confirmation mode is set to “Upon payment” (Accommodation → Settings → General).
You can use Stripe with either deposit or full payments (Accommodation → Settings → Payment Settings → General Settings).

Then go through the following configuration:
- Customize the title and description.
Customize the title and description of the payment method at checkout to state any specific details. - Set Stripe Secret and Public keys.
Obtain your Stripe Secret and Public keys via your Stripe dashboard and insert them into the appropriate fields. Note: you need to paste test API keys from Stripe when Sandbox mode is enabled in plugin settings. - Optionally add a fixed or percentage payment transaction fee.
Add it if you want to pass the payment processing fee to the guest. This fee is calculated from the booking total and added as a surcharge at the final step of checkout.
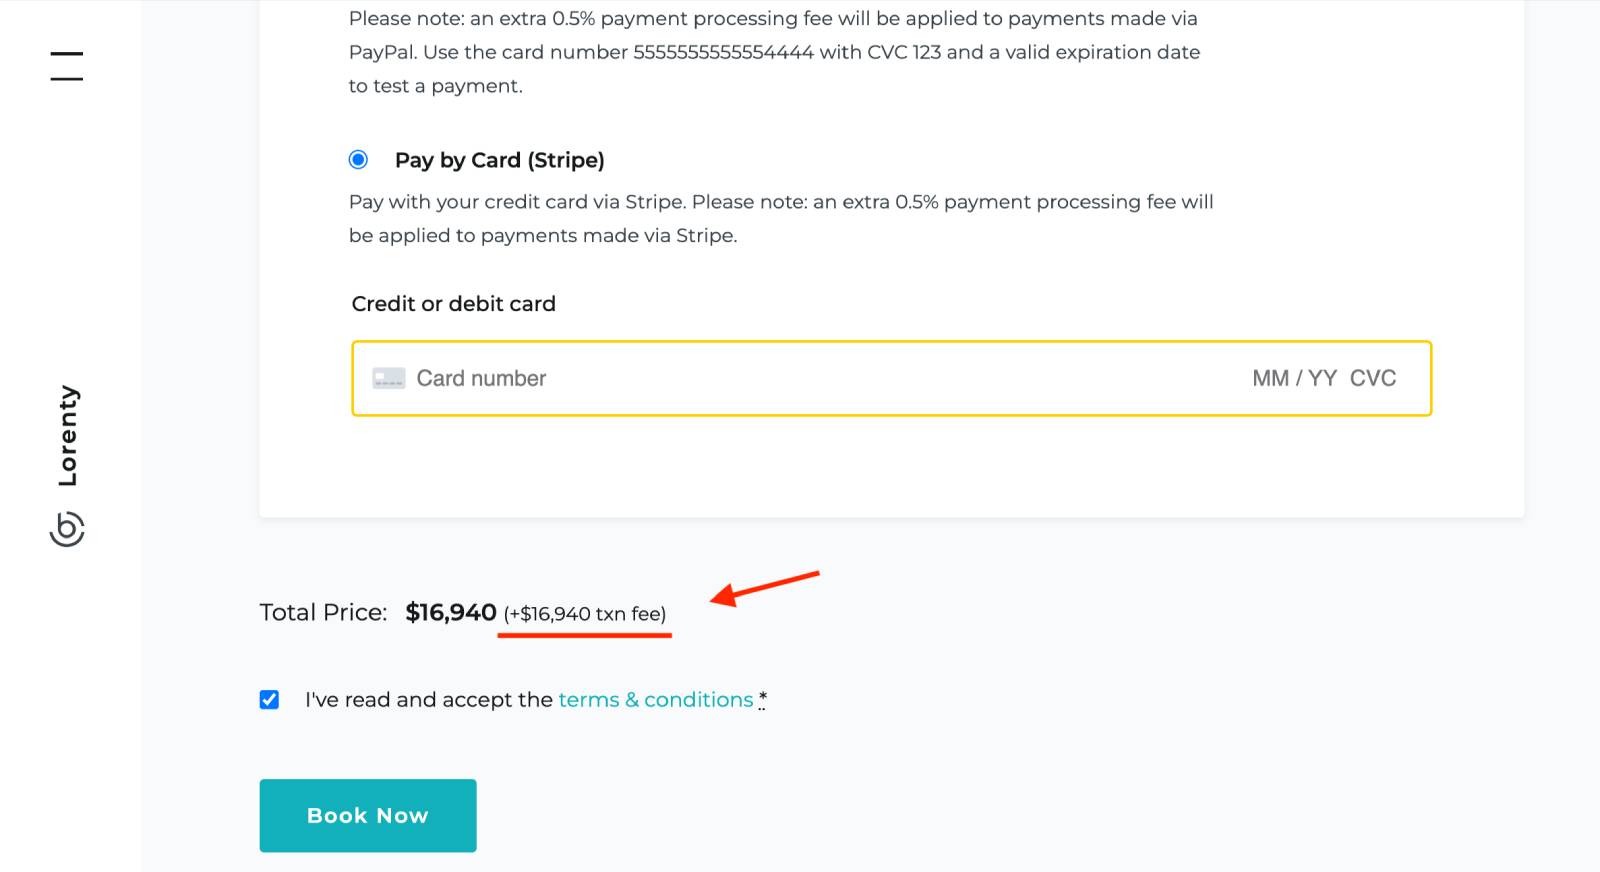

Applies to any online transaction, whether it’s full, deposit, or payment due request. Invoices and booking emails do not include payment processing fees. Refunds are issued from the total booking cost, excluding these fees. - Optionally configure Stripe Webhook settings.
To set up webhooks, follow the provided “Setting up webhooks” tutorial.
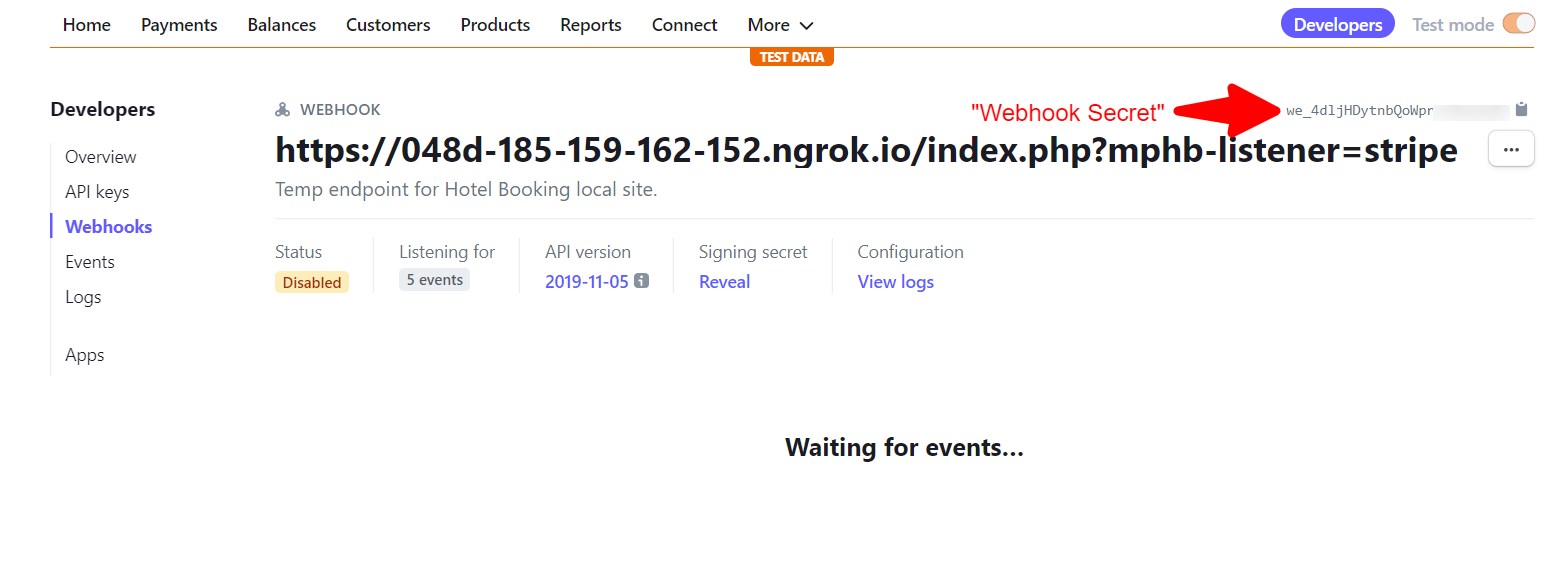
“Webhook Secret” – Find your webhook secret (Webhook ID) in the upper right corner of your endpoint page.
 To add a new endpoint, go to Developers > Webhooks > “+ Add endpoint”.
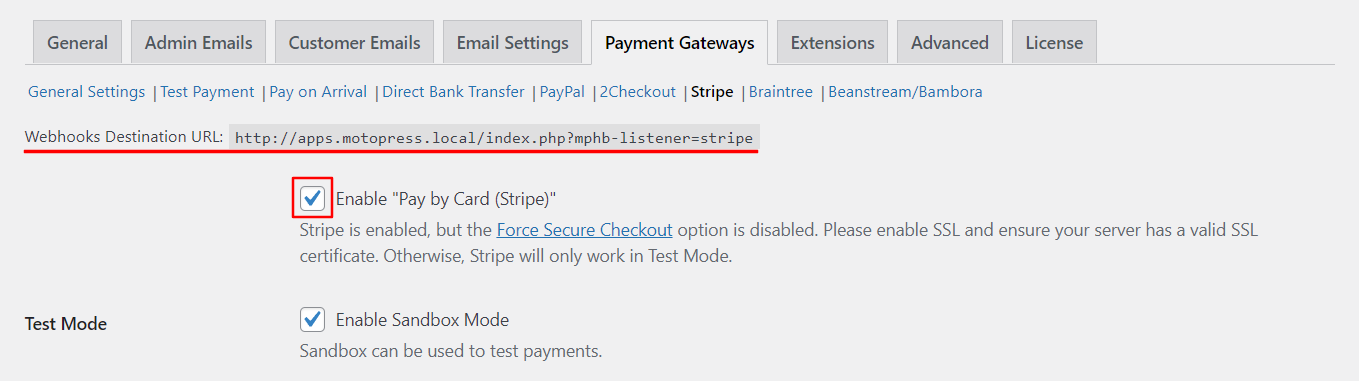
“Endpoint URL” – This URL is displayed when the Stripe payment gateway is on (to turn it on, check the box “Enable “Pay by card (Stripe)”, then save the changes).

Select these event types when setting up webhook endpoints:
charge.failed
charge.succeeded
source.canceled
source.chargeable
source.failed - Enable the preferable payment methods (credit cards, or other available local payment methods).
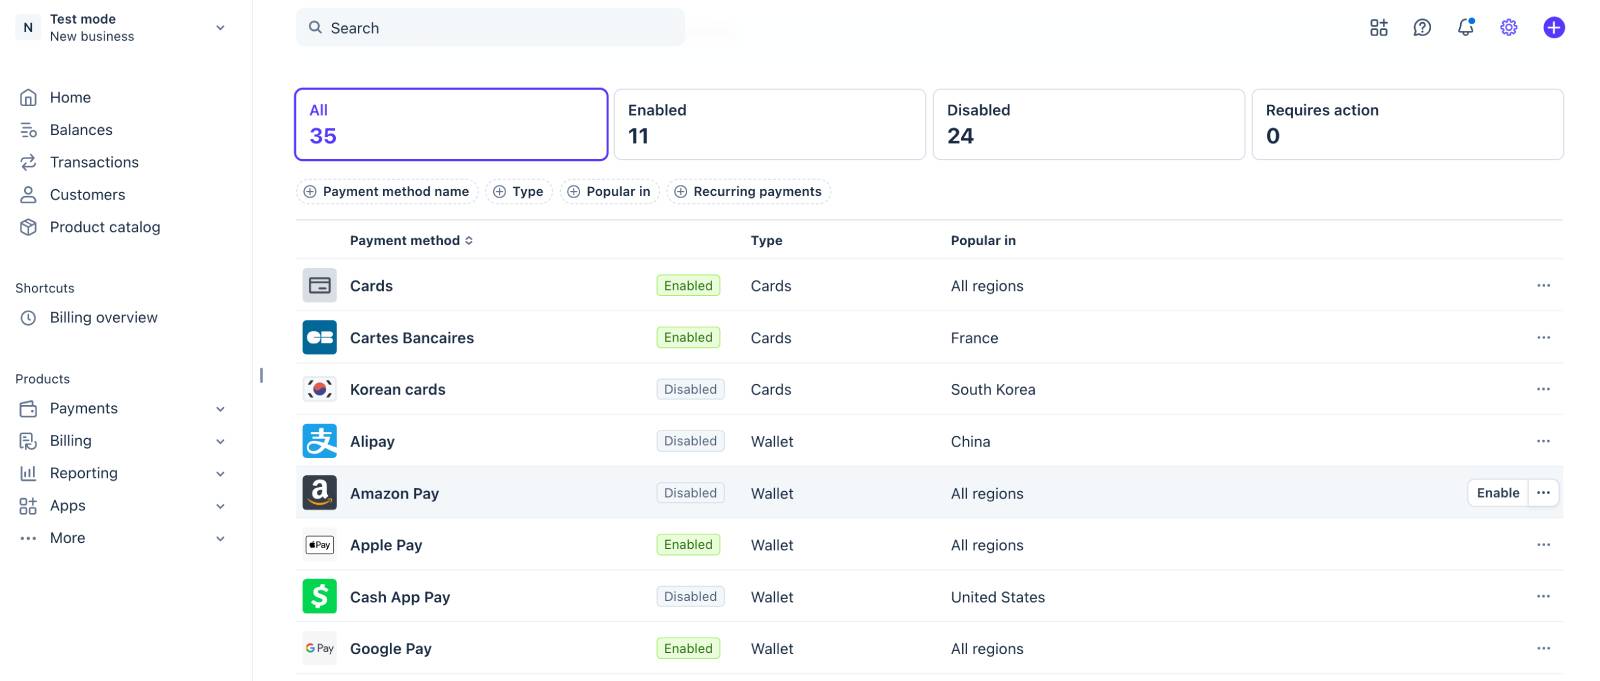
- Add your Stripe Configuration ID in the Payment Methods field to use any payment gateways available in Stripe, including Google Pay, Apple Pay, Affirm, Klarna, WeChat Pay, and 100+ more from Stripe.


Once Configuration ID is added, enable the neeeded methods in your Stripe account (click ‘Enable’ next to the chosen method). - Choose a charging method – Automatic (immediate) or Manual (use Stripe Authorize & Charge method).
- Set up language preferences for the checkout.
You can register a demo account to see the process in action.
Please note:
- A valid SSL certificate (you can ask your hosting provider about this) is required to ensure that the payment process is secure for your guests.
- You can process test payments by enabling the Sandbox mode in the plugin. Note: you need to paste test API keys from Stripe when Sandbox mode is enabled in plugin settings.
Stripe Authorize & Capture (Manual charge)
This feature lets you reserve funds on a guest’s card first and charge them later manually. It is commonly used in hotels and vacation rentals where bookings may require review before final payment is confirmed.
What does “Authorize and Capture” mean?
Authorize and Capture is a two-step Stripe payment workflow:
- Authorize payment – funds are temporarily reserved on the guest’s card.
- Capture payment – funds are collected later when you confirm the booking.
Instead of charging immediately, Stripe places a temporary hold on the funds. The guest sees the amount as pending or blocked, but the money is not transferred until you capture it.
When you might want to use it
– You need to verify availability before charging
– You manage bookings across multiple channels (OTAs + direct bookings)
– You handle high-value or long-stay reservations
– You want to reduce fraud risk before charging
– You use manual booking approval workflows
– You want flexibility before finalizing payments.
How to enable Stripe Authorize & Capture
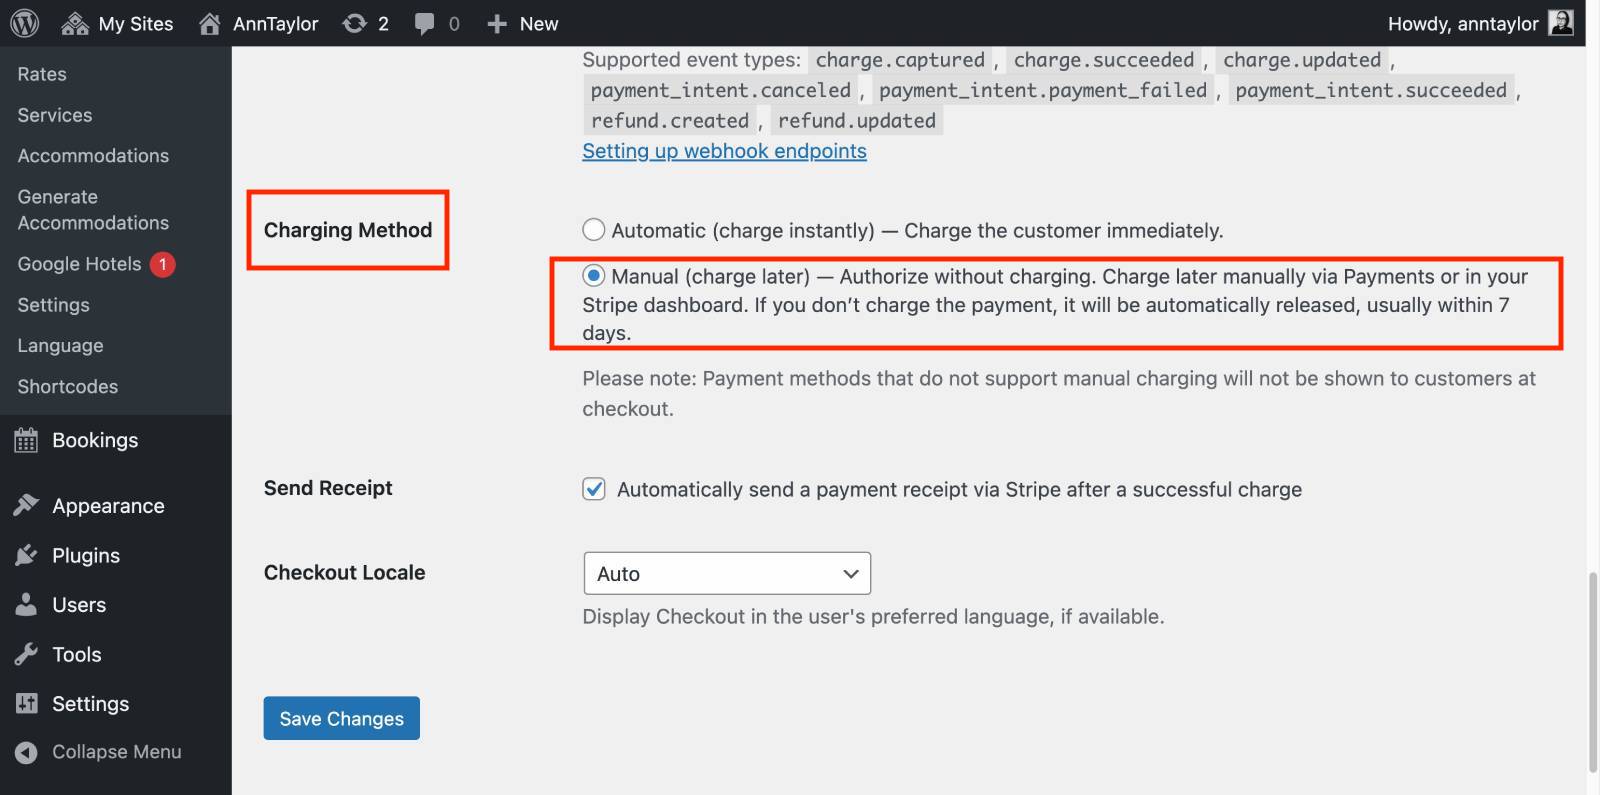
- Go to Accommodation → Settings
- Open Payment Gateways → Stripe
- Find Charging Method
- Select Manual
- Save changes
Required settings
- Go to Settings → General
- Set Confirmation Mode → Confirmation upon payment
- Add your Stripe API credentials and Configuration ID
What you can do with authorized payments
- Authorize a payment without charging immediately
- Capture the payment manually later
- Cancel authorization and release funds
To manage authorized payments in Hotel Booking, follow the steps:
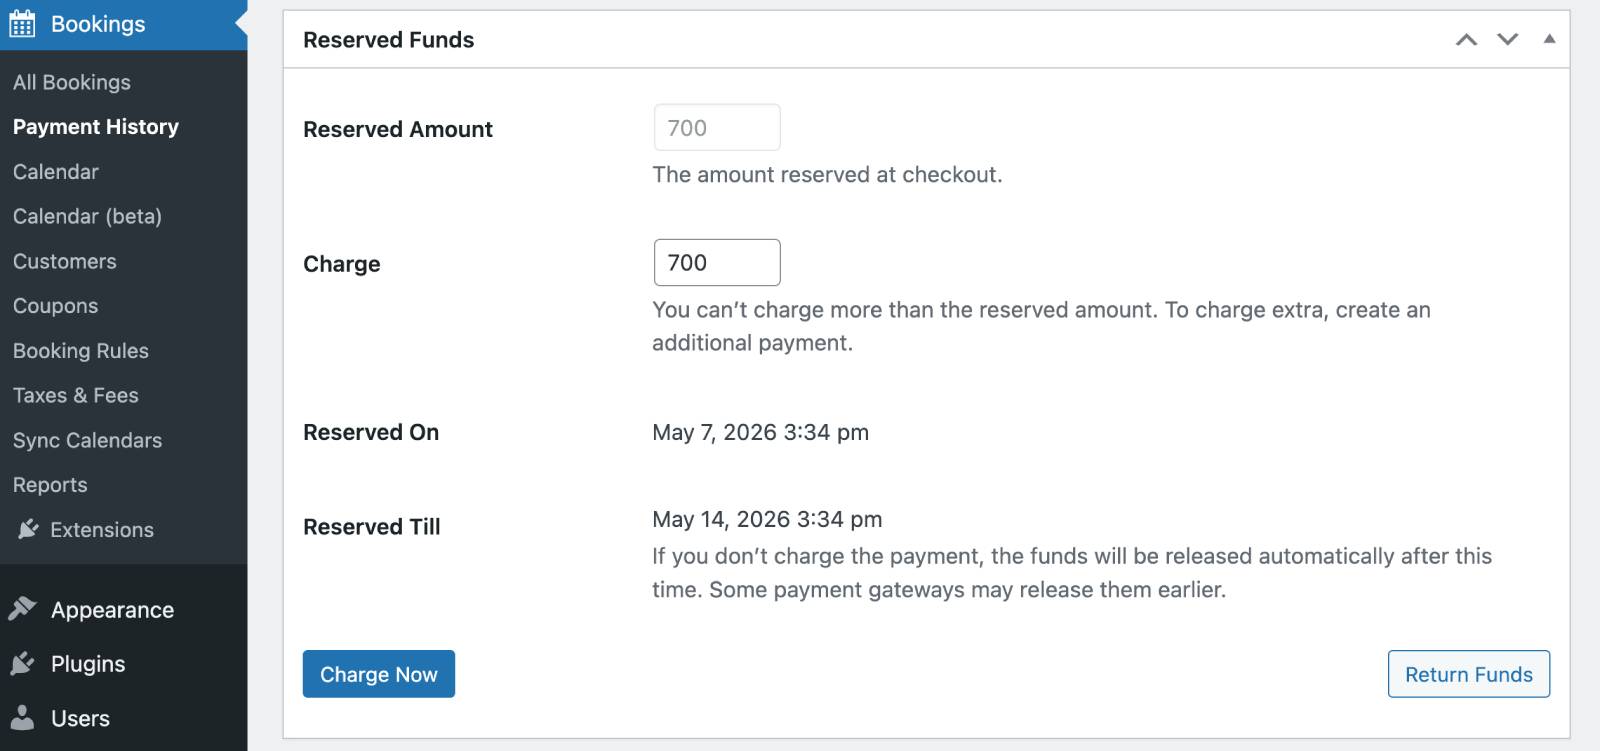
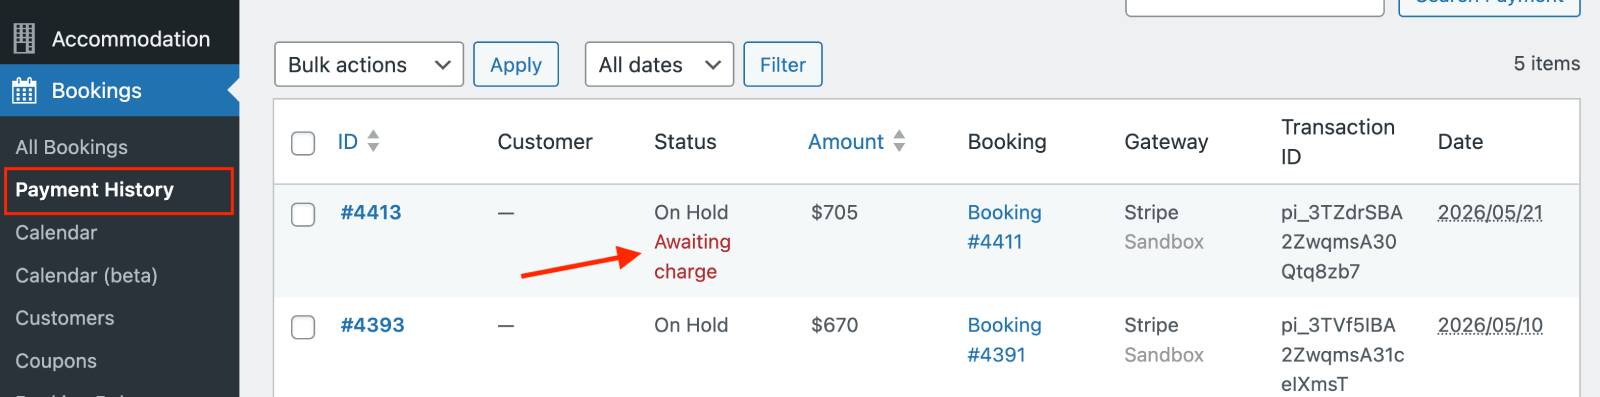
- Open Payment History in your WordPress dashboard
- Select the payment inside the booking
- Open the Reserved Funds section and choose your action:
- Capture payment – charge the guest (“Charge now”)
- Cancel authorization – release held funds back to guest (“Return funds”)
You will also see:
- Authorization expiry date (“Reserved till”)
- Payment status in the system
How payments appear in the sashboard
- Status: Awaiting charge in Payment History
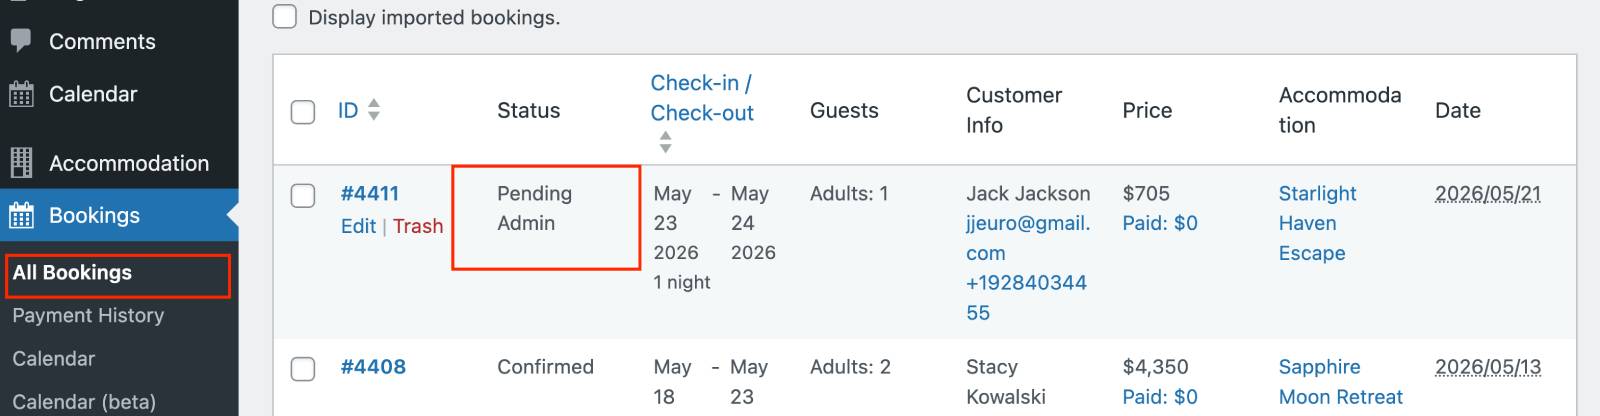
- Booking status: Pending admin
Managing payments in Stripe
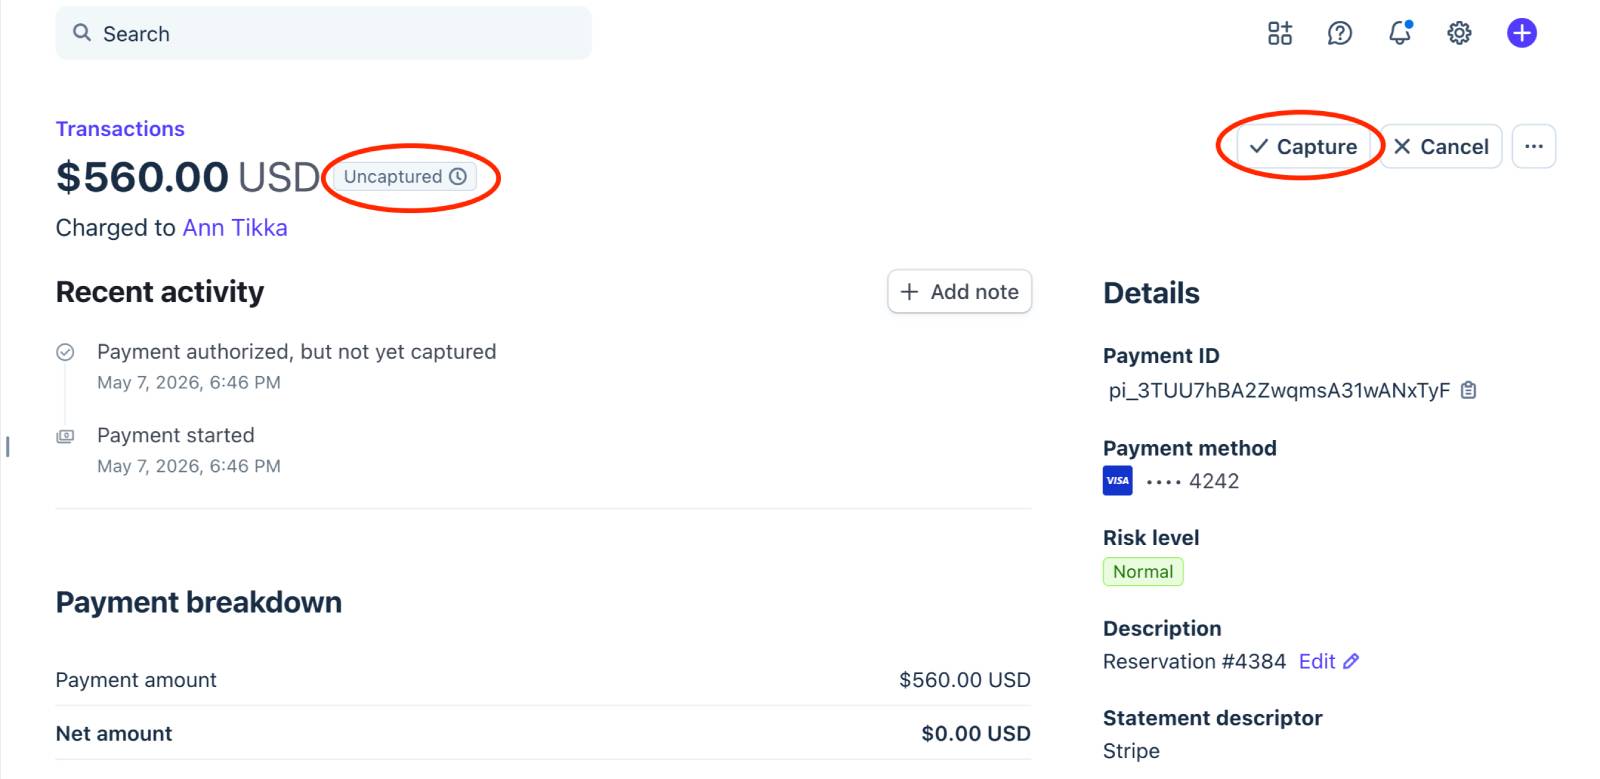
You can also do the same without logging in to your WordPress and managing payments in Stripe. Inside your Stripe dashboard, authorized payments appear as Uncaptured. So, you can:
- Capture – finalize the payment
- Cancel – release the authorization hold
Canceled authorizations are not treated as refunds because no charge was completed.
What happens after capture or cancellation
After Capture
- Booking status automatically changes to Confirmed
- Guest receives booking confirmation email.
After Cancellation
- Funds are released back to the guest
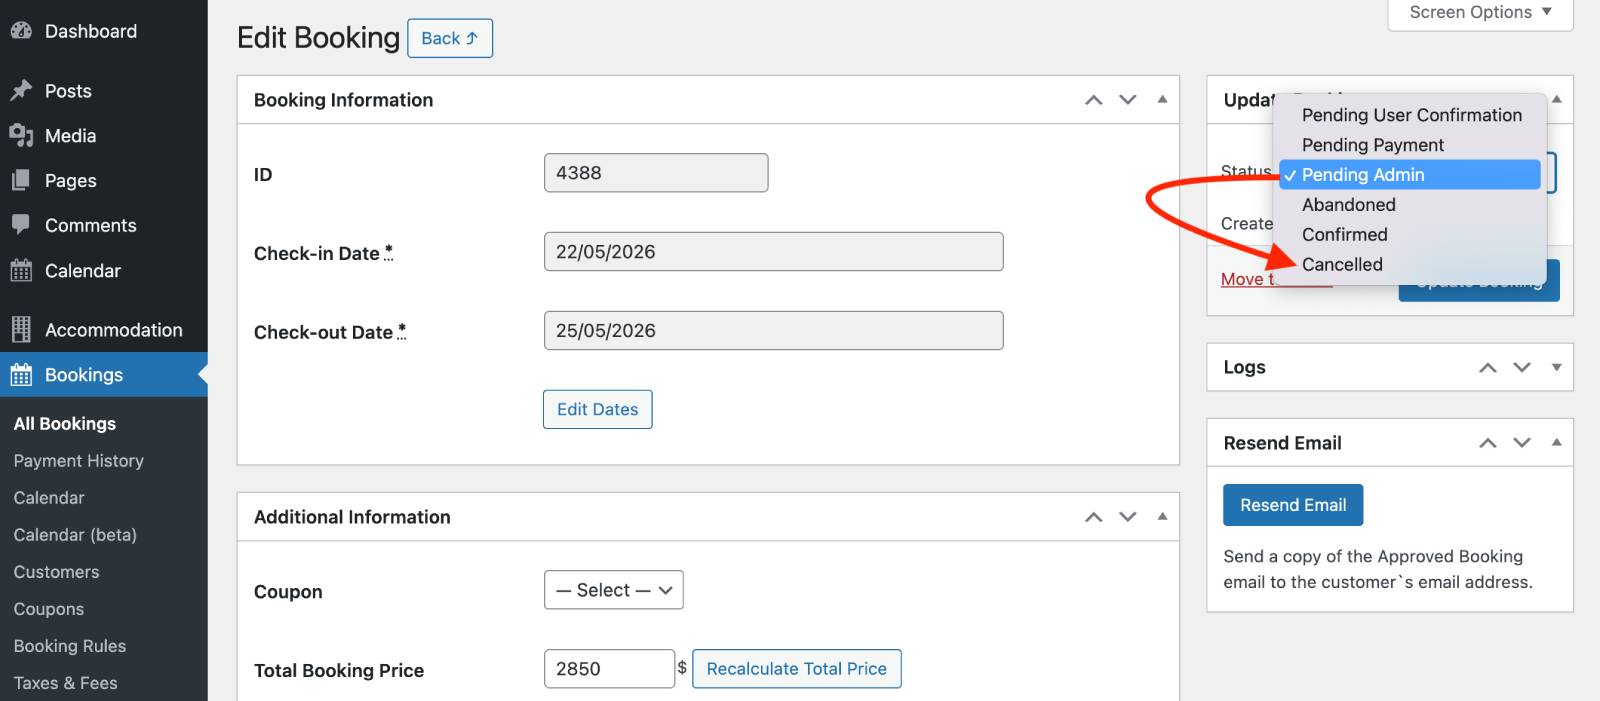
- Booking is not automatically canceled
- You must manually update booking status
This allows continued communication with the guest before final decision.
Authorization expiry
Authorization holds are time-limited and depend on payment method:
- Card payments: typically ~7 days
- PayPal: ~10 days
- Affirm: up to ~30 days
If not captured in time, funds are automatically released.
Supported payment methods
Supported:
- Credit/Debit cards
- PayPal
- Klarna
- Afterpay
- Cash App Pay
- Affirm
Not supported:
- ACH
- iDEAL
Important notes
- Availability of payment methods depends on guest location and device.
- Stripe may show different options per customer.
- Not all methods support separate authorization and capture.
- Expired authorizations are automatically released.