How to Make a WordPress Site Private: 7 Simple Methods (2025)
Table of Contents
In most cases, a website built on the basis of WordPress, like any other site, is intended to be publicly visible. The primary purpose of the Internet is to create resources that offer information or services, attracting people from around the world. However, not all WordPress websites are designed with mass visibility in mind. Depending on their content, goals, and target audience, some website owners prefer to restrict access or maintain a low profile. If this is your situation, or if you are looking for professional WordPress development services to help manage your site’s privacy settings, read on. In the following lines, we will tell you how to make a WordPress site private.
Why Keep a WordPress Site Private?
Several reasons might influence the decision to keep a website away from the general public’s eyes:
- Development and Testing: Before launching a site, developers often set it up in a staging environment. Here, they can test new features, designs, and functionalities without the risk of errors being seen by the public or affecting the live website.
- Internal Use: Businesses and organizations may have private online resources for employees only. These can contain training materials, internal communications, HR resources, and more.
- Sensitive Information: Sites that handle confidential information might need added layers of privacy. This could include financial portals, personal blogs detailing sensitive experiences, or research websites with yet-to-be-published data.
- Membership or Subscription-based Content: Some online resources operate on a model where only subscribed or paying members can access content. This exclusivity can add value to the content and create a revenue stream for the site owner.
While there are valid reasons to be interested in getting to know how to make a WordPress site private, it’s essential to strike a balance if you’re looking to grow your audience in the future. If you’re aiming for wider visibility later on, consider employing strategies that gradually open your online resource to a broader audience over time. This can be done by making some pages public, using SEO strategies, or incorporating social media sharing.
What Is the Difference Between Public and Private WordPress Websites?
A public WordPress site is accessible to everyone on the internet. It’s like an open book that anyone can read. Typically, blogs, e-commerce projects, and company websites fall into this category. The public resource is open for broader interaction, enabling visitors to leave comments, purchase products, or subscribe to newsletters. Moreover, additional benefits for SEO are also “included” in the package: because the projects are accessible to everyone, they also can be freely indexed by search engines, driving organic traffic to the site.
So, what about private WordPress sites? For online resources of this type, access can be limited to specific individuals, such as members of an organization or subscribers. One common reason to make a website private is to use it as an internal company portal, membership site, or personal blog that one doesn’t want to share with the general public. Consequently, projects of this nature are often not indexed by search engines and, therefore, don’t receive organic traffic from them.


How Do I Hide My WordPress Site From the Public?
First of all, it’s crucial to understand that there are several ways to make your project private. This refers not only to methods but also to the levels of privacy themselves. The simplest action in this direction is to prevent search engines from indexing your website, though ordinary visitors will still be able to access it.
Another option is to hide only certain pages. The most private approach is to make your project completely hidden; however, even in this scenario, there are various methods to achieve it. All of these options will be detailed in the following sections.
How to Ask Search Engines Not to Index Your Website?
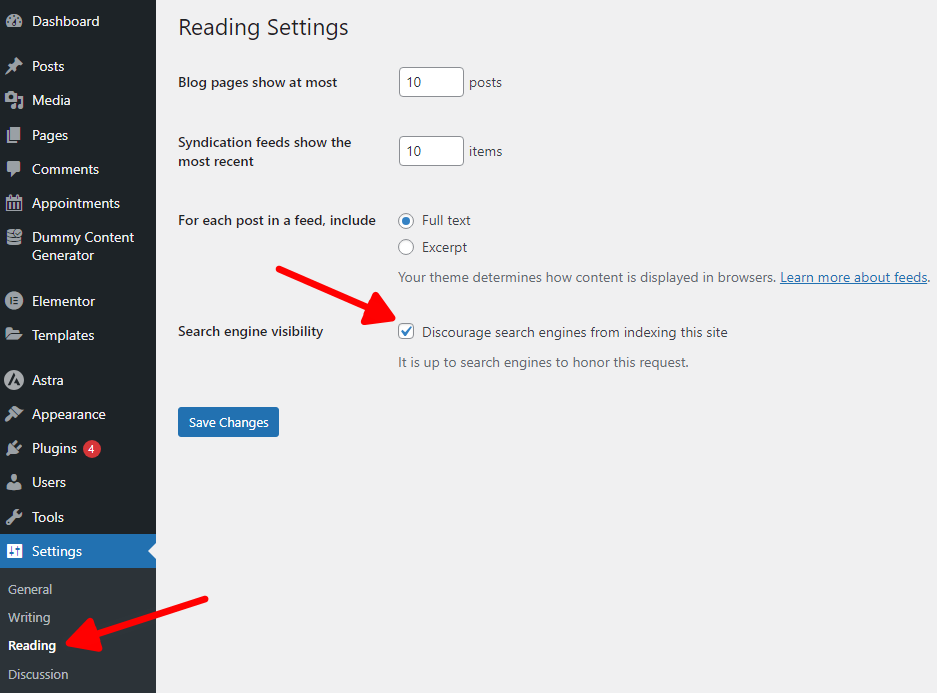
If you only need to hide your online resource from search engines, but not from regular visitors, follow these steps:
- Go to your WordPress dashboard.
- Navigate to “Settings” > “Reading”.
- Find the section labeled “Search Engine Visibility”.
- Check the corresponding box.
- Save your changes.
This will request search engines not to index your site. However, it’s more of a plea than an assurance. To ensure your website isn’t indexed by Google and other counterparts with absolute certainty, you should adopt more sophisticated protection methods. These approaches involve detecting search bots and returning a 403 “Forbidden” or even a 404 “Not Found” response instead of HTML content.
We have outlined the general principle of how to make a WordPress site private for search bots, but the actual implementation of this functionality requires some coding skills. Additionally, we were unable to find a pre-built plugin that would precisely detect search bots and prevent them from indexing the site. Therefore, if you really want to detect the bots and ban them, it’s up to you to conduct your own exploration for off-the-shelf solutions or to implement your own protection through coding.
How to Secure WordPress Content: Basic Protection Approaches
Whether you’re aiming to simply display a “maintenance mode” notice, secure content with passwords, or delve deeper with .htaccess configurations, there’s something here for every level of expertise. This section offers a breakdown of various WordPress protection techniques. You’ll be able to choose the method most appropriate for you, ensuring your content remains exclusive to your chosen audience.
Maintenance Mode Extensions
If your website is under development and, once all the work is complete, you don’t want to hide it from anyone, you can activate Maintenance Mode. Plugins such as WP Maintenance Mode or Coming Soon Page & Maintenance Mode are useful for this purpose. Installing and activating any of these extensions, or other similar alternatives, will display a message to your visitors indicating that the website is under maintenance.
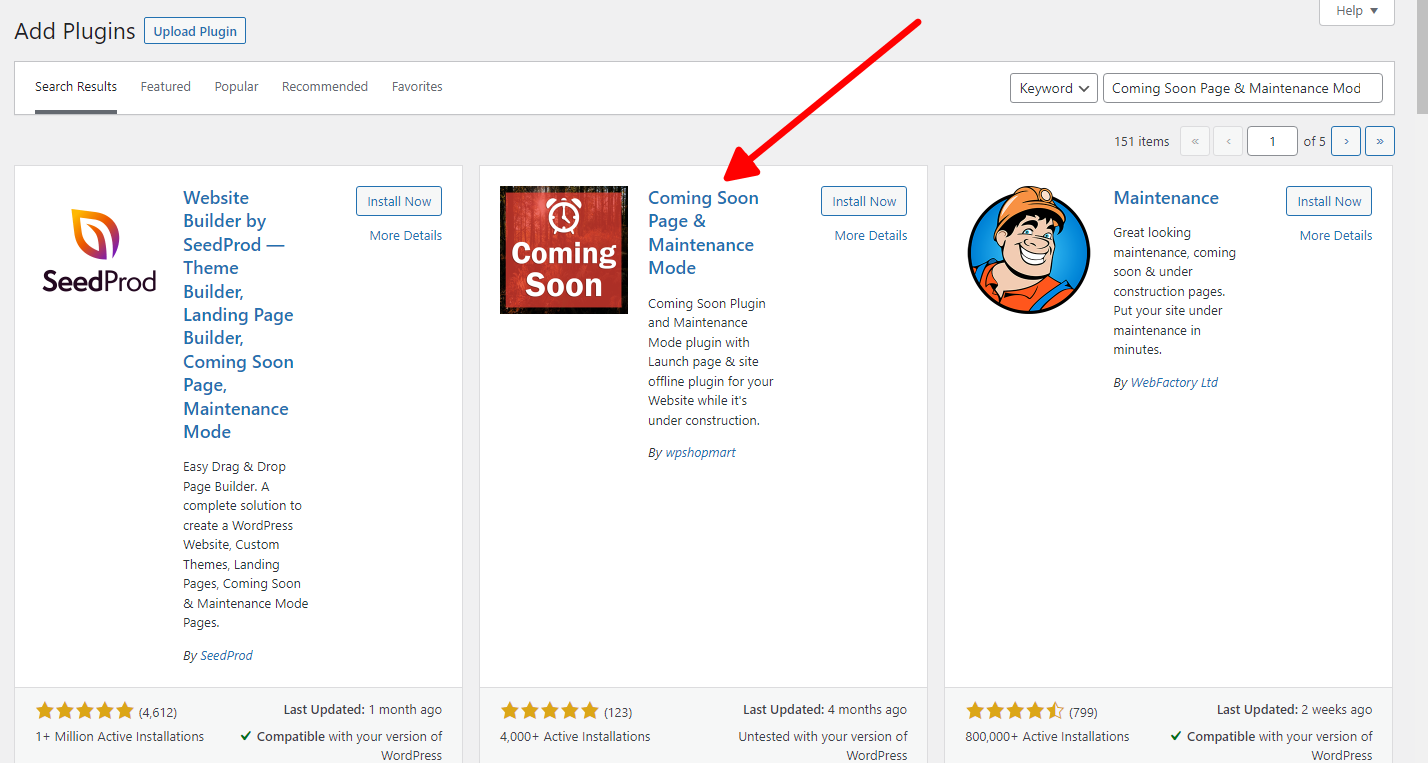
Here are the steps to follow, using the Coming Soon Page & Maintenance Mode plugin as an example:
- Head to the “Plugins” > “Add New”.
- Enter the name of our example (or any other alternative you prefer) into the search box.
- Locate the necessary plugin and press “Install Now”.

- Activate the plugin and proceed to its settings page.
- Pick “Enable Coming Soon Mode” and save the changes.
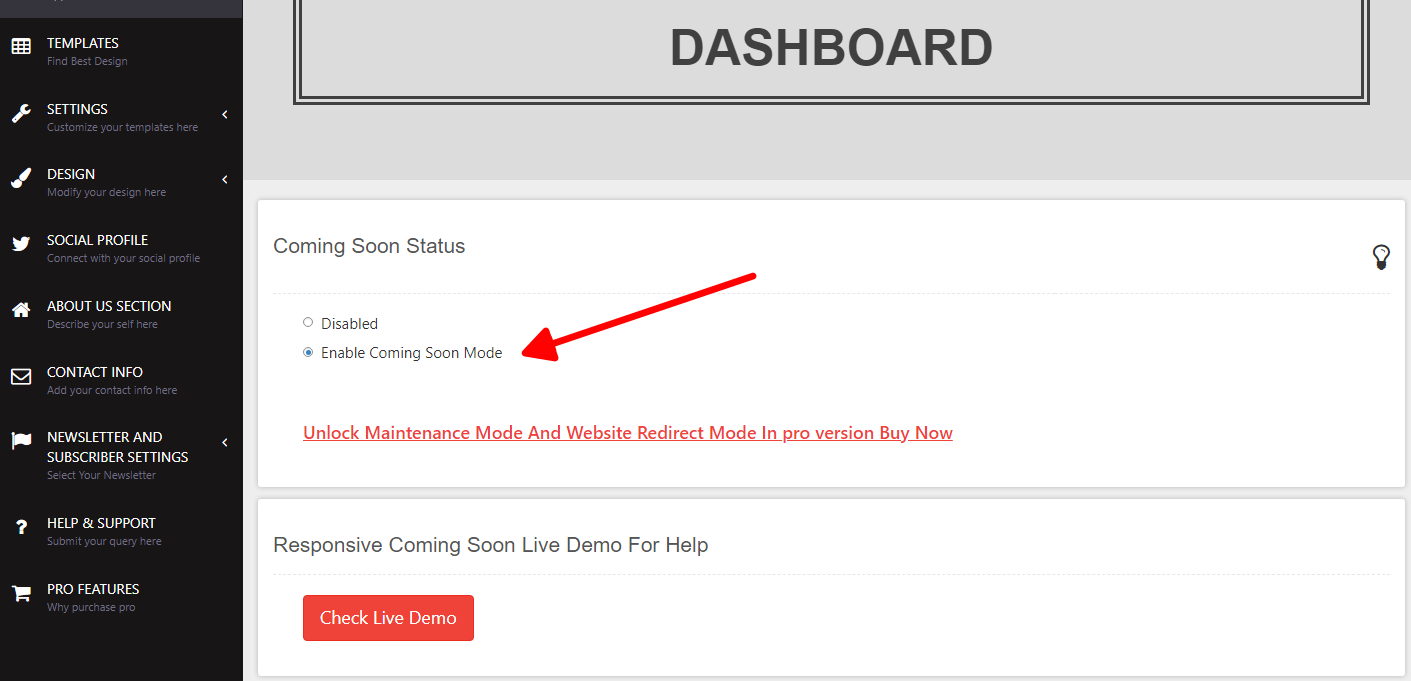

- Enjoy the result:
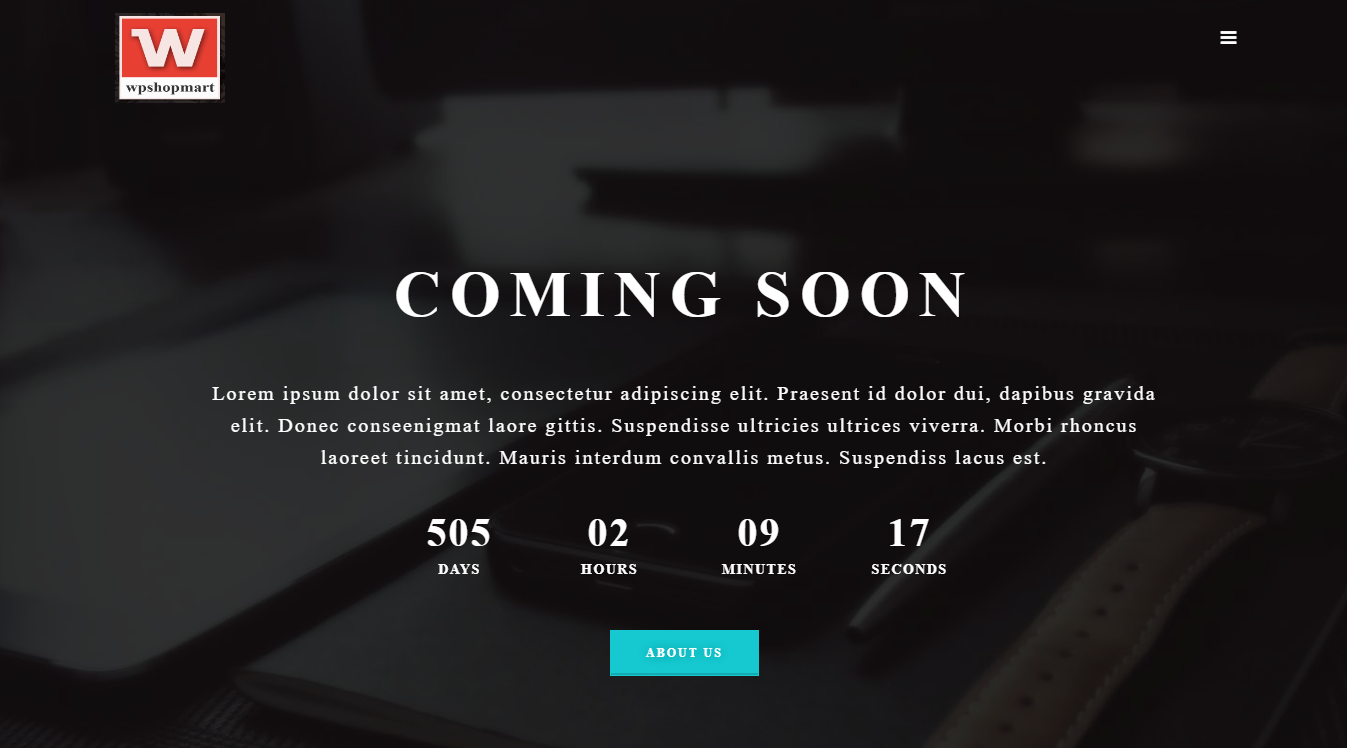

Of course, for the sake of brevity, we didn’t adjust any other settings. However, in your specific case, it’s advisable to review all the available configuration options for this extension and modify them accordingly.
Besides the example mentioned, there are numerous similar alternatives. If you want to learn more about them, we have a post where you can compare the best WordPress coming soon plugins.
Password Protection in WordPress: Plugins vs. Built-in Editor Features
The next method is to set a password for your specific posts/pages. This will prompt visitors to enter a password before they can view the content. Here are some of the most popular extensions:
- Secure Copy Content Protection and Content Locking not only offers protection against right-clicks and other methods to safeguard your content from theft, including scraping, but it also provides multiple ways to secure content. This includes password protection for specific posts, pages, or even individual content blocks.
- Passster is another tool that allows you to protect entire pages, posts, or even specific content sections with a password. It also offers the capability to lock the entire website.
- Password Protected: This is a more general plugin, but you can enable global password protection which affects all posts and pages, and then selectively disable it for posts or pages you want to be public.
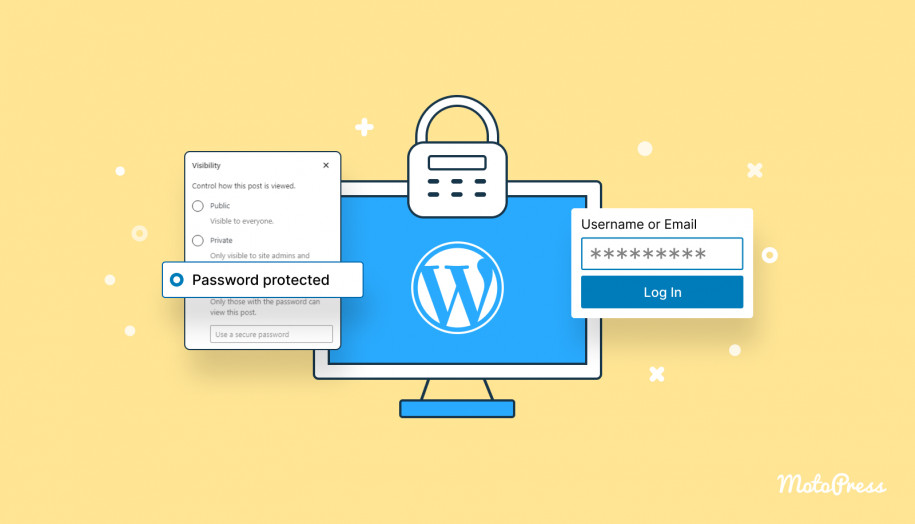
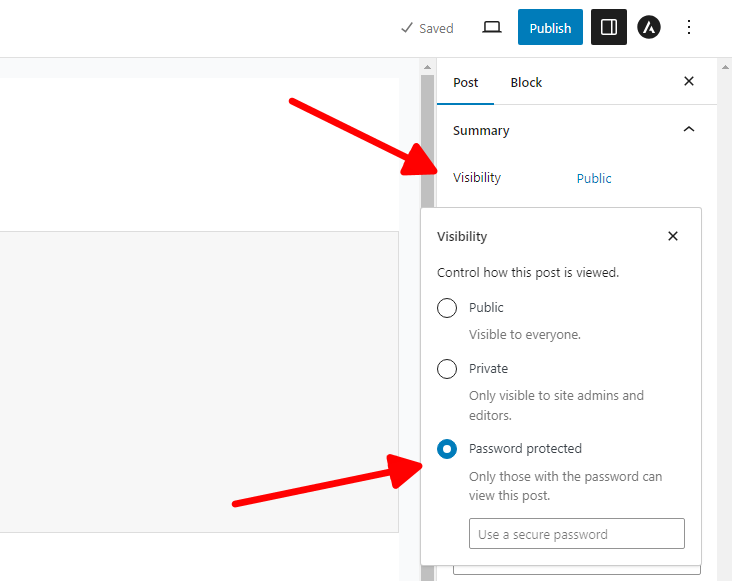
You might wonder, “Do I really need a separate plugin for this?” In reality, no, it’s not mandatory to use any of the listed extensions. WordPress already has a built-in feature for this purpose. You can easily use the “Visibility” setting in the WP editor and select “Password Protected”.
Protection With the Help of .htaccess File
This approach is universal and can be applied not only to WordPress websites but also to any online resource, whether it uses another CMS or none at all, as long as it runs on the Apache HTTP Server. The idea is to create a special .htaccess file that instructs the server to protect a specific folder or file. Here is what you need to do:
- First, create a special .htpasswd file with the following content:username:hashed_passwordWhere “username” is any nickname you choose, and “hashed_password” is a password hash. This hash can be generated using online tools, which can be found by searching for “htpasswd generator” or similar keywords. A more secure approach is to use a utility with the same name “htpasswd”, which is available on Linux systems. The overall idea here is that the file “.htpasswd” will contain your username and encrypted password.
- Next, create a “.htaccess” file itself with the following content:
a) For a simple HTML website, when only one page needs to be restricted:<Files "protected-page.html"> AuthType Basic AuthName "Restricted Area" AuthUserFile /path/to/passwords/.htpasswd Require valid-user </Files>
b) For a WordPress blog post with an ID “123”:
<If "%{QUERY_STRING} =~ /p=123/">
AuthType Basic
AuthName "Restricted Area"
AuthUserFile /path/to/passwords/.htpasswd
Require valid-user
</If>
However, this approach is not as reliable as using a specialized plugin.
c) For the protection of a complete directory (it should be placed in the folder you want to protect):
AuthType Basic
AuthName "Restricted Area"
AuthUserFile /path/to/your/.htpasswd
Require valid-user
However, it’s important to note, that it is not recommended to protect folders like “wp-admin”, “wp-includes”, or “wp-content” unless you have a very specific reason and are aware of the implications. It can break your website’s functionality. This approach is rather for some other folders, that do not relate to WordPress. For our favorite CMS, it is better to use specialized plugins.
- Log in to your web server using an FTP client, cPanel’s File Manager, or any other method you typically use to manage your website files. Upload the files you created in the previous steps: .htaccess and .htpasswd. Ensure that the actual path to the .htpasswd matches the path specified in the .htaccess file. Also, check if the .htaccess file already exists in the website folder where you plan to upload it. Make sure you don’t overwrite the existing file entirely, as this could break your website.
- If everything is done properly, here is what you will see:

Several important notes: although this approach can be used to protect specific pages or posts on a WordPress blog, it is somewhat troublesome and unreliable, especially if the ID of your post changes. This method is more commonly used to safeguard admin frontends that aren’t related to WordPress but serve as supplementary tools on your web server, like PhpMyAdmin, etc.
Regarding the topic of our article, namely — how to make a WordPress site private — you indeed can restrict access to the entire WordPress website using this approach by placing the .htpasswd file in a directory outside your web root (for instance, one level above public_html or www) and uploading the .htaccess file to the root directory of your WordPress installation. However, this is a risky venture. Some aspects of WordPress, especially AJAX-based features or API calls, may stop functioning as expected.

How to Make Your Pages or Posts Private?
In the previous segment, we discussed general approaches that are also relevant to this task. The spotlight here will be on methods, that allow making pages private or password-protected. We’ll explore a few scenarios where this feature proves especially valuable.
How to Organize Invite-only Events?
Organizing exclusive events often requires a space where only a select few can access the necessary details. By creating a private page, you can ensure your event details remain confidential. Here is what you need to do:
- Begin by crafting a compelling page that contains all the details of your event, from the date and time to the venue. Create it just like you would any other web page in WordPress.
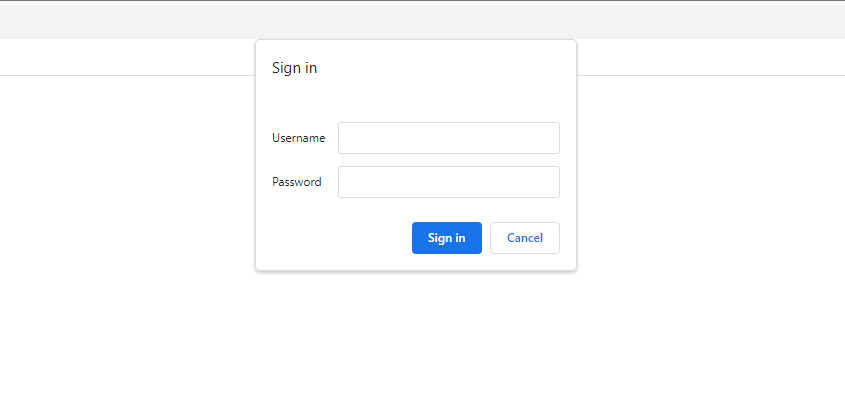
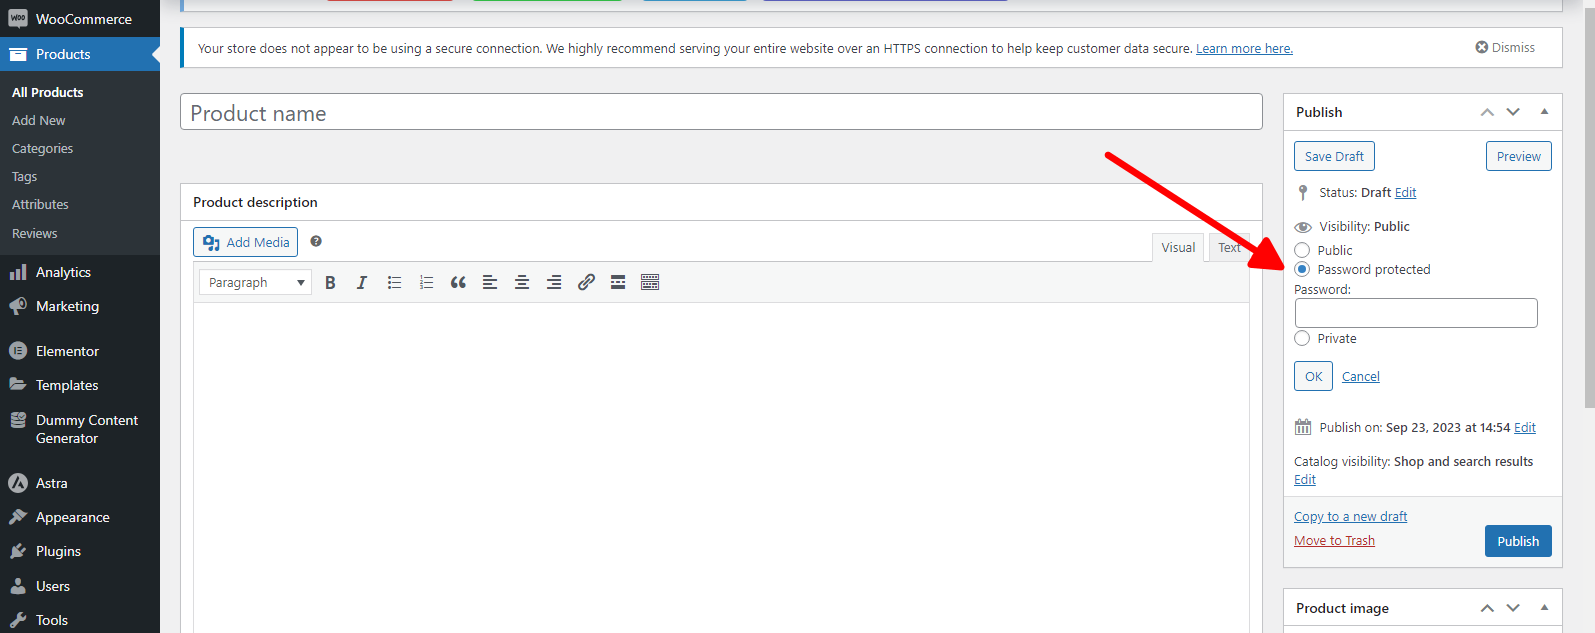
- The main distinction from an ordinary page lies in the privacy settings. Once you’ve finished editing, go to the “Visibility” settings in your page editor and choose “Password Protected” or “Private”. This ensures that your page is not openly accessible. Here is the corresponding screenshot again, for your convenience:

- After setting everything up, distribute the page link and password exclusively to your intended invitees. This ensures that only those who have the credentials can access the event’s details.
How to Create a Private Corporate Website for a Department?
If your project is intended for internal use among your colleagues, concealing sensitive departmental information is crucial. Such information should not be openly accessible. Here’s how you can ensure it stays confidential:
- Firstly, you can configure your WordPress website to be accessible only from certain IP addresses. There are numerous methods to achieve this objective, but for illustration, we will use the All In One WP Security & Firewall plugin as an example. This comprehensive security extension offers more than just IP restriction features. If you prefer a tool solely dedicated to IP restriction, consider searching for other alternatives. We’ve chosen AIOS due to its reliability and popularity. Here’s how you can use it to restrict access by IP:
- Install and activate the All In One WP Security & Firewall extension. The procedure is the same as with any other WP plugin.
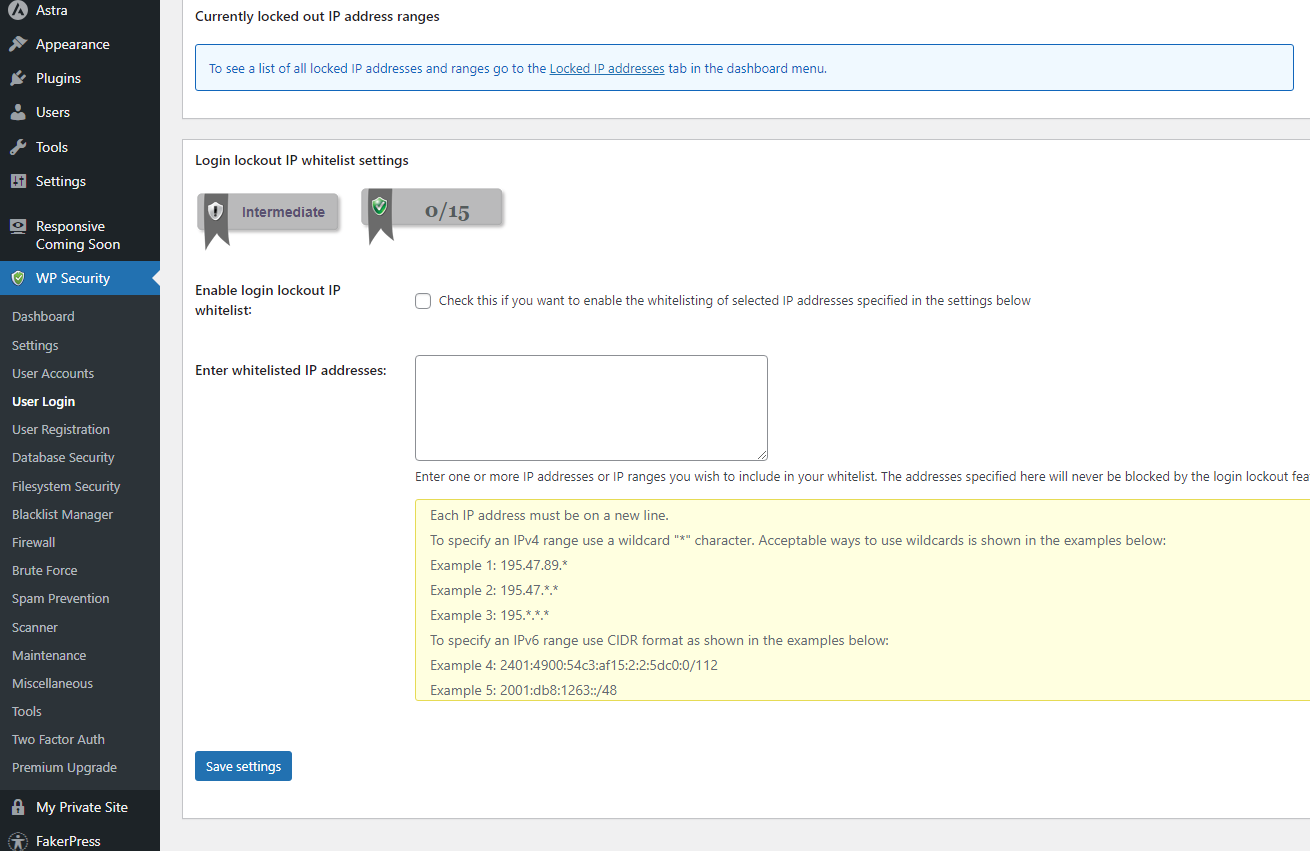
- Navigate to the WP Security menu in your WordPress dashboard. Click on the “User Login” menu item. From there, list down to locate the section “Login lockout IP whitelist settings”. Add the IP addresses of your colleagues, or of your shared VPN if you use one. Here, you can specify IP addresses that will always have access to the login page:

- The plugin also lets you block IP addresses from accessing your entire website. Go to the “Blacklist Manager” — here, you can configure IP addresses or IP ranges that should be blocked:
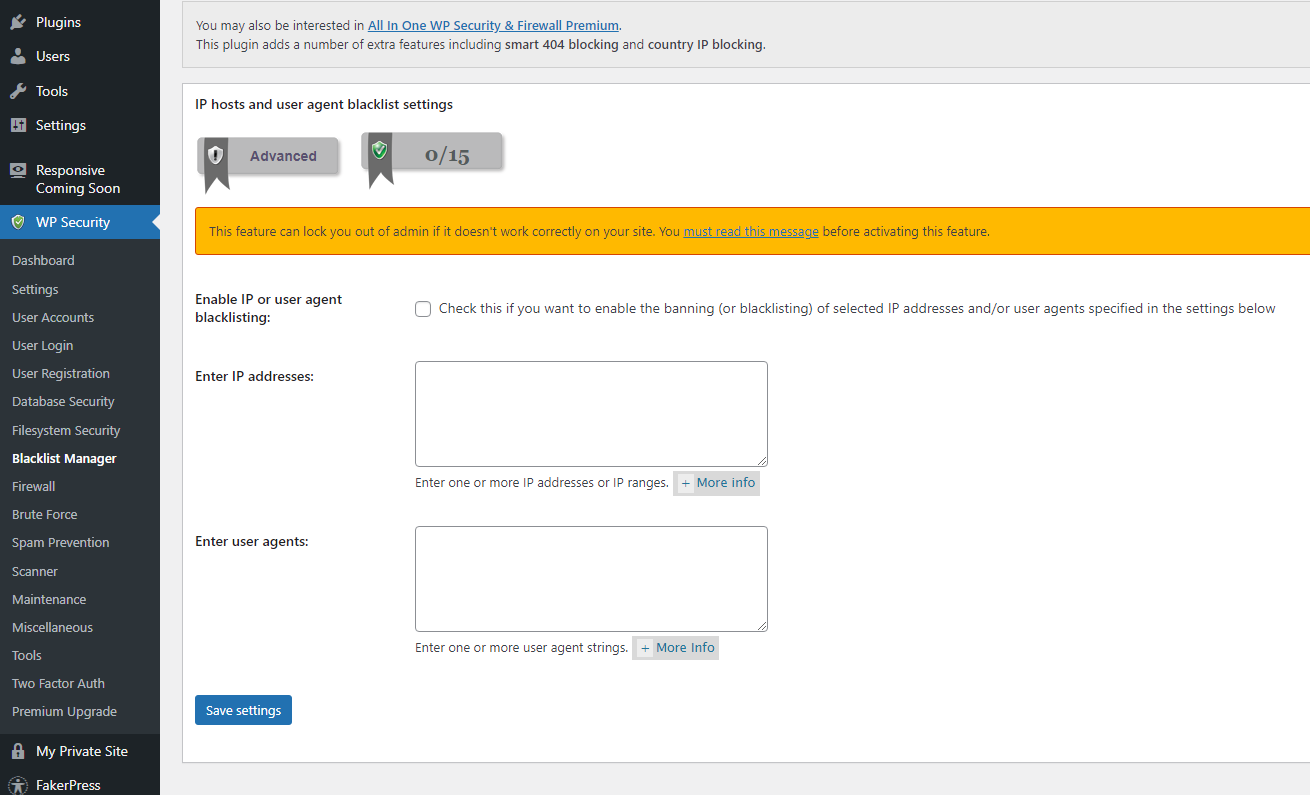

- After adding the IP addresses, make sure to save your changes.
It’s worth noting that blocking IP addresses can be effective, but it can also inadvertently block legitimate users if you’re not careful. Always ensure you don’t block your own IP or the IPs of your team members.
- Use default WordPress visibility setting: WordPress offers a “Private” visibility setting. When you choose this, only specific user roles, typically administrators and editors, can see the content, which was marked as “Private”.
- For added security layers, consider plugins that offer more granular access controls based on user roles. These extensions can allow for complex configurations, ensuring only the right eyes see your sensitive data. Here are some of them:
- User Role Editor allows you to change user roles and capabilities easily. By tailoring specific roles, you can grant or restrict access to various parts of your website.
- Members is an extension that amplifies your control over your blog. It’s a user, role, and content management plugin that was created to make WordPress a more powerful CMS.
- Advanced Access Manager is known for its comprehensive set of features, allowing you to control who sees what content, including posts, pages, widgets, and even menu items.
- Restrict User Access enables you to limit access to pages, posts, and categories based on user roles.
There’s a whole array of tools out there designed specifically for creating private corporate websites. Start by getting a grip on the basics: think about IP restrictions, using passwords, and setting access levels for different user roles. Once you’ve got that down, it’s all about picking a plugin that fits you in terms of user interface and offers the features you’re after.
How to Create Private Areas of an E-commerce Shop
If you’re running an online shop, there might be occasions when you want to offer exclusive products or deals to a particular set of members or customers. Here’s how to create these private shopping areas:
- Many e-commerce plugins, such as WooCommerce, come with built-in settings to create private or members-only product areas. By using these settings, you can easily set aside sections of your store for exclusive access.

- If you desire greater flexibility, think about utilizing a membership plugin that integrates with your e-commerce platform. Such extensions allow you to limit access to specific products or categories, ensuring that only members can view and purchase them. Concrete examples of these extensions were already mentioned: Members and Restrict User Access. It’s worth noting that these plugins are explicitly mentioned to be compatible with WooCommerce. However, there’s an extensive array of other similar options available.
How to Maintain Private Journals or Diaries?
Personal reflections, thoughts, and musings might not always be for the world to see. If you wish to keep them under wraps, WordPress offers a simple solution:
- Begin by creating a new post to jot down your thoughts, just as you would with standard posts.
- While in the post editor, set its visibility to “Private”. This means that the post is shielded from public view. The screenshot was already shown in previous sections.
Remember, only logged-in users with the right permissions, usually, administrators and editors, will be able to view these private posts.
How to Make Your Whole Site Private?
There might be a myriad of reasons why you’d want to keep your website away from the prying eyes of the public. Whether you’re still in the development phase, wish to cater to a niche audience, or want a personal platform for friends and family, there is a solution to the question of how to make a WordPress site private. Let’s dive into some of the most effective ways.
Using a Privacy Plugin
WordPress, being the most popular CMS in the world, offers a plethora of extensions for various needs. Our task is no exception: for those looking to privatize their content, plugins like My Private Site or similar ones provide an effortless solution.
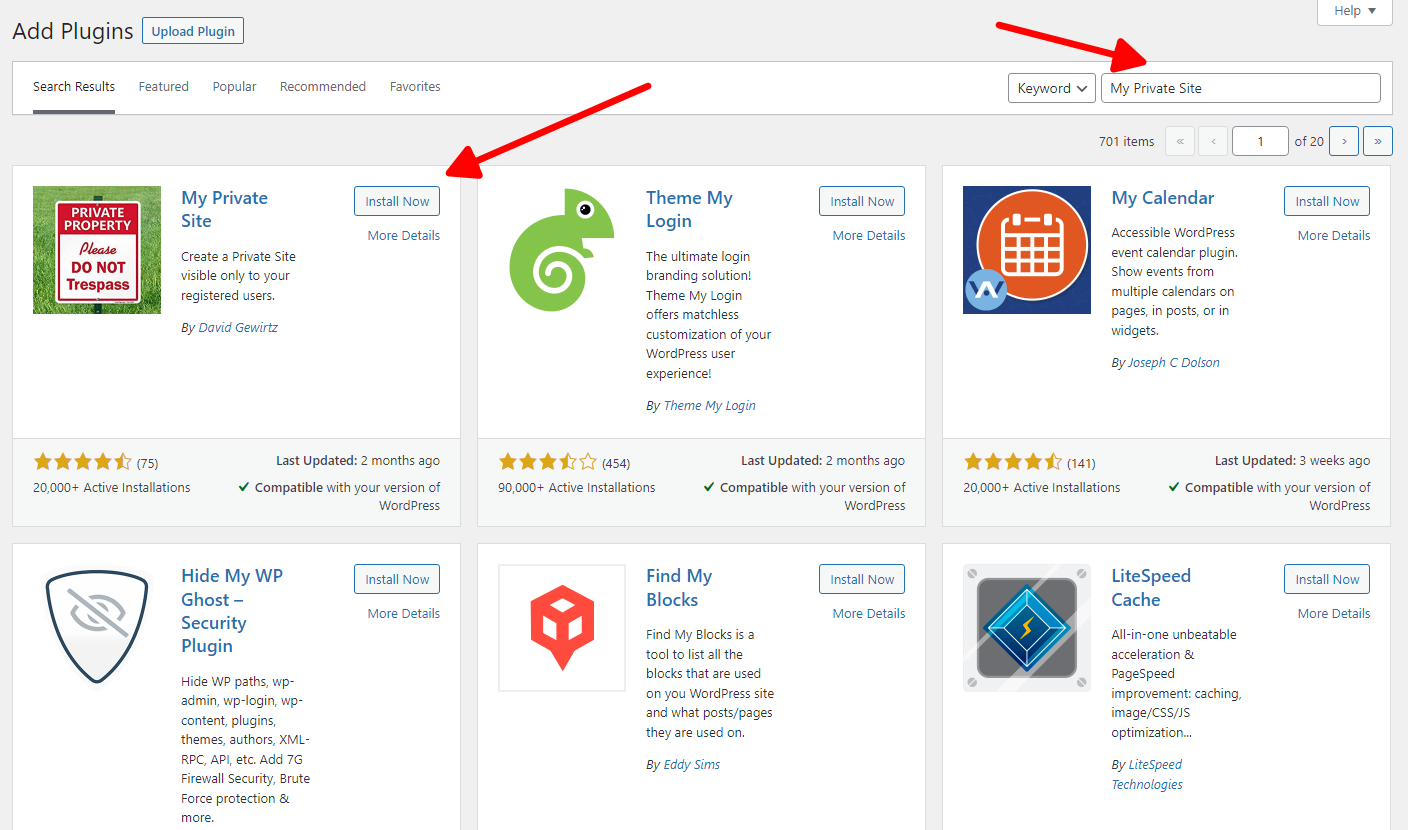
- Begin by choosing an extension that aligns with your requirements. We recommend My Private Site, but you can choose any similar, according to your preferences.
- Head over to the “Plugins” section of your WordPress dashboard, search for your chosen plugin, install, and activate it. For our example, this process will look like this:

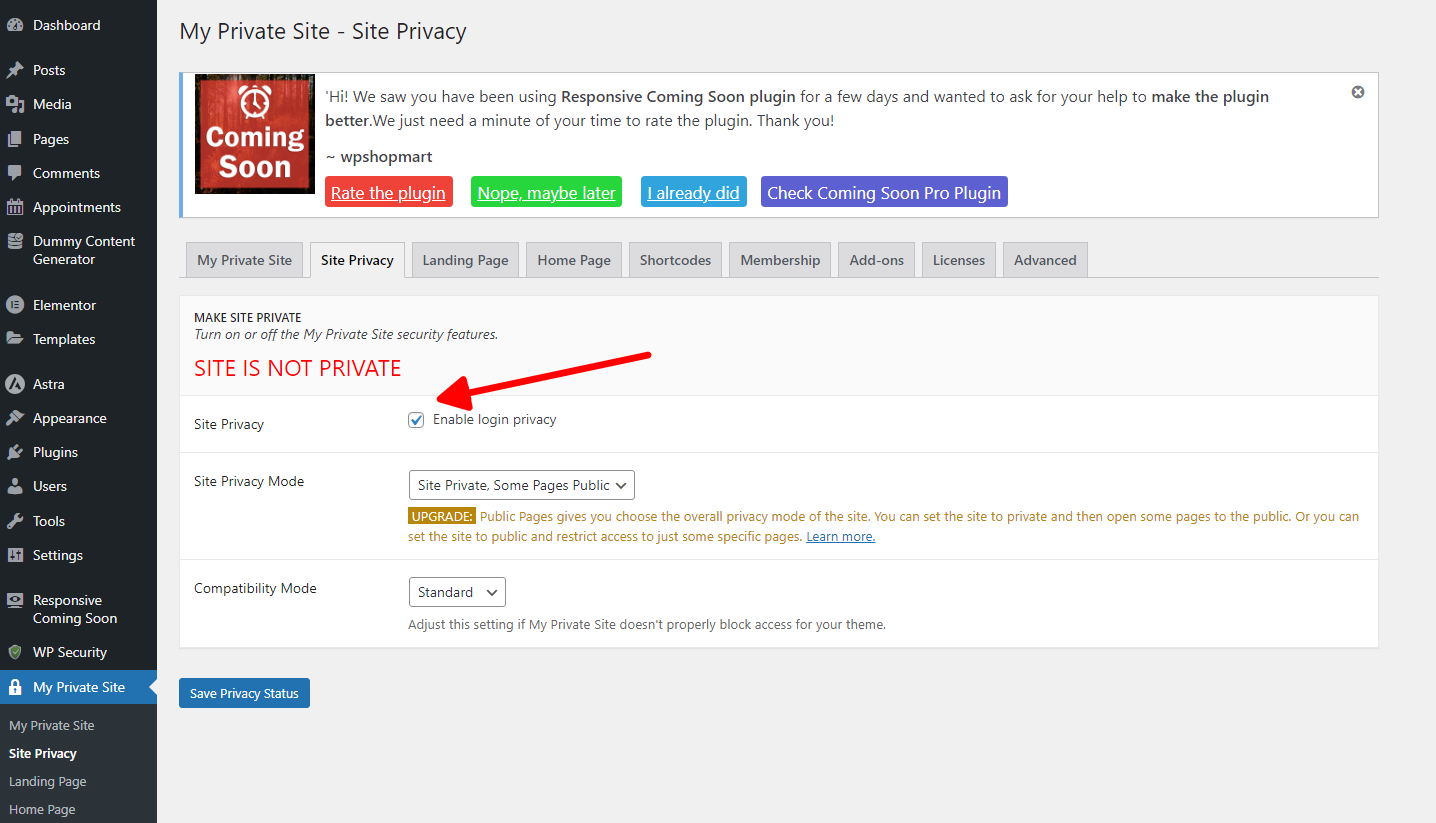
- After activation, navigate to the settings page of the plugin. From there, you can customize access levels, decide which parts of the site to keep private, and a lot more:

Plugins are a user-friendly way to make online resources private. They not only make the process smoother but also offer flexibility in terms of which parts of your site to restrict. Another approach is to use .htaccess and .htpasswd files in the root folder of your website, as described above in the corresponding section. However, this approach is much more intricate.
How Can Visitors View a Private WordPress Blog?
The previous subsection hinted at the method to make your website hidden. But what should visitors of your private site do to gain access to the blog? It’s simple: to view the content, they will need to log in.
If you use a more advanced restriction plugin that allows for more granular access level settings, you’ll need to adjust the privacy settings so that not only editors and admins can read the content, but also regular users.
How to Add Users to Your Private Website
Sharing is caring, and sometimes, you might want to give someone else the keys to your WordPress kingdom. Here’s how:
- Head to your WordPress dashboard.
- Navigate to “Users” > “Add New”. This is where you’ll introduce new members to your site.
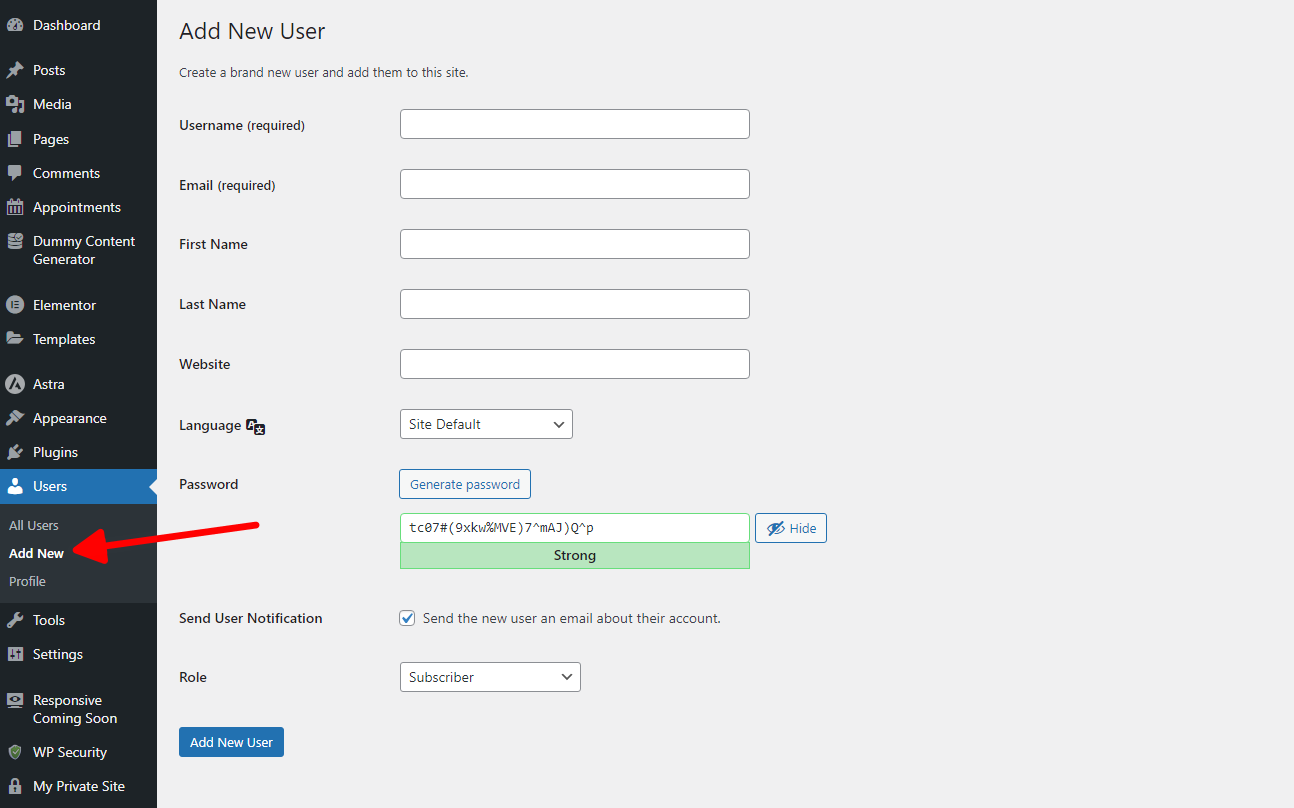

- Fill out the fields with the new user’s information, typically including their username, email, and role (e.g., Administrator, Editor, Subscriber). Once completed, send them an invitation.
How to Set Up Password-Protected Categories
In the WordPress ecosystem, categories play a crucial role in organizing content. However, what if you wish to restrict access to some of them? While there are numerous options available for privatizing specific pages or an entire blog, the choices become more limited when there’s a need to make only certain category pages private.
In our search, we found just one plugin capable of this functionality. Your exploration might yield better results. Nonetheless, regarding the extension we discovered, here are the steps to follow:
- Password Protected Categories is a premium plugin that allows for the restriction of access specifically to certain categories. It is necessary to acquire, install, and activate it.
- Now, head over to your product or post categories. Here, you’ll have the option to assign passwords to specific categories. Set your desired passwords and voilà, those categories are now under lock and key:
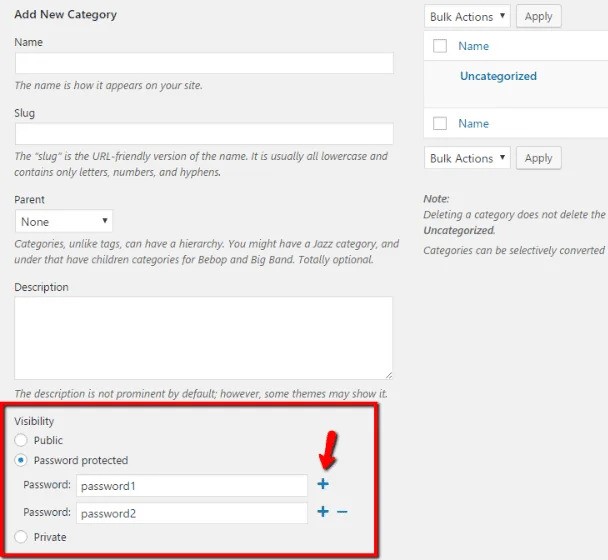

Overall, the protection is offered in three forms: “Password Protected”, “Role Protected”, and “User Protected”. The “Password Protected” mode grants access through passwords, “Role Protected” is designated for specific user roles, and “User Protected” restricts visibility to certain user accounts, facilitating a tailored protective setup for your categories. Additionally, beyond categories, this plugin extends its protection features to pages and posts.
Concluding Words
We’ve strived to present a thorough overview of various strategies to privatize the content on your WordPress website. These approaches span from concealing text sections using specialized plugins to leveraging built-in WordPress features for rendering particular pages and posts private or password-protected. Additionally, the special extension that allows for category privatization has also been mentioned.
Moreover, we’ve spotlighted several alternative ways to secure an entire website, ranging from opting for particular plugins to utilizing the .htaccess file for those with more advanced web management expertise.
No matter which option you choose, always assess whether the capabilities of the chosen extension or technical approach correspond to your specific requirements. There’s no necessity to make the entire website private if you only want to hide a few pages. Conversely, if you wish to shield the entire blog, there’s no reason to conceal each page and post manually.
We value your personal experience, so if you have employed other methods of privatization, faced challenges, or found certain plugins and approaches more effective, please share your insights in the comment section below.
Disclaimer: This article may include affiliate links to third-party products. If you choose to click on a link and make a purchase, we might receive an affiliate commission without any extra cost to you.