How to Extend MotoPress Content Editor: Visual Builder for WordPress

You need only four easy steps to extend MotoPress with your own elements.
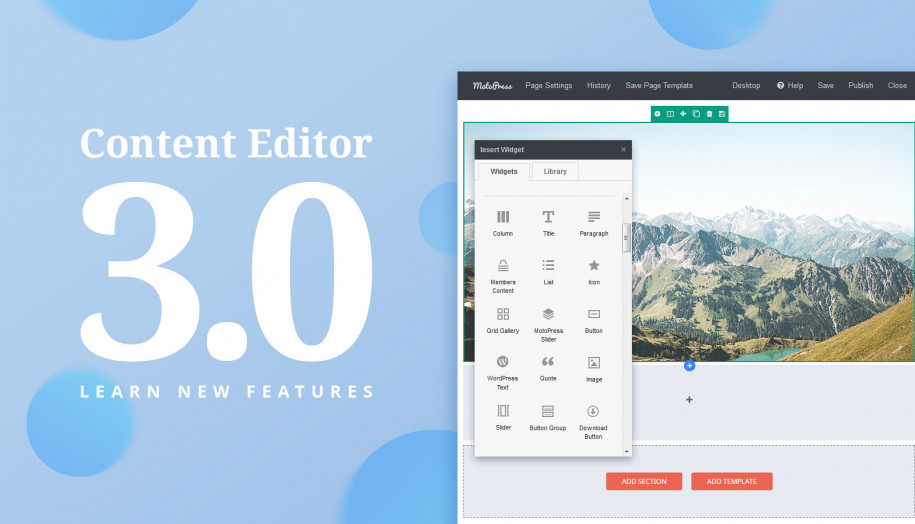
This step-by-step tutorial will show you how to extend MotoPress Content Editor with your widgets. It will guide you on how to create the plugin which enables to add the new “Testimonial Object” to the Visual Builder. While writing this plugin we will use MotoPress Documentation and WordPress coding standards.
At the end of our tutorial, you’ll get an object like the one below where you can customize the content and the background color.
Lorem ipsum dolor sit amet, consectetur adipiscing elit. Cras diam lacus, interdum vitae commodo sit amet, interdum in nisi. Sed laoreet ipsum eget venenatis imperdiet. Ut et nisl mi. Pellentesque adipiscing arcu orci, in tincidunt sapien pulvinar nec.
Let’s get started!
1. Create the file, name it motopress-my-testimonial.php and add the informational header with the plugin description into it.
/**
* Plugin Name: MotoPress My Testimonial
* Plugin URI: https://motopress.com/
* Description: This example describes how to extend MotoPress Content Editor plugin library with your own shortcodes.
* Version: 0.1
* Author: MotoPress Team
* Author URI: https://motopress.com/
* License: GPL2 or later
*/
2. Use the add_action hook to extend MotoPress with our new element.
add_action('mp_library', 'my_testimonial_example', 10, 1);3. Write the description of the new object. Indicate the shortcode name, object title and add two controllers to assign the color selection and the content editor. Set the type, name and the default value to the each controller.
Note, the saveInContent attribute indicates that content will be saved in the body of the shortcode.
function my_testimonial_example($motopressCELibrary) {
	global $motopressCELang;
	$myTestimonialObject = new MPCEObject('my_testimonial', _('Testimonial'), null,
        array(
            'content' => array(
                'type' => 'longtext-tinymce',
                'label' => _('Content:'),
                'default' => '<em>Lorem ipsum dolor sit amet, consectetur adipiscing elit. Cras diam lacus, interdum vitae commodo sit amet, interdum in nisi. Sed laoreet ipsum eget venenatis imperdiet. Ut et nisl mi. Pellentesque adipiscing arcu orci, in tincidunt sapien pulvinar nec. Duis elementum cursus eleifend. In elementum, turpis quis volutpat auctor, sapien nibh vehicula sem, sed volutpat mauris metus vel est. Proin at enim at lacus condimentum condimentum. In tristique eu velit eget posuere.</em>
<p style="text-align: right;"><a href="http://getmotopress.com">John Smith</a></p>',
                'text' => $motopressCELang->CEOpenInWPEditor,
                'saveInContent' => 'true'
            ),
            'color' => array(
                'type' => 'color-picker',
                'label' => _('Background Color:'),
                'default' => '#eeeeee',
            ),
        ),
        0,
        MPCEObject::ENCLOSED
	);
    $motopressCELibrary->addObject($myTestimonialObject);
}
4. Register our new shortcode and describe how it will display the content.
function my_testimonial_shortcode($atts, $content = null) {
	extract(shortcode_atts(array(
		'color' => '#eeeeee',
		'classes' => ''
	), $atts));

    if (!empty($classes)) $classes = ' ' . $classes;

    $testimonialHtml = '<div class="my-testimonial-obj ' . $classes . '">';
    $testimonialHtml .= '<div style="padding:20px;background-color:' . $color . '">' . $content . '</div>';
    $testimonialHtml .= '</div>';

	return $testimonialHtml;
}
// register your shortcode
add_shortcode('my_testimonial', 'my_testimonial_shortcode');
Activate the plugin. Create a new post and launch MotoPress Content Editor. The new “Testimonial object” will appear in the left panel. Drag our new object to the post. Look at the testimonials below to see the result.
Lorem ipsum dolor sit amet, consectetur adipiscing elit. Cras diam lacus, interdum vitae commodo sit amet, interdum in nisi.
Sed laoreet ipsum eget venenatis imperdiet. Ut et nisl mi. Pellentesque adipiscing arcu orci, in tincidunt sapien pulvinar nec.
In elementum, turpis quis volutpat auctor, sapien nibh vehicula sem, sed volutpat mauris metus vel est. Proin at enim at condimentum.
By using the documentation and the wide range of controls you can easily extend our example by adding your own styles, images, etc. Hope you enjoyed our brief guide and received some useful takeaway for your awesome website.
can i get a video of this?
Hi,
We’ll think about recording a video tutorial. Currently you can ask your questions here in the comments or visit our forum
How can I add a picture ?
Hi Bernhard, have a look at the brief video which describes in detail how to add images and content to your web-page: https://www.youtube.com/watch?v=0QVDU8NqNW4&list=UUtkDYmIQ5Lv_z8KbjJ2lpFQ
I know how I can insert an image in the editor !
My Question belongs to:
“How to Extend MotoPress Content Editor:”
I always just get the image id displayed . How do I get the picture?
‘image’ => array(
‘type’ => ‘image’,
‘label’ => __(‘Image dialog’, ‘your_textdomain’),
$result .= “image => “.$image.”n”; = gives only the image ID
Bernard, with technical questions you should contact our support team: https://motopress.com/support/
Hi I just ordered the business license for the full version. I received the email regarding my order, but I don’t know how to extend it in my WP website.
Hi Chera, could you contact our support team concerning this question and they will help you to extend your WP website. Thank you in advance.
How do I make the text background anything other than black or white?
Hi Ames, at the current moment the background can be only black or white.
Seriously? OMG!
I thought Motopress gave more flexibility.
When do you expect color choice will become available?
Marie, you can change the baground color for each object. Use MotoPress demo to see how it works http://demo.getmotopress.com/wp-login.php?redirect_to=http%3A%2F%2Fdemo.getmotopress.com%2Fwp-admin%2F&reauth=1
Thanks for the tutorial, this is exactly what I needed! Except, I’m not entirely sure where to save the motopress-my-testimonial.php I’ve created. Can you clarify?
Nevermind! Figured it out 😀 Thanks
Than you 🙂 Happy editing with MotoPress and have a wonderful day!
Hello! Can I edit a template with it?
Hi HJ,
Yes, if you create your page with MotoPress you can edit and structure your template the way you like.
No, I purchased a WP template and I was trying to see if I could utilize or edit the content and rearrange with MP. Will that be possible?
You can not edit previously created content with the plugin, you can do it with the default WordPress editor. But if you are going to fill your page with new content elements, MotoPress is the best solution for this.
The code after point 4, about register shortcode, should I place it in functions.php?
Yes, you can write the code either in the plugin or in the theme, F.E. in the functions.php file of your theme.