
How to Update WordPress Plugins in 3 Easy Ways
Table of Contents
With every other newly-emerging WordPress plugin version, a greater fear of “something going wrong” comes by. A number of users continue to ignore the plugin updates, which leads to a greater risk of hacker attacks and compatibility issues. Are you really into this risk?
The good news is, updating your WP plugin takes less time than you’ll spend on reading the article. At least, these precious 5-10 minutes will be spent for the sake of new knowledge when you finally learn how to make WordPress updates in 3 effortless ways.
But first…
Why Updating WordPress Plugins Is Important
- Protection from hacking attempts
Keeping up with the older version makes your website a more vulnerable spot for hackers. Eventually, your website code will not be perfectly clean to protect you from attacks of different kinds allowing hackers to execute arbitrary code. How would you find out an error? Every now and then, WordPress notifies users of all detected errors in their newsletter. But let’s face the truth: just “being aware” of bugs is nothing compared to their initial prevention.
- Fixing older errors
The key reason for frequent WordPress plugin updates is that they make a great contribution to fixing older issues. Developers get rid of emerging bugs to enhance a better user experience. Imagine if each of your installed plugins contains at least a single error – will that be favorable for your business website?
- New (and better) functionality
Nothing makes WordPress geeks so enthusiastic about plugin updates than a chance to test new functionality. Developers know it, so they rip and tear to stand out with their new and innovative functions. Why not take the chance?
Consider This Before Making Updates
Updating WordPress plugins isn’t rocket science and it’s okay if you are a complete newbie. But speaking of software, things don’t always go that smooth. The plugin update might cause an unwanted effect on website performance.
No worries, though. With these seven precaution measures, your website will remain safe and sound (it will actually become better):
- Do backups. Updates with poor code have a greater risk of creating conflicts inside WP core, other plugins, or themes. Update errors occur rarely, but as they say, “caution is the parent of safety”. Do backups in order to have a chance to revert.
- Turn off automatic updates for newly installed plugins. Automatic plugin updates are unwanted because they might go out of control. I recommend turning that option off for new plugins and switch it back after testing the plugin reliability.
- Test the update on a local website. Having a local test or intermediate website to check the updates before their installation on a real website is highly recommended.
- Make updates in hours of low traffic. If the update causes issues, it will be a concern for as few visitors as possible.
- Wait for several days after the release. Some errors and conflicts become apparent only after their release. Non-priority updates can wait several days until developers find out and work on their errors.
- DO NOT update all plugins at once. This option seems tempting for the sake of saving your precious time. Nonetheless, individual updates give users a better understanding of which plugins might cause the current website bugs.
- Learn the date of the recent plugin update. Developers are always working on improving software features. Popular and reliable plugins get updated every other 3-4 weeks.
3 Ways How to Update Plugins in WordPress
Back to why you are actually here reading this post.
I’ll give you 3 step-by-step instructions on how to update a WordPress plugin based on 3 simple methods:
- Automatic update (one-click solution);
- Half automatic (from the admin site);
- Manual.
1. Automatic Update
Automatic updates work well with the plugins that you found directly on the admin panel. You will always be notified of the available updates and those notifications will be visible at 2 places – the Plugins Menu and the WordPress Dashboard:

In the current list of plugins, we see the notification about the newer Getwid version 1.5.4 that I currently have on my website. Click the “Update Now” button and wait till the update is completed.
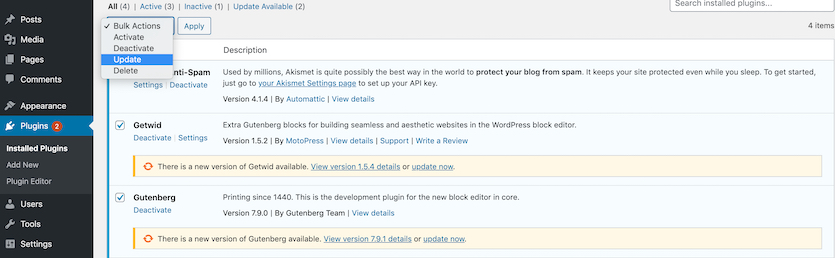
You also have an option of simultaneous WordPress plugins update. This means, if two or more of my installed plugins are ready for the update, you can do it simultaneously (remember, this relates to trusted plugins only!).
Tick the necessary plugins, and select ‘Update’ from the list of actions in the drop-down menu:
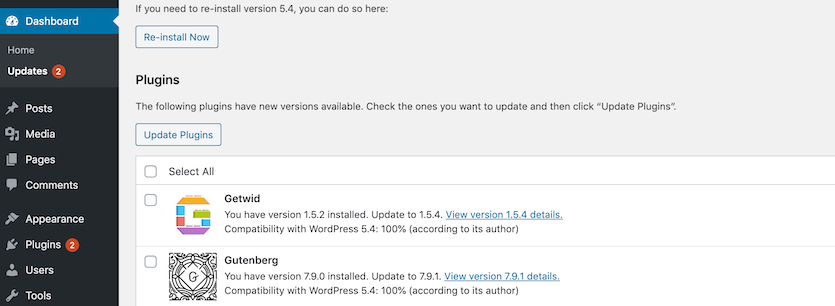
Now, check on the Dashboard to see the information on ALL current updates, including WordPress itself, a website theme, add-ons, and plugins.
Go to Dashboard → Updates, and you’ll see the identical list of all items ready to be updated to a newer version. Scroll to the Plugins list and select the ones you want to update:
Automatic updates are easy as 1 2 3 but it may not always be the ultimate solution.
That’s why users have 2 more options to go for: half-automated and WordPress manual plugin update.
2. Half-Automatic Update
This method requires you to download the ZIP file of the plugin’s newest version from wordpress.org, plugin developers’ websites, or third-party marketplaces.
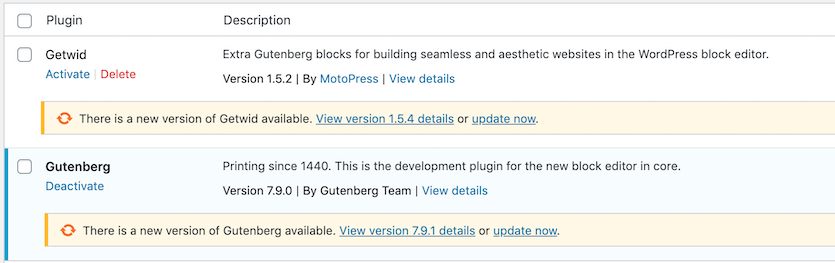
But before you upload one to WordPress, you’ll need to deactivate/remove the older plugin version. If you go to the ‘Plugins’ menu to the list of installed plugins, you can deactivate the plugin, and then remove it off the admin panel completely:
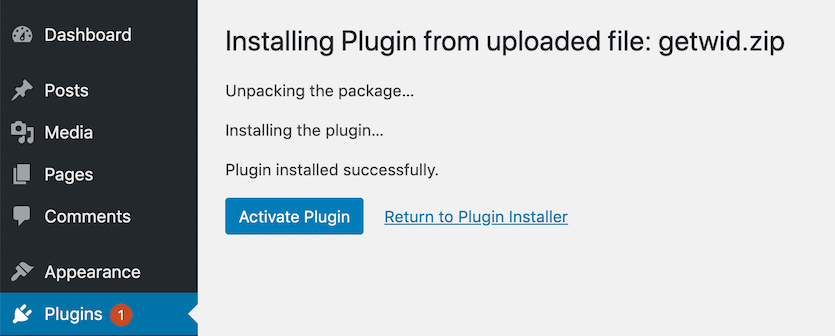
In the ‘Plugins’ menu, choose Add New ➝ Upload Plugin.
Select the ZIP archive from your computer, wait till the end of the installation, and click ‘Activate Plugin’:
No further action is needed – the plugin will be updated to your site and you can already start using its functionality.
3. How to Manually Update WordPress Plugin?
What if the other methods for the WordPress plugin update failed? This might be caused due to incorrect file permissions, incorrect version numbers, or other server configuration factors.
In that case, you’ll have to deal with the messiest (but not super complicated) option of all three and manually update the WordPress plugin.
Like the previous half-automated method, you’ll need to upload the ZIP file of the latest plugin version. Unzip the archive with the relevant software:

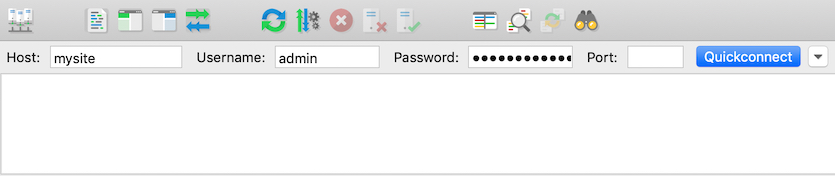
Now you’ll need an FTP client. I have FileZilla but you can use any FTP client to your liking.
To connect to your site using FTP, you will need to enter your site name (hostname), as well as your FTP username and password:
Find the folder with the files of your plugin, and delete this content from your archive.
The installation of the latest plugin version starts from this point. First, you’ll need to go to the FTP client (FileZilla in my case), choose ‘Local’ and then search for the new plugin folder on your computer. This would be the folder with the latest plugin version you had previously extracted from the archive. Right-click and select “Upload” from the FTP menu:
![]()
![]()
Now you have to wait until the FTP client completes transferring from the plugins folder on your computer to the website.
Once the process is complete, you should check on the Plugins page, find the newly-uploaded plugin and activate it. Done!
Update Completed Successfully!
It makes no difference if you choose to update the WordPress plugin manually or decide to stick to automating updates (but doing it “in a smart way”).
In any case, the ultimate goal remains the same: maximize the speed, boost up performance, and enhance the full security of your website.
Developers do their best to ensure the user’s convenience and safety, and it’s not something you should ignore.