How to Become a Tour Guide (and Sell Activities & Experiences)
Table of Contents
Looking for concise and useful information on how to become a tour guide? You’re in luck! In today’s article, we’ll take a look at the ways of promoting yourself as a tour guide to help you reach more potential clients and travelers interested in what you provide. From starting a tour guide business to optimizing your website and offering city tours and activities on a global scale with WordPress solutions, you can easily up your advertising and promotion skills as a local guide in no time with our guidance.
What You Need to Become a Tour Guide
 Firstly, let’s examine what you need to do to get tour guide jobs. Most of the talents in this sphere of tourism are deeply connected with specific local areas. This means that as a local activity and sightseeing expert, you need to have deep knowledge and passion for the region you want to popularize among tourists. The preferable range of knowledge a guide needs to have usually covers the following:
- History of the local attractions;
- The region’s culture;
- Local culture and customs.
In addition to the skillset, being one of the tour activity providers also requires obtaining certain licenses and understanding how insurance and local regulations work. These may vary depending on your location. Some authorities may also ask you to complete a tourism-related course, especially if you are new to the industry and are just discovering how to be a tour guide.
Skills you’ll need as a representative of a city tour company don’t end there. Having strong communication and time management skills (for example, with Google Calendar), as well as being proficient in multiple languages, is vital if you’re learning how to become a tour guide. Additionally, having a good sense of direction and problem-solving abilities can help you on your path to becoming a provider of tour activity experiences. As a result, constant professional development and increasing your location knowledge are key to becoming a successful tour guide who is more than just a source of information.
How to Promote Yourself as a Tour Guide
 Let’s assume you have already acquired all it takes to get tour guide jobs locally. But what if you want to advertise yourself online and increase the number of booked excursions? Most importantly, how do you promote yourself as a tour guide? Here, various marketing and promotion solutions can be of assistance. One of the most effective ways to get the attention of your potential clients is by registering on Online Travel Agencies (OTAs). These are platforms that allow you to be easily discovered without having to manually advertise your activities. Such sites include:
- Viator;
- GetYourGuide;
- Airbnb Experiences;
- TourRadar;
- Klook.
Depending on your location and the tours you provide for booking as a guide, some platforms may be more beneficial than others when you’re willing to learn how to become a tour guide. That’s why some additional research before choosing is recommended. By crafting detailed and informative listings with professional photos, customer reviews, and well-built itineraries, you can already stand out just by appearing on these websites.
Social Media Marketing and Site Optimization
 Aside from OTAs, if you want to know how to be a good tour guide, you may also need to work on your social network presence. To do that, create social media profiles to showcase your excursions, local food recommendations, and reviews from your clients. Additionally, don’t hesitate to cooperate with local tourism boards and travel bloggers to increase your tour, and network with hotels or hostels that can refer clients your way. This will allow you to establish a reputation as a trusted and approachable walking tour guide who is all about offering memorable and unique adventure experiences. Here are some efficient social media strategies you can use:
- Post consistently: Provide relevant content regularly. For example, you can try posting photos, stories, or short videos from your tours. This will keep your audience engaged.
- Highlight unique experiences: Feel free to showcase behind-the-scenes moments on your social pages. Posting traveler testimonials or information about local traditions is also recommended.
- Engage with your followers: Don’t forget to promptly reply to comments, answer questions, and tag your accounts of your clients and visitors.
- Run promotions: Finally, social media is perfect for running giveaways, specials, and promotions for your tour agency and website. For example, you can offer a discount for referrals or free spots as an exchange for social shares.
One more step to promoting yourself as a tour guide online is directly connected with how well your website performs. With a well-optimized and fast site, you’ll be able to attract more potential clients while also keeping their attention with appealing visuals and a user-friendly site UI. This also helps with search engine optimization. Focus on clear navigation and engaging visuals. If you’re wondering how to become a tour guide and perform SEO, one of the key steps on this path is to optimize your site’s content by including relevant keywords (for example, “local walking tours in Brussels”). This also means writing blog posts that can assist your travelers with choosing a tour and answering their questions.
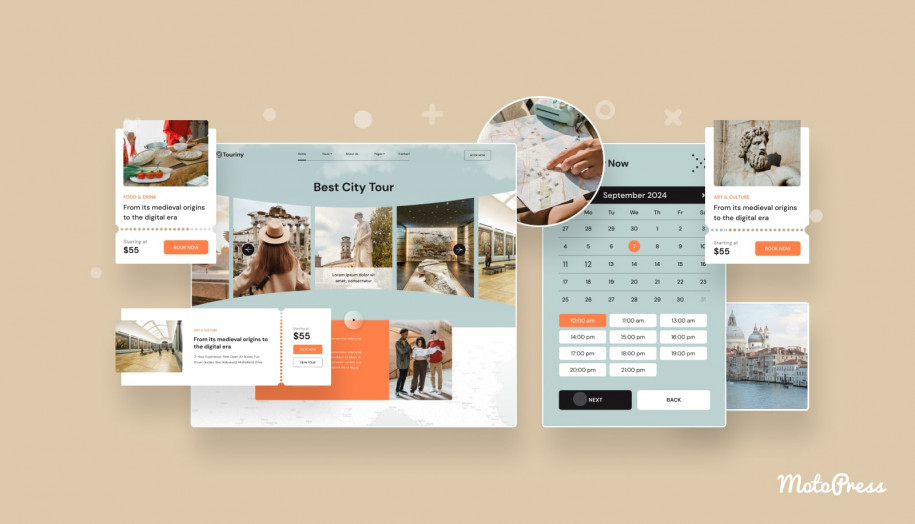
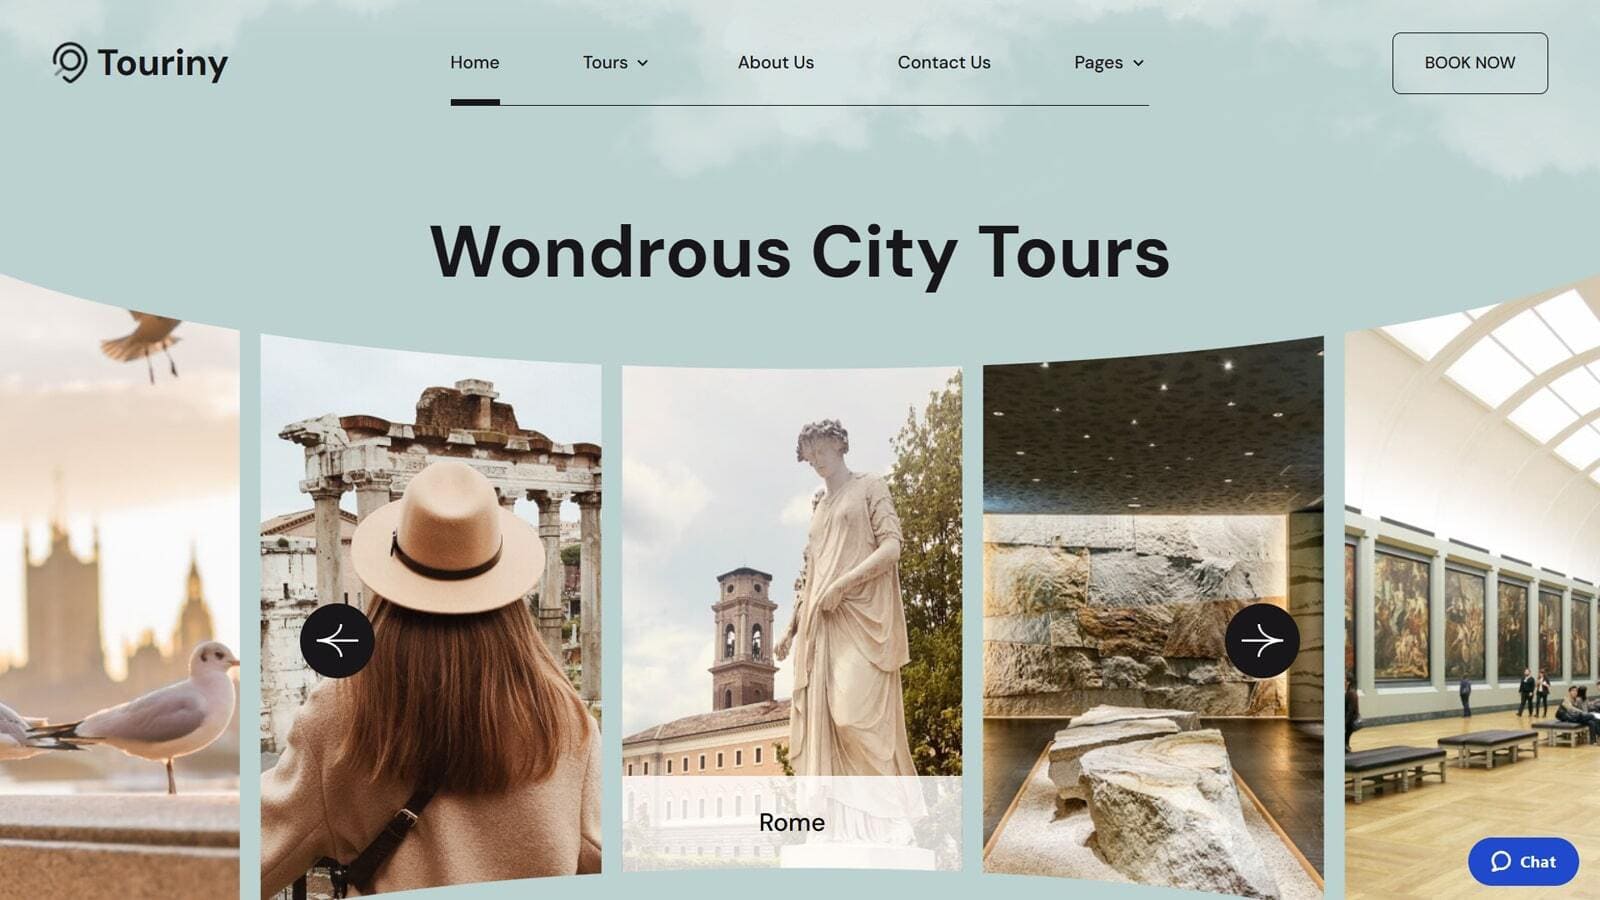
Touriny – A Responsive City Tour Booking Theme for WordPress
 If you are using WordPress, you get access to a diverse variety of solutions for tour guides, such as booking themes and plugins.
The platform is popular for a number of reasons, including its customization potential and ease of use. For those who are just getting started with building their own city tour company website, using one of the themes that already has the necessary pages and plugins would be a great option.
One of such solutions is Touriny travel booking WordPress theme, designed with guided city tours in mind. Besides, it is a great option if you wish to know more about how to start a tour guide business by using a well-developed website for selling travel itineraries.
Powered by the Appointment Booking plugin, the theme is perfect for selling tours and travel packages as it has individual pre-designed pages to present both.
With integrated galleries and blog layouts, you can also provide relevant content for your local guide website in no time. Being developed for Gutenberg, WordPress’s visual page editor, the theme is quite customizable and allows for easy creation of new pages. Most importantly, it has a flexible booking widget with an availability calendar and payment gateway support. This helps you manage tour bookings and gives your clients a way to safely pay for them within a few clicks. With this solution, you’ll save a lot of time on web development to spend it on learning how to become a tour guide instead.
Key features:
- 4 Tour & Blog page designs;
- Perfect for individual guides and tour agencies;
- Support of group tour bookings;
- Automated email notifications;
- Built-in Getwid plugin with over 30 content blocks for your site.
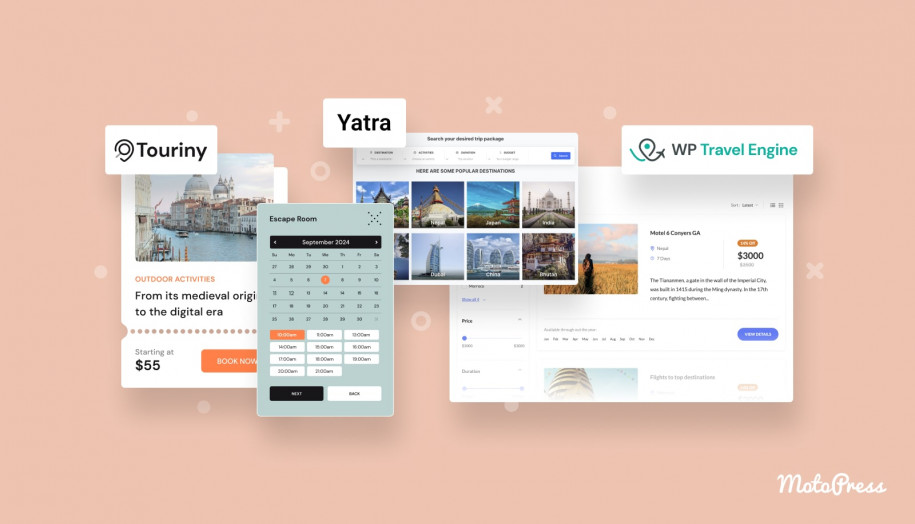
| Name | Developer | Price | Installations |
|---|---|---|---|
| Touriny | MotoPress | From $49/year | 165+ |
Setting up a Tour Guide Website with Touriny & Appointment Booking
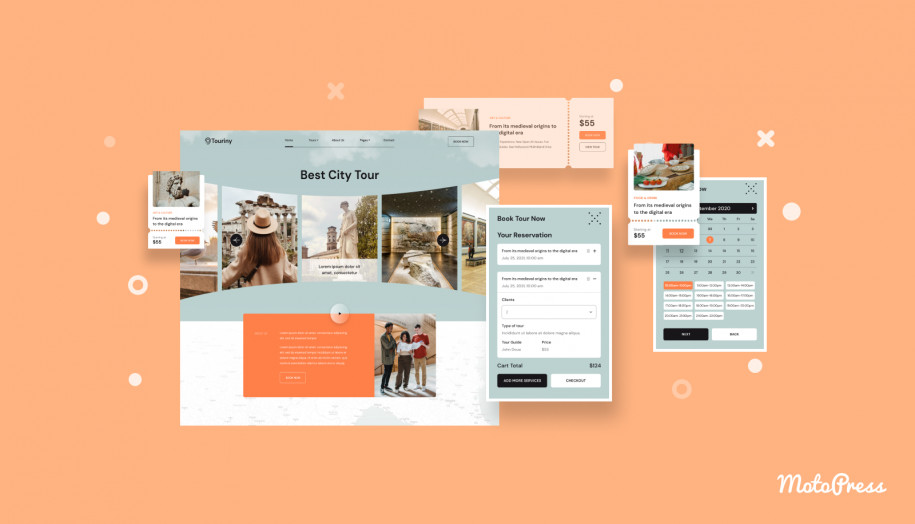
As you see, Touriny is quite functional and well-designed, especially when it comes to presenting sightseeing tours and excursions. After downloading and installing the theme, you can start customizing it and adding your content to the Blog, About, Gallery, and Team pages, as well as creating your own layouts to present your day trips and excursions. The built-in Appointment Booking plugin elevates the tour & booking management experience to a new level. With it, you can create individual booking schedules for your tour guides, add and customize excursions, and local destination pages to provide unique experiences for your potential clients. Let’s look at how to configure this plugin below to get the most out of the Touriny theme.
Step 1. Adding Tours
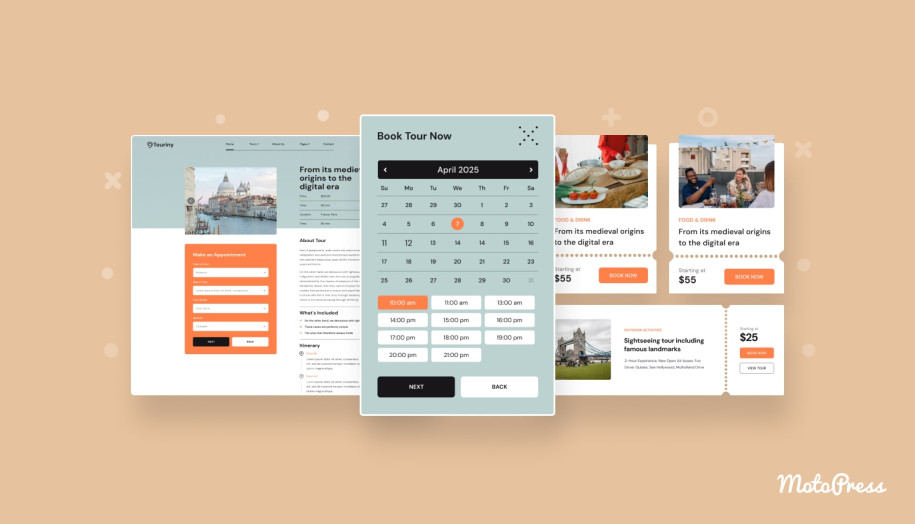
One of the first steps to take after the theme installation is to add tours and excursions using the Appointment Booking plugin if you want to know how to become a tour guide. Similar to all customization and content editing actions, this and other steps are performed in the WordPress dashboard. To start adding local guides, walking tours, and other kinds of bookable activities with the Appointment Booking plugin, do the following:
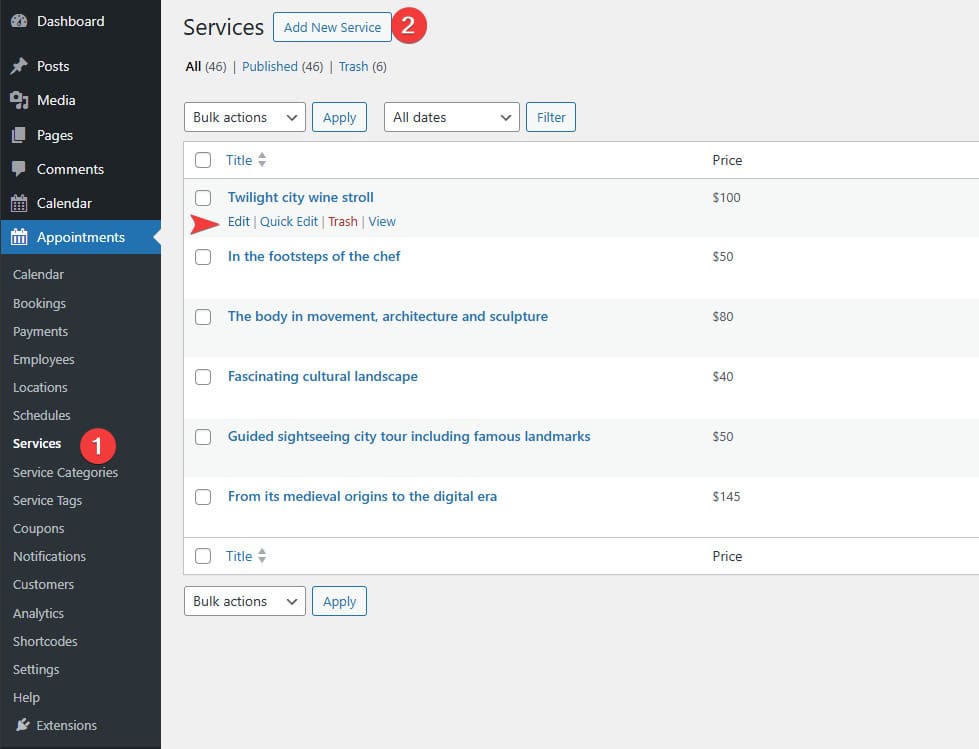
- In the dashboard, navigate to the Appointments – Services tab. There you will see the list of excursions added with the Touriny installation.
- To edit any of them, hover over a chosen excursion or city tour and press Edit. Alternatively, you can create a new bookable activity by pressing the “Add New Service” button at the top of the page.

- A Gutenberg editor page will open with ready-made content or a blank page, depending on your choice. You can do any edits you need to change how a tour is advertised and shown on your website.
- Scroll down to change any booking settings of the excursion. For example, in the Service Settings section, you can edit:
- Price & duration of an excursion;
- Buffer times and intervals;
- Scheduling window for a tour;
- Time before booking.

- Using this tab, you can set up group bookings for your day trips and walking tours. To start, tick the “Group Reservations” checkbox. Here, you can also set:
- Minimum and maximum capacity settings for group booking;
- Price multiplication based on the number of booked spots on a city tour;
- Bookable item name (e.g., places, spots, seats).
- On this page, you can also set one or several tour guides responsible for the current tour or excursion just by clicking a checkbox near their name if you have already added a tour guide in the “Employees” tab.
- Additionally, the plugin allows you to enable deposit payments for the current tour in the “Deposit Settings” section, as well as add and pick categories and tags on the right sidebar for easier tour search.
- After finishing editing the new or existing tour, press the “Save” or “Publish” button to make the changes visible.
Step 2. Adding Tour Guides
Adding a tour guide is essential for proper tour booking management and discovering how to become a tour guide even before you add a trip, tour, or excursion. To add guides and specify other details regarding them, follow these instructions:
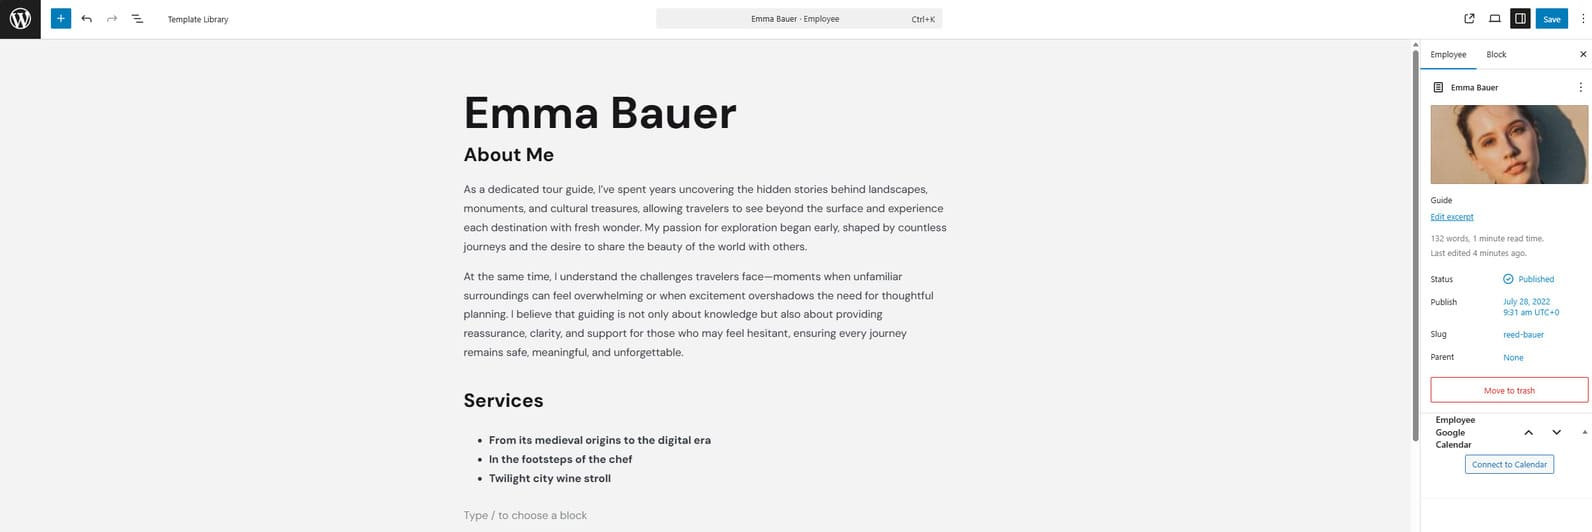
- Open the Appointments – Employees tab.
- Press the “Add New Employee” button to add a tour guide or choose an existing one provided by the Touriny theme.
- On the opened page, you can start by specifying the first and last names of your guide as well as adding other details, such as a short description.
- Under the Gutenberg editor space, you can add necessary details for a guide. They include:
- WordPress user email (used for creating a profile for a tour guide on your website);
- Phone number;
- Social networks to be displayed on the tour guide page when it’s published;
- Additional information.

- You can also add the featured image for the guide page on the sidebar.
- After creating a user profile in the users tab of the WordPress dashboard, the registered tour guide can open this page in the employees tab to connect to Google Calendar. You can read more about using this integration for your city tour company website here.
Step 3. Adding Excursion Destinations
You may be planning to use Touriny and Appointment booking for selling travel itineraries & managing city tours. After learning how to become a tour guide, it is recommended to add excursion destinations using the plugin’s dashboard. These locations can be used later by clients when submitting a booking. Here’s how you can do it:
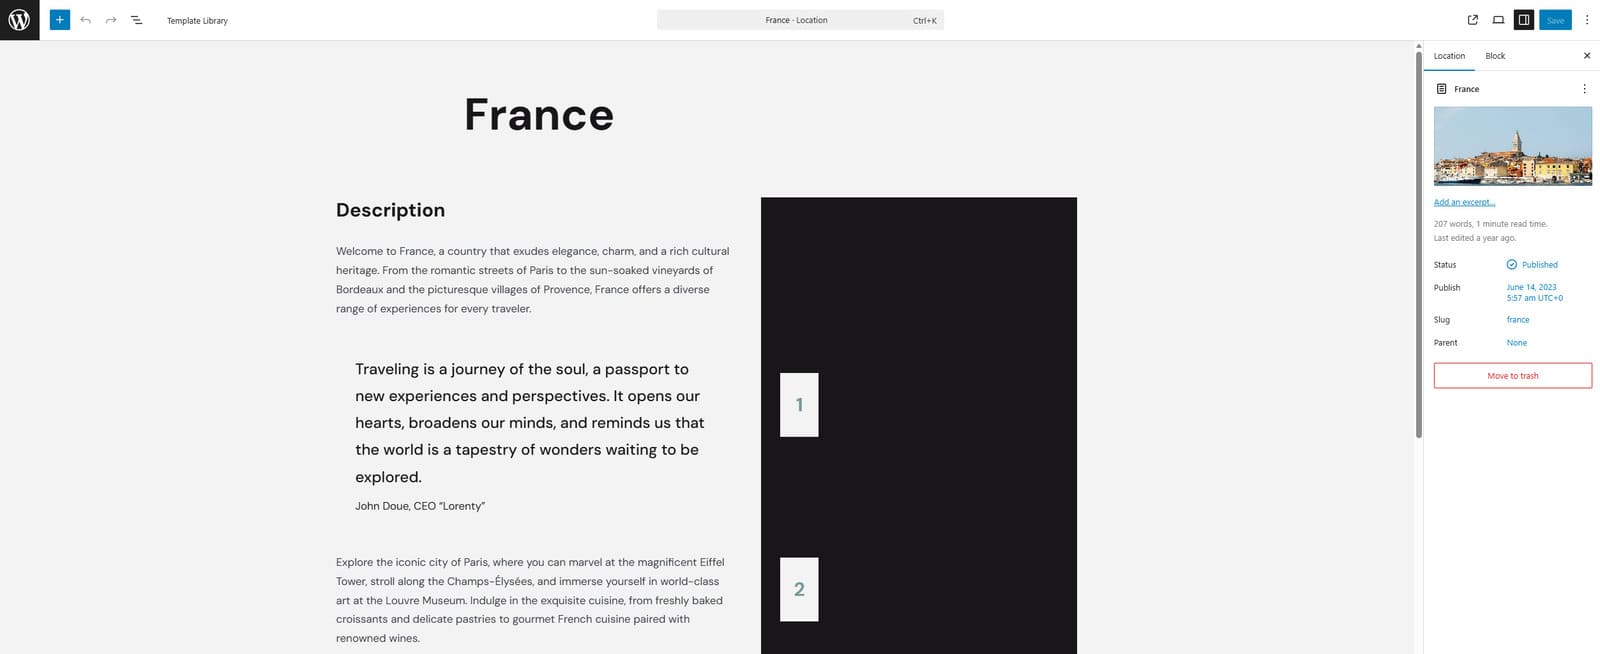
- Open the Appointment – Locations tab.
- Press the “Add New” button to create a new location or choose an available one.
- In the opened editor page, write the location name and description. Feel free to use Gutenberg blocks to customize how the destination page will look when published.
- Press the “Publish” or “Save” button to make your changes public.
Step 4: Managing Tour Guide Schedules
Even if you are planning to run your tour guide website as a single provider, it is necessary to set up your schedule with the Appointment Booking plugin to manage your availability efficiently.
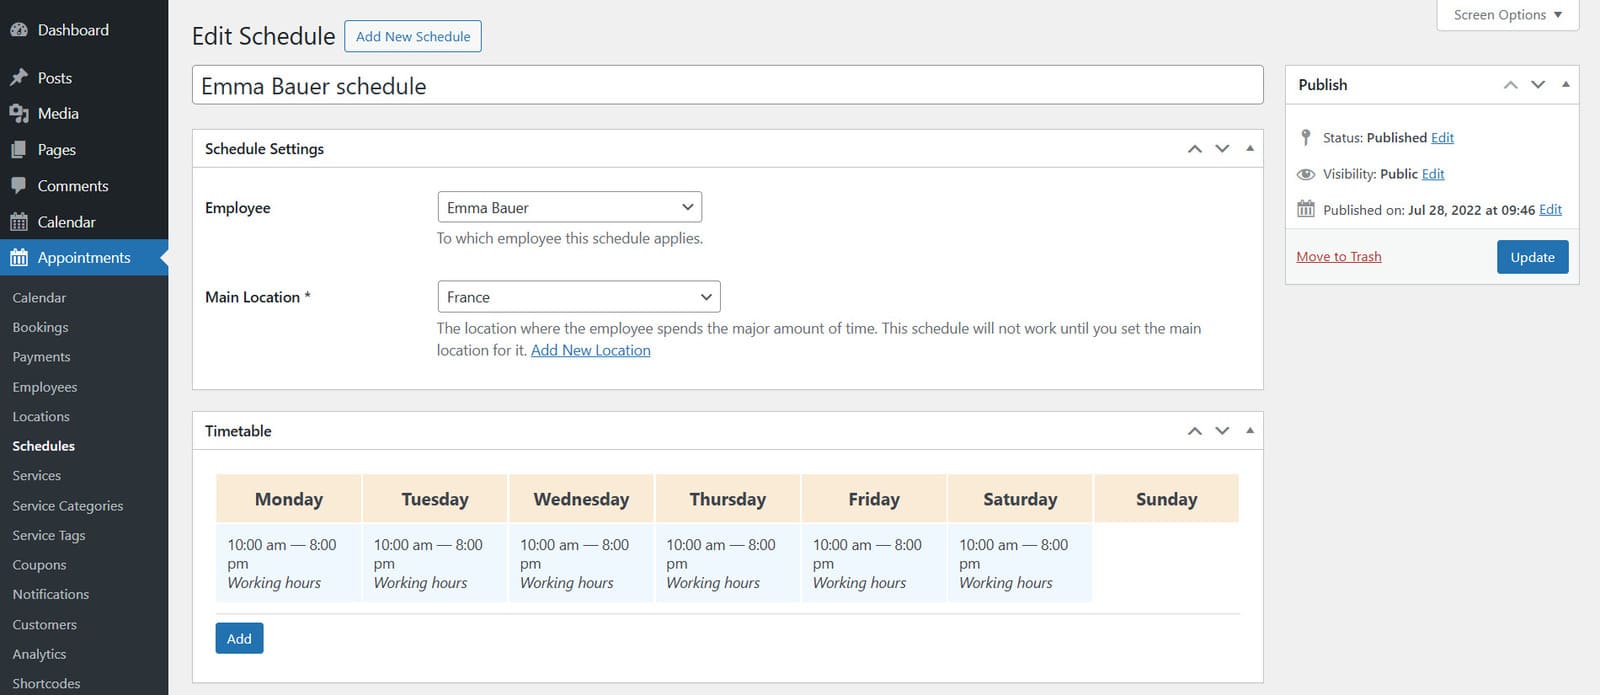
- Open the Appointment – Schedules tab.
- Press the “New Schedule” button to add a new schedule.
- Pick an employee and a location you want to connect the schedule to in the Schedule settings section.
- Using the timetable and pressing the “Add” button, you can set up your or your guides’ schedule for each day individually. Locations for each day can be varied and defined as well. Here’s what you can specify:
- Day of week;
- Period of time;
- Activity type (Working hours, lunchtime, or break);
- Location.

- Below on the same page, in the “Days Off” and “Custom Working Days” sections, you can configure additional availability settings to ensure that your booking schedule meets your needs and expectations.
- On the right, press the “Publish” button to make all schedule changes final.
Step 5. Enabling Email Notifications
Informing your clients of any status changes regarding their booked excursions is also a key part of proper tour management and learning how to become a tour guide. Luckily, Touriny can help you with it, too.
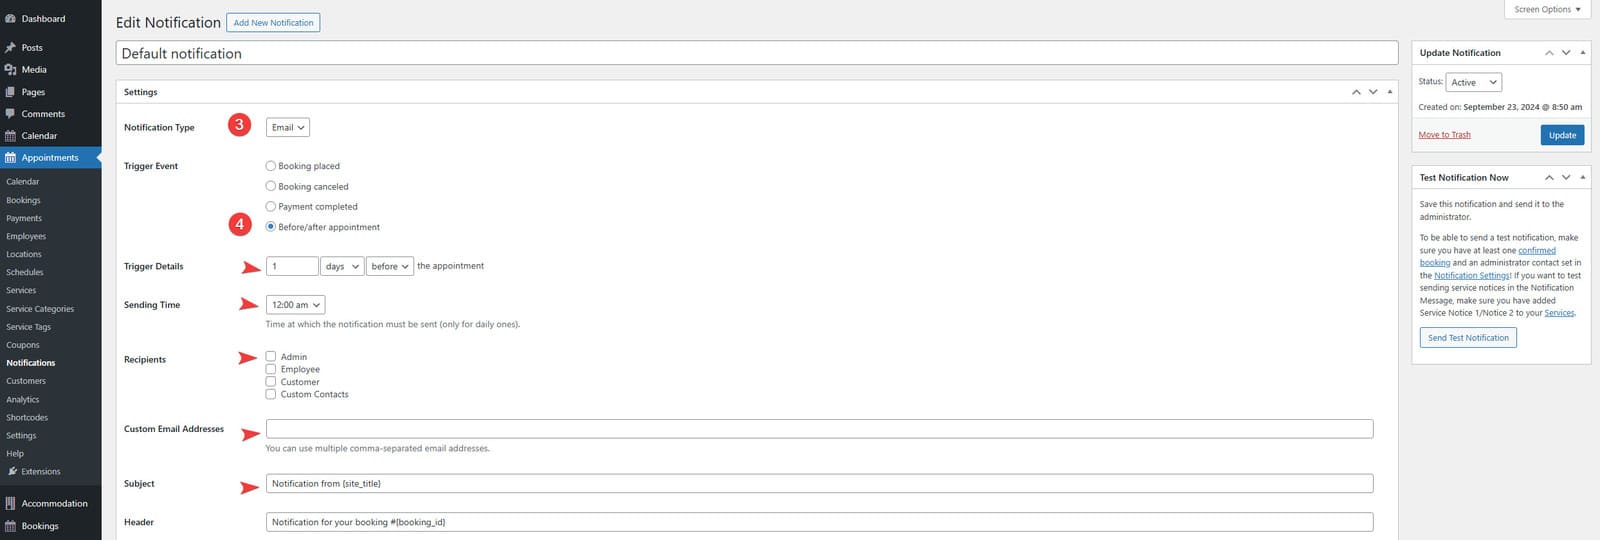
- Open the Appointments – Notifications tab in your WordPress dashboard.
- Press the “Add New Notification” button at the top of the page.
- On the new page, you can specify what type of notification you want to create. For starters, add the notification title to easily know what it is for.
- By default, you can only create automated email notifications. Using a Twilio add-on for Appointment Booking, you’ll also be able to add SMS notifications on the same page.
- Using various settings on the page, you can set the following:
- Notification trigger (Before/after appointment, Booking placed, canceled, completed);
- Trigger details and sending time;
- Recipients;
- Custom email addresses;
- Subject and header;
- Notification message.

- In the message field, you’ll see a default notification template, which you can freely edit and add tags – parts of the notification that can automate its contents for various cases. For example, they can help you insert the traveler’s name automatically or specify the booking ID without writing it manually every time.
- On the right of the page, you can also set the notification status as active or disabled. Additionally, here you can test it before adding it to your tour booking system.
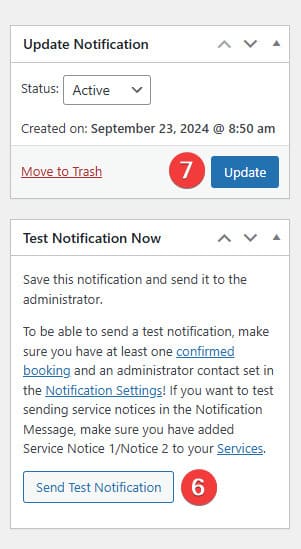
- Finally, press the “Create” button to finish the notification editing.
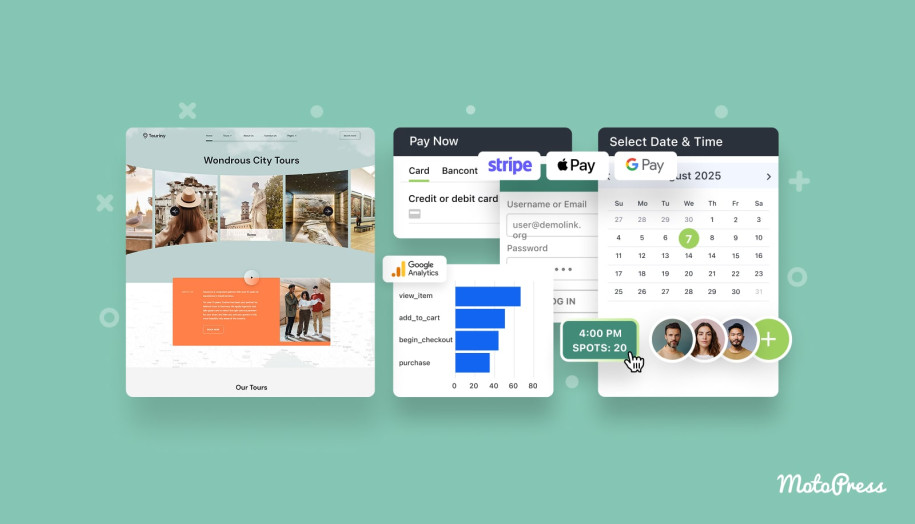
Step 6. Configuring Payment Methods
Do you want to know how to become a tour guide and allow travelers to pay for excursions or local culture tours right away? The Appointment Booking plugin supplied with the Touriny theme allows you to configure online payment integrations included with it.

- Open the Appointments – Settings tab.
- On the page that appears, navigate to the “Payments” tab. Here you will see multiple payment methods:
- Press the “Manage” button to edit the desired payment methods. In this example, we’ll configure the Stripe integration for secure online payments.
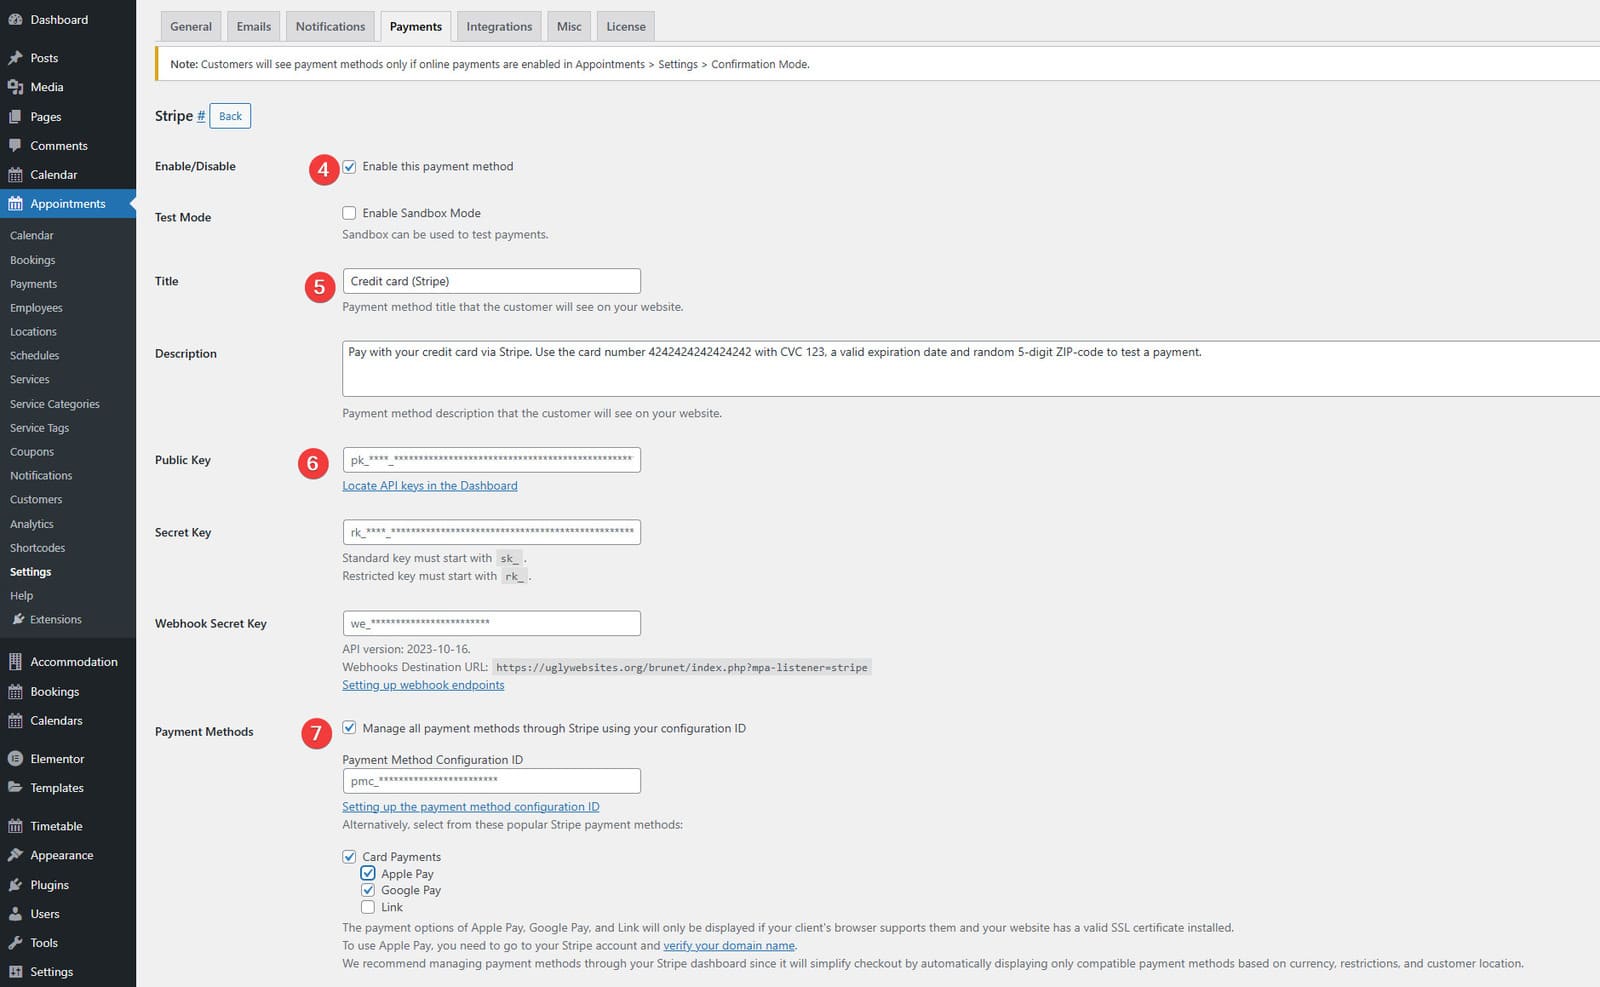
- After clicking “Manage” across Stripe integration in payment settings, you’ll see all available options for it. First of all, enable this payment method with the checkbox in the “Enable/Disable” section.
- Below on this page, you can edit the title and description of the Stripe payment method to define how it will be displayed during tour booking.
- For the method to work, you’ll need a registered Stripe account, where you can get the API keys required for its work (public key, secret key, and webhook secret key). You can read more about it in the Appointment Booking plugin documentation here.
- In the Payment Methods section, you can choose how your travelers will be able to pay for the tours using Stripe. With it, multiple payment methods are available, so to choose a specific configuration, you’ll need a payment method configuration ID. You can get into your Stripe account.
- At the bottom of the page, the plugin allows you to set a checkout locale if necessary.
- After providing the necessary Stripe data, press the “Save Changes” button to finish editing.
Step 7. Adding Blog Posts

After setting up the tour booking functionality, you may want to share some relevant and SEO-ready content on your blog to optimize your website. This will also help your potential clients and travelers who are looking for tips and recommendations on how to become a tour guide, the latest walking tours, and unique experiences. Here’s how you can create new blog posts in a few simple steps:
- In your WordPress dashboard, open the Posts tab.
- Press the Add Post button to start creating a new blog post on your website.
- You will see a blank Gutenberg editor page. Add or write necessary blog content. You can share information about new and popular walking tours, sightseeing tips, local culture, food, and other facts and information your audience might be interested in.

- Don’t forget to add images and videos to make your post more visually appealing. This can be done by pressing the plus button on the top left of the editor page and choosing Image or Video blocks from the Media section of the block inserter. This way, you can also add other post elements, such as tables or lists.
- After finishing with the post editing, pick a category and tags for your article or create new ones using the sidebar on the right. Here, you can also add a featured image to make the blog post more noticeable on your website.

- If you want to make your post SEO-ready, we recommend installing SEO plugins, such as Yoast SEO. With them, you can add a focus keyword to your post and change how the post is shown in the search results by editing the post slug, meta title, and meta description. Don’t forget to add relevant keywords throughout your post’s content to make sure it is optimized.
- After finishing all content editing, press the “Publish” button to make your post public.
Conclusion
We hope this short guide has helped you to find out more about how to become a tour guide. Whether you are just starting out or already an established professional looking for more exposure, following the mentioned recommendations and using WordPress booking solutions can be more than just useful. In addition to that, using themes and plugins like Touriny and MotoPress Appointment Booking can help you with:
- Tour listings: By creating and managing tour listings online with WordPress, you can easily present new and popular itineraries, update prices, and add quality images.
- Automated bookings and secure payments: With modern booking plugins for tour guides, it is easy to avoid manual work with confirming tour bookings, while also providing secure payment experiences thanks to Stripe and PayPal integrations.
- Availability management: Even if you work solo or are still learning how to be a tour guide, with solutions by MotoPress, you’ll find it easy to manage availability and update tour schedules without having to manually code or remember everything you need to take care of.
- SEO and increased performance: Ensuring the best site performance and easy-to-follow structure will help your site be displayed higher in search results and potentially attract more travelers.
- Review integration: By adding client reviews and testimonials from popular OTAs, you can let your visitors know right away why they should choose your tour services. Besides, positive reviews can easily improve the reputation of your website where you’re selling travel itineraries.