How to Add a Real-Time Availability Calendar to Your WordPress
Table of Contents
Looking for a way to implement a WordPress availability calendar without having to develop something specific for your business? You are not alone. Whether you need a flexible system for managing and scheduling equipment rentals, providing cars, accommodation, or medical appointments, having an availability calendar WordPress solution is recommended. In today’s post, we’ll look at one of such solutions, WordPress Booking Calendar by MotoPress.
You’ll learn how its flexibility can serve you depending on your business niche, the type of bookings you may need to manage, and other options your online presence may need to succeed with online scheduling.
What is MotoPress WordPress Booking Calendar?
 Before we dive deeper into the options of this plugin, let’s learn more about it first.
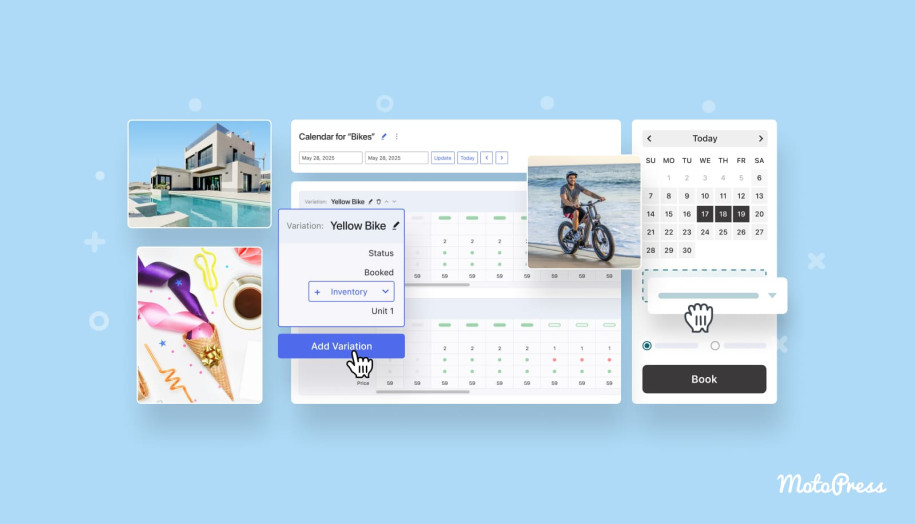
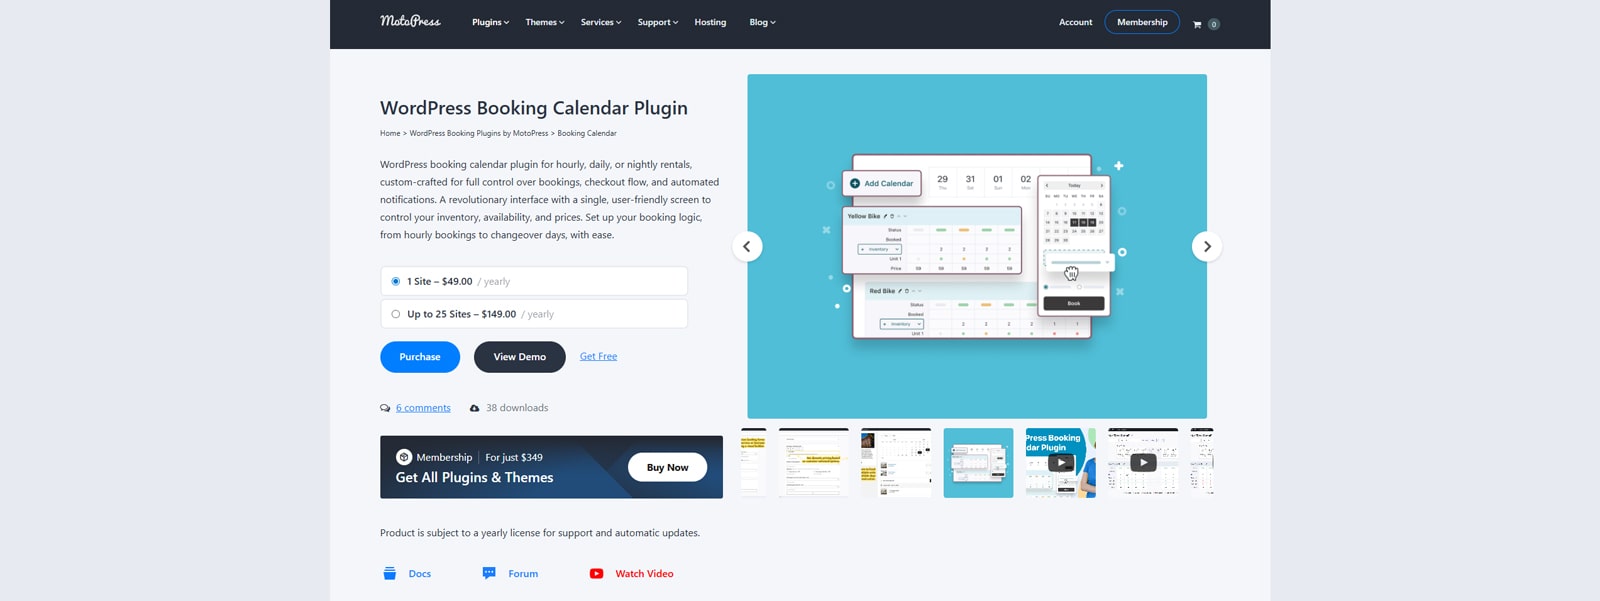
WordPress Booking Calendar by MotoPress is an affordable and user-friendly solution designed to help you manage nearly any kind of rental. From boats and bikes to vacation rentals and venues, this plugin can be used to manage and schedule anything you need. It allows for smart inventory management, multiple types of supported rentals, and an easy-to-use calendar for booking management.
However, these are just some of the advantages to expect from this availability calendar WordPress solution.
The plugin also provides easy embedding, allowing you to use shortcodes and an integrated Gutenberg block to easily show a booking calendar on any page and accept bookings on your website. While this MotoPress plugin doesn’t yet support online payments, it is expected to be added later this year as part of regular updates. But what if you need access to payment integrations immediately? In that case, we recommend exploring the premium versions of the Hotel Booking and Appointment Booking plugins by MotoPress, which support PayPal, Stripe, and other payment gateways.
As for the WordPress Booking Calendar, it has a free version you can try just by downloading it from the WordPress plugin catalog. It is a perfect WordPress availability calendar option for seeing if it fits your business needs.
Key features:
- Visual calendar management interface;
- Automated booking notifications;
- Dynamic pricing support;
- Booking form builder;
- Customizable booking logic.
| Name | Developer | Price | Installations |
|---|---|---|---|
| WordPress Booking Calendar | MotoPress | Free or from $49/year | N/A |

3 Ways to Add a Booking Calendar to Your WordPress Website
 So, how to add a real-time calendar to your WordPress website? It’s quite simple. First of all, ensure that the WordPress Booking Calendar by MotoPress is installed and activated. For what’s described in this article, you can also use the Lite version of the plugin, as we’ll take a closer look at booking availability and calendar settings that can be accessed for free. We’ll go over all three booking modes the plugin provides – hourly, daily, and nightly bookings.
How to Enable Hourly Bookings for Your Rental Space
After installing the availability calendar WordPress plugin, you can get started with creating a calendar just by navigating to the Calendars tab in your dashboard. It appears after your plugin is activated and allows you to manage all calendars you create, view, and edit them. With an unlimited number of calendars supported, you can create a separate calendar for each type of booking. We’ll start with hourly bookings to show how the WordPress availability calendar plugin works. This type of Booking can be suitable for renting out:
- Photography studios;
- Meeting rooms;
- Equipment (kayaks, bikes, scooters, etc);
- Parking spaces;
- Yoga rooms.
Step 1. Adding the Hourly Calendar
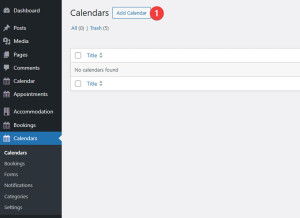
- Add a calendar: First of all, press the “Add Calendar” button in the upper left corner of the page to get started. This step is required for all types of bookings, as here you set up the calendar you’ll be working with.
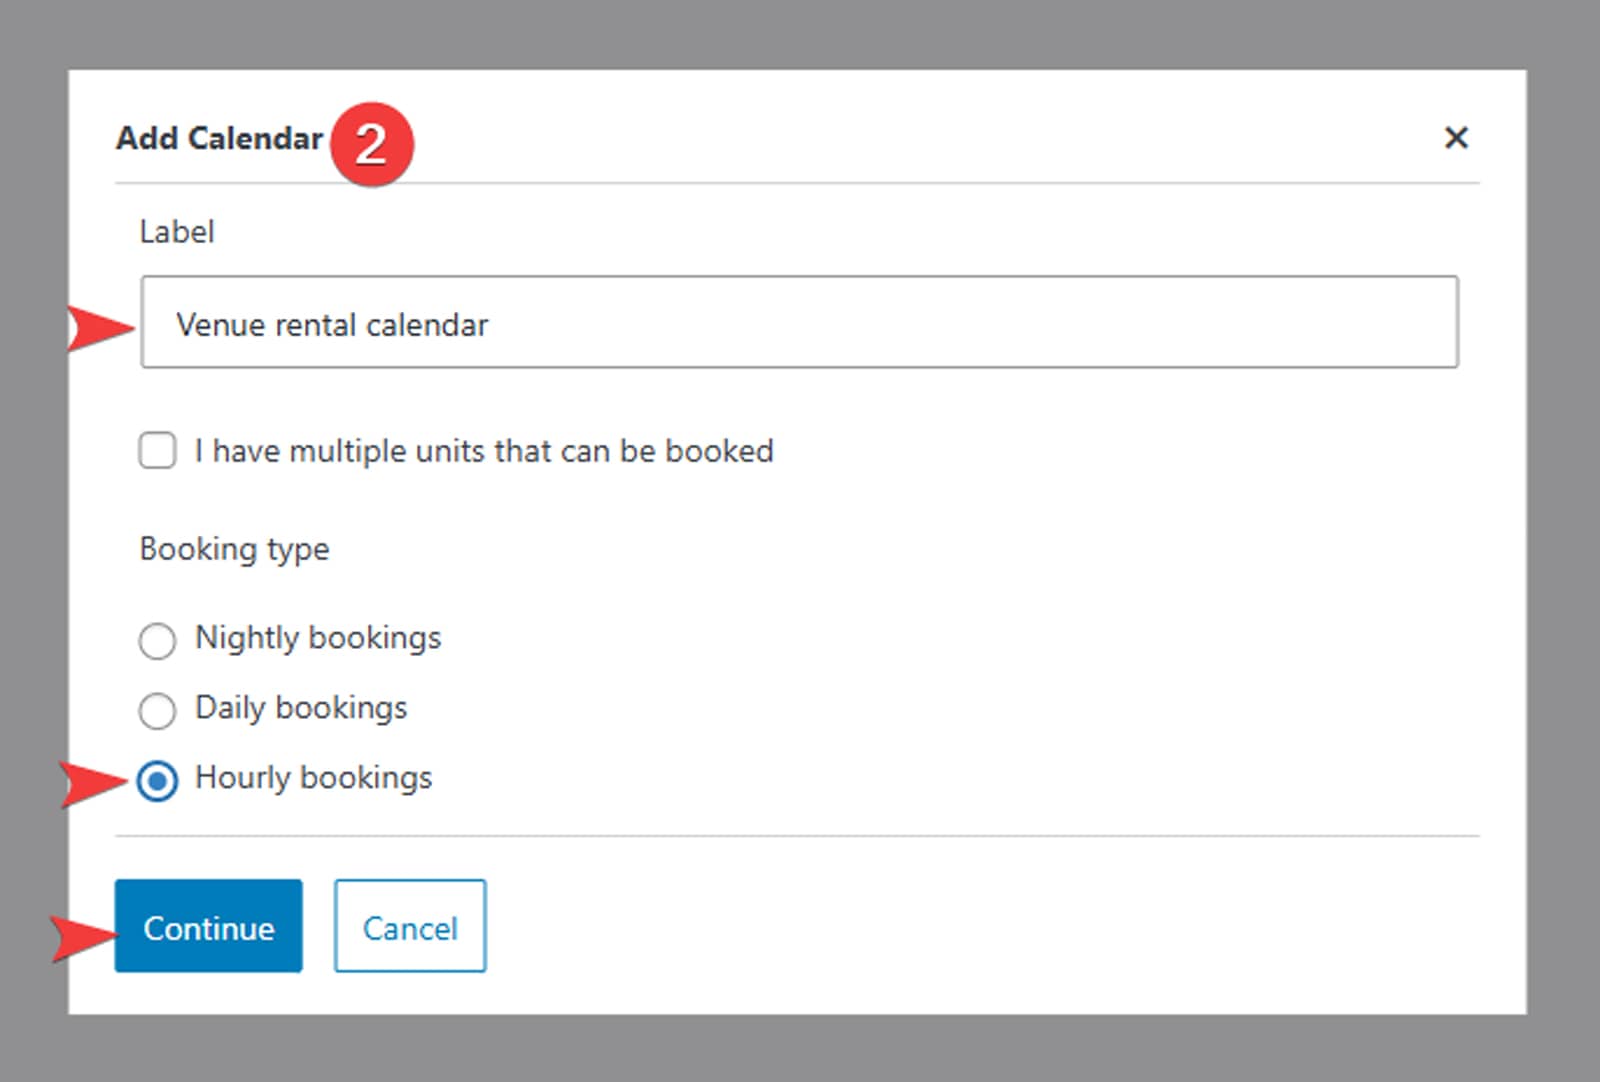
- Choosing the calendar type: A new modal window will appear where you can configure the basics of your calendar.
- Provide the calendar label: In the “Label” text field, provide the name of your calendar. We recommend using something short and easy to understand for more comfortable calendar management.
- Choose the booking type: The 3 booking types of the WordPress calendar plugin define how your calendar will look and function. This plugin supports nightly, daily, and hourly bookings. For this part of the guide, we’ll choose hourly bookings. Additionally, you can make multiple units bookable if it is required for your calendar.
- Finish editing: Press “Continue” to proceed with creating the calendar.
Step 2. Adding Rentable Units
 After filling out the details of the WordPress event calendar in the “Add calendar” modal window, you’ll see the WordPress availability calendar page in the dashboard. If you opened this page for the first time, you’ll see the quick start guide – a series of popups that will guide you through the calendar functionality. The page combines the calendar with variations, a feature that allows you to manage the inventory and define what units are booked or rented out, open for rental, or unavailable. But first, you need to add them. To do so, press the plus button next to the “Inventory” section. In the sidebar that appears, you can add the following:
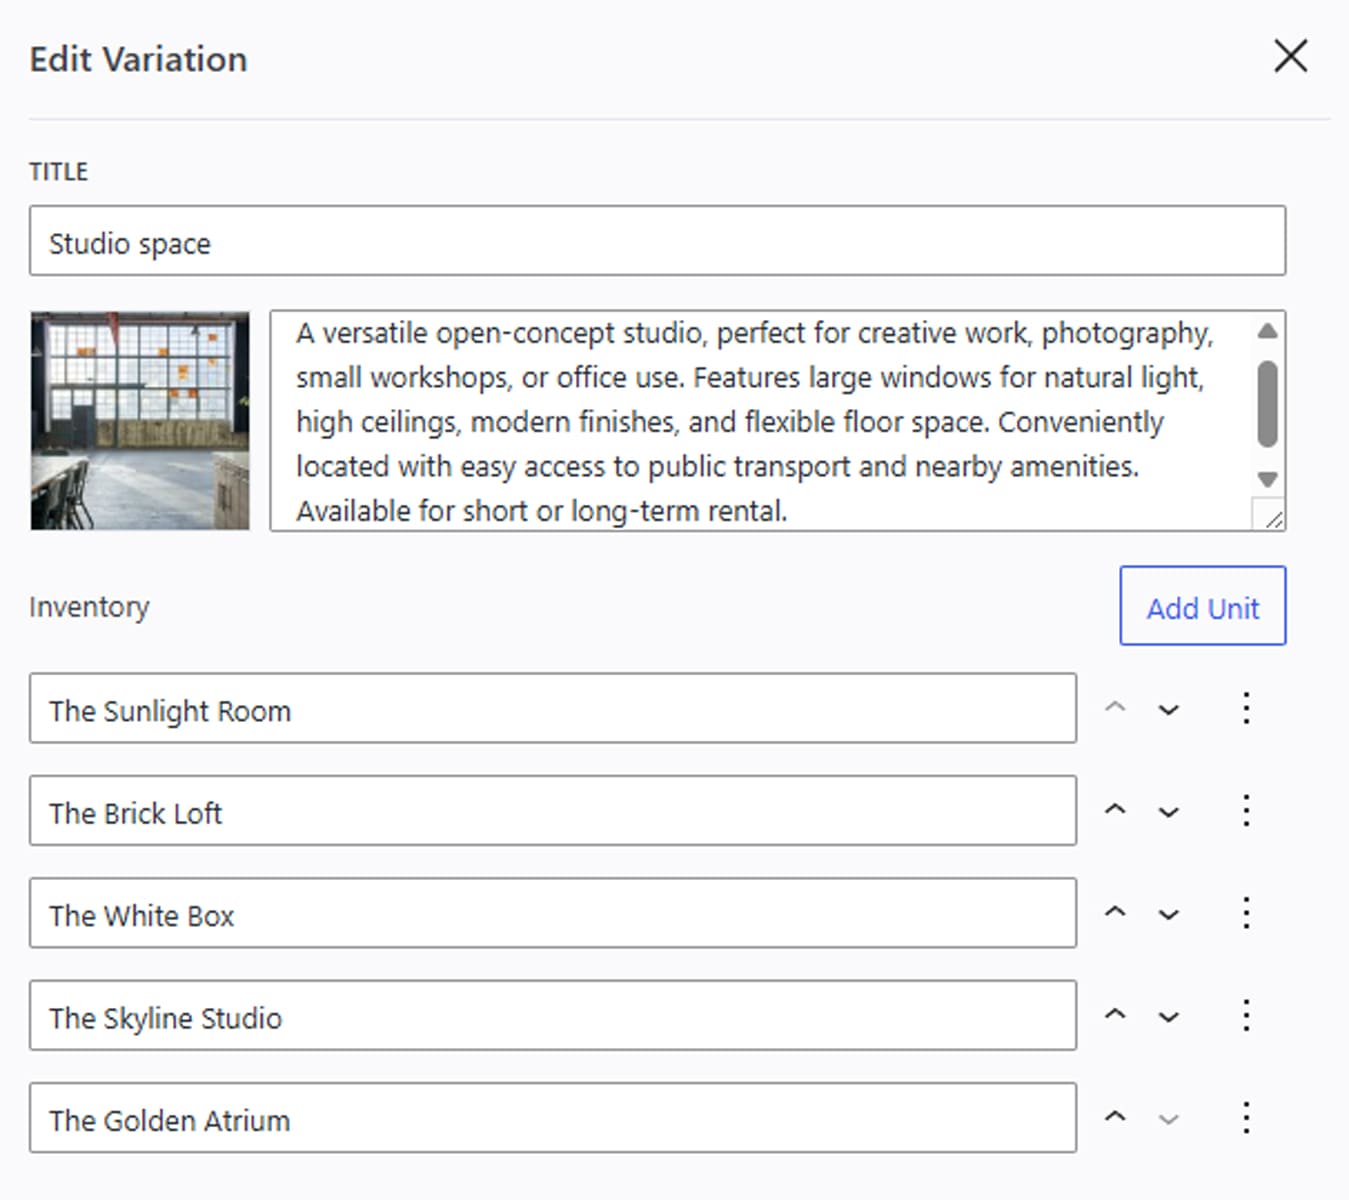
- Variation title, e.g., “Studio space“
- Variation description and image;
- Inventory section, where you can add, manage, or delete units by pressing the corresponding buttons. Don’t forget to press “Save” to add units to the variation.
Step 3. Adding Timeslots
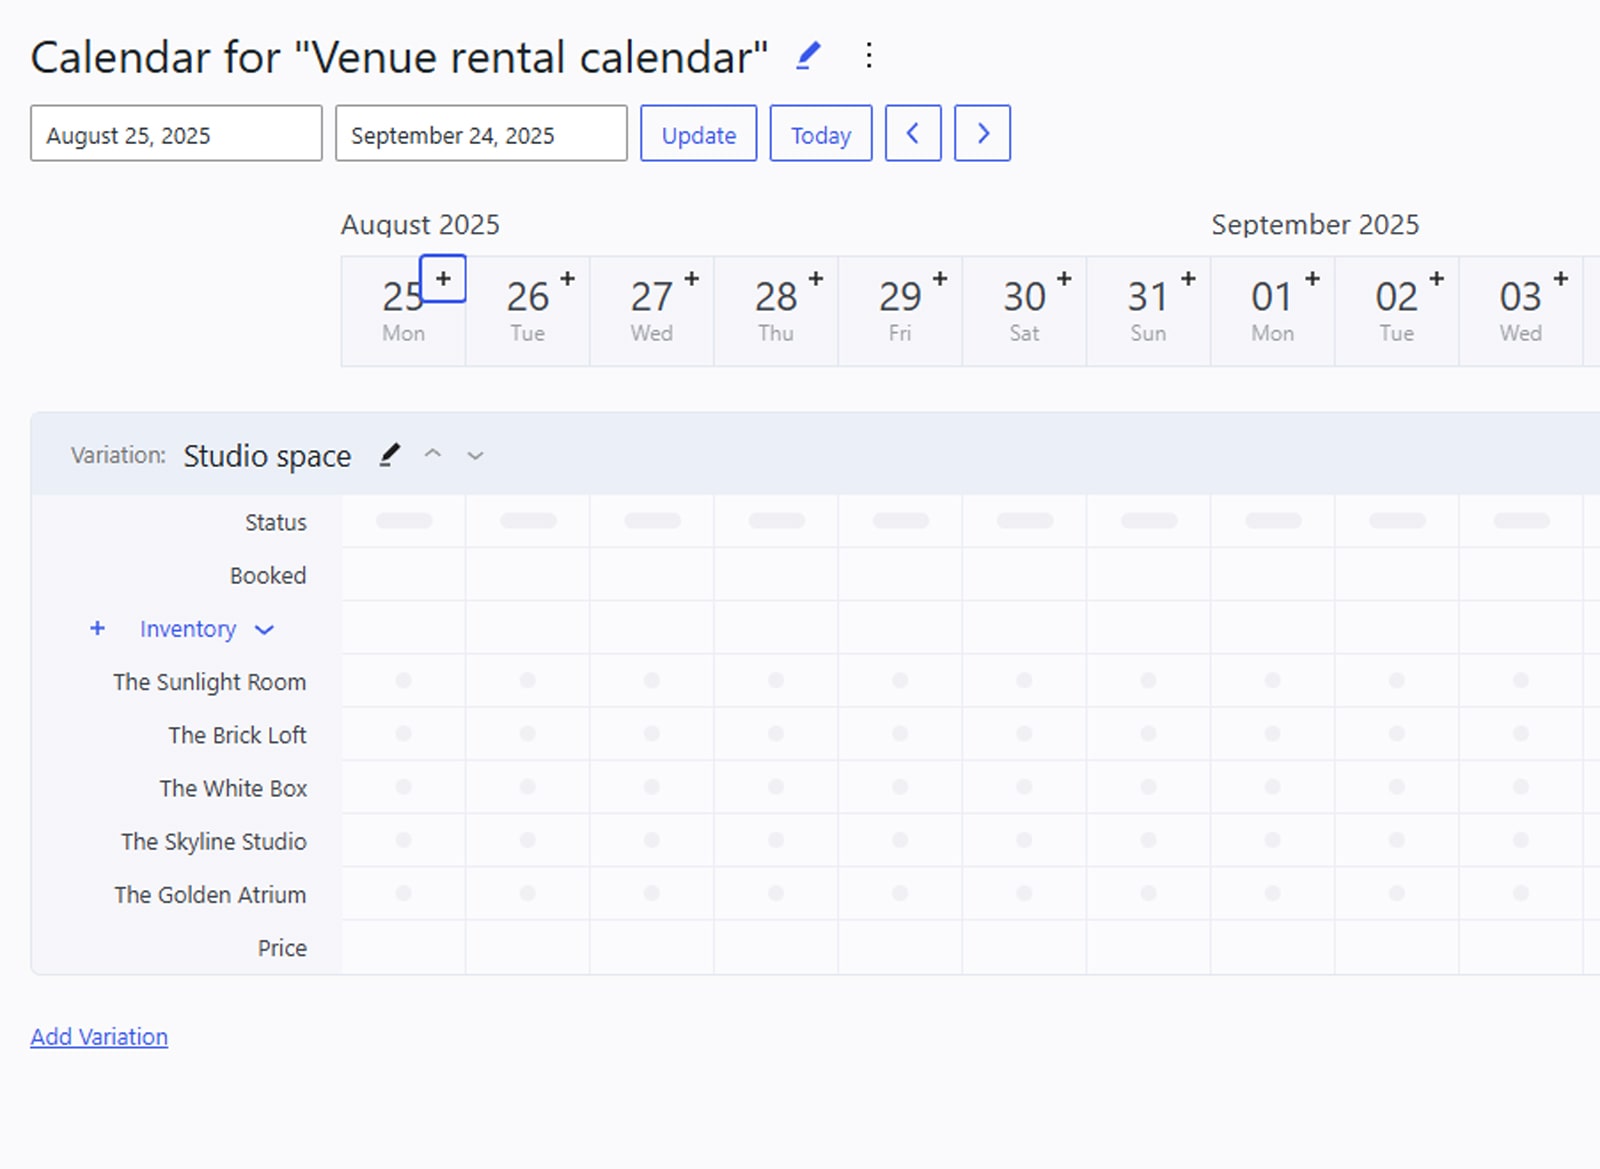 The next step is connected with adding a timeslot that will be later shown as available during booking on your website with the best WordPress calendar plugin. In the upper part of the page where the calendar is located, press the plus button near the desired date. This will allow you to:
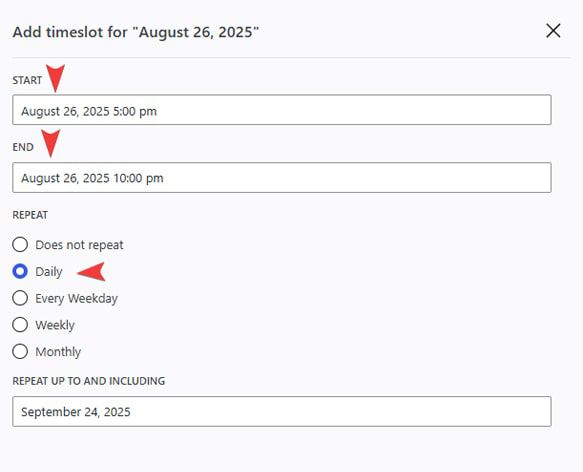
- Define the start/end time and date of a timeslot.
- Enable, disable, and define repeatable timeslots for easier rental item management.
- Press “Save” to display the timeslot changes in the calendar.
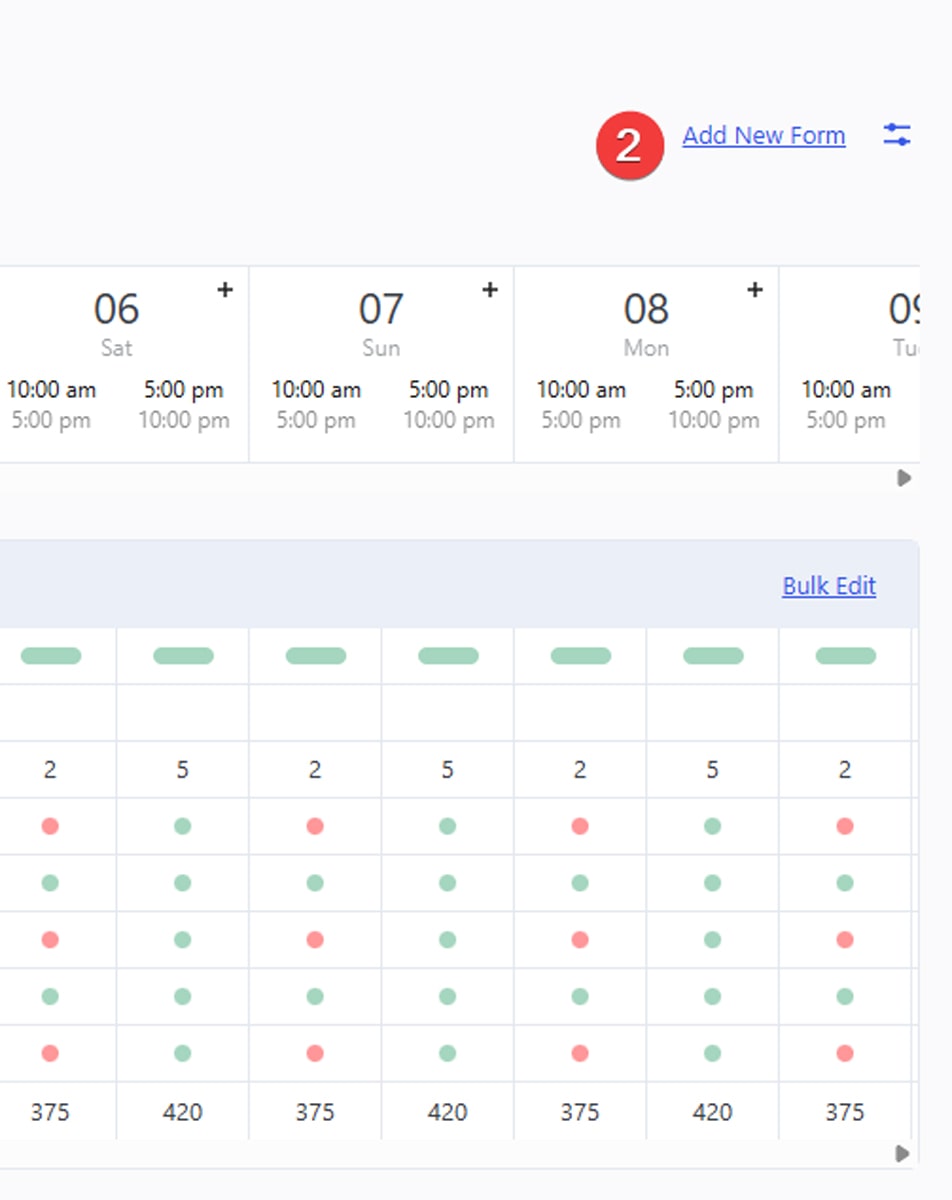
Step 4. Editing Availability
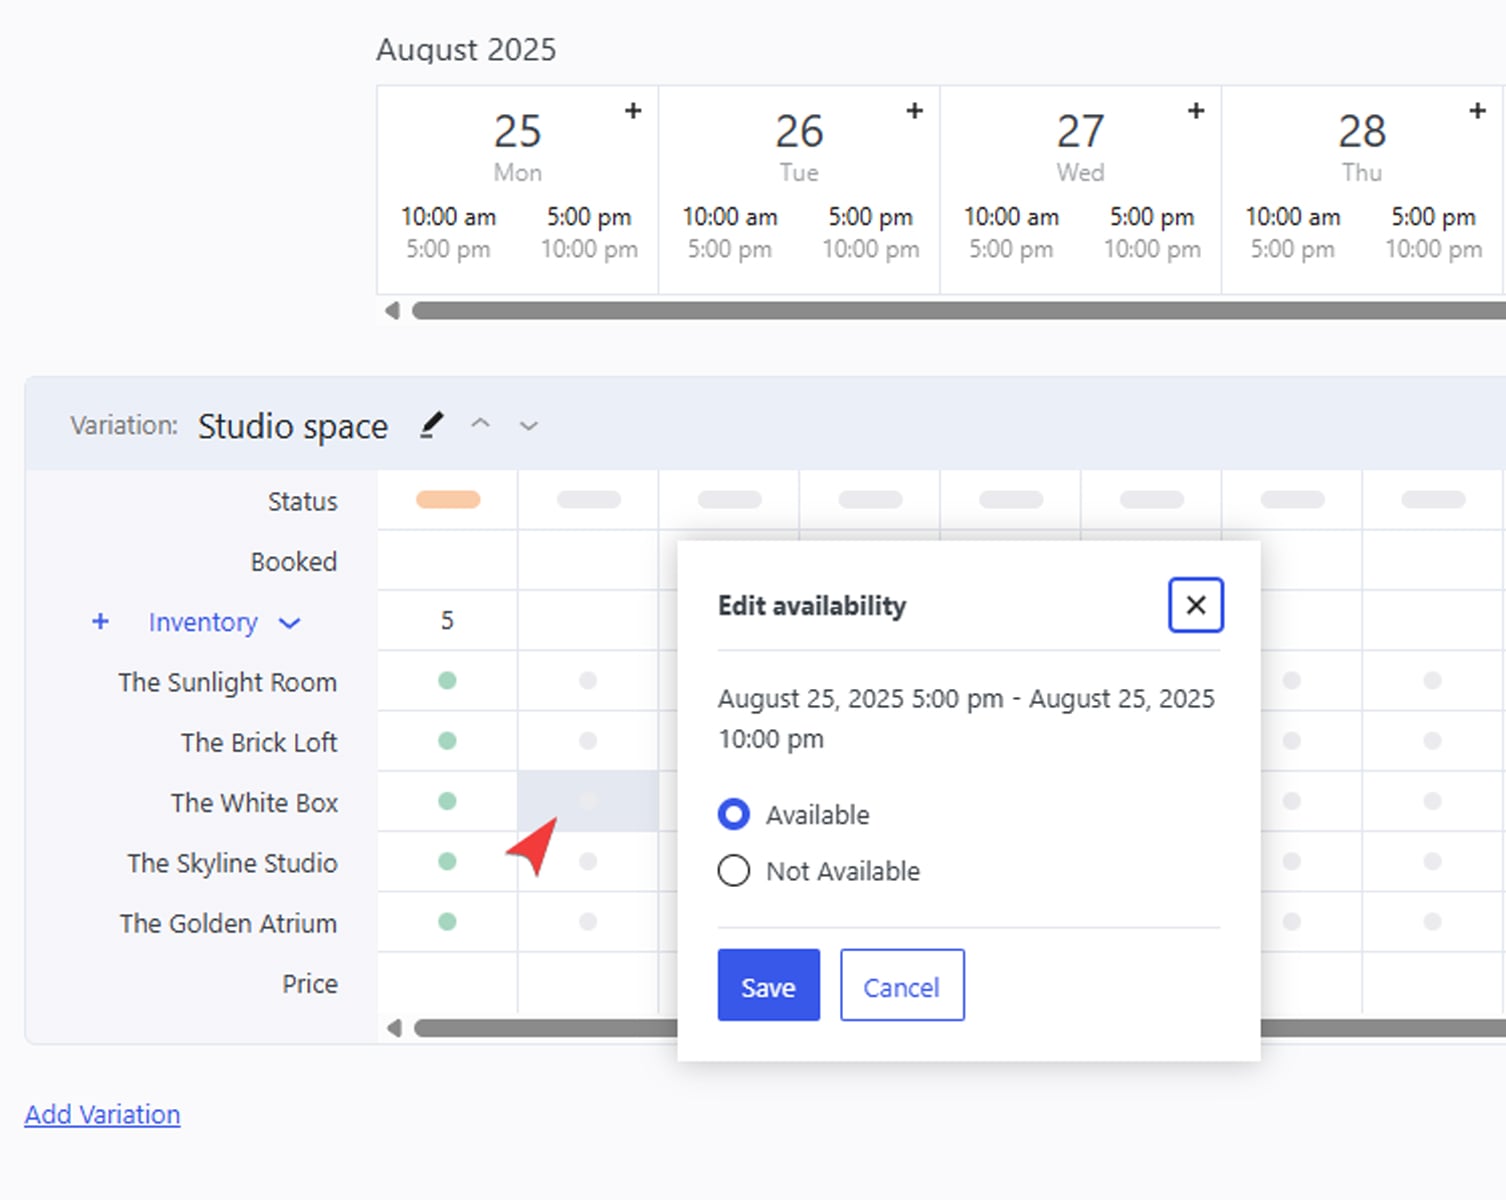 After adding all necessary units to your variations, you’ll need to edit their availability. You can do it manually in a few simple steps using the WordPress availability calendar:
- Enable item status by pressing the “Status” selector for the desired dates and timeslots.
- By pressing the gray dots in the Variation table across each bookable item, you can set up their availability as Available or Not available.
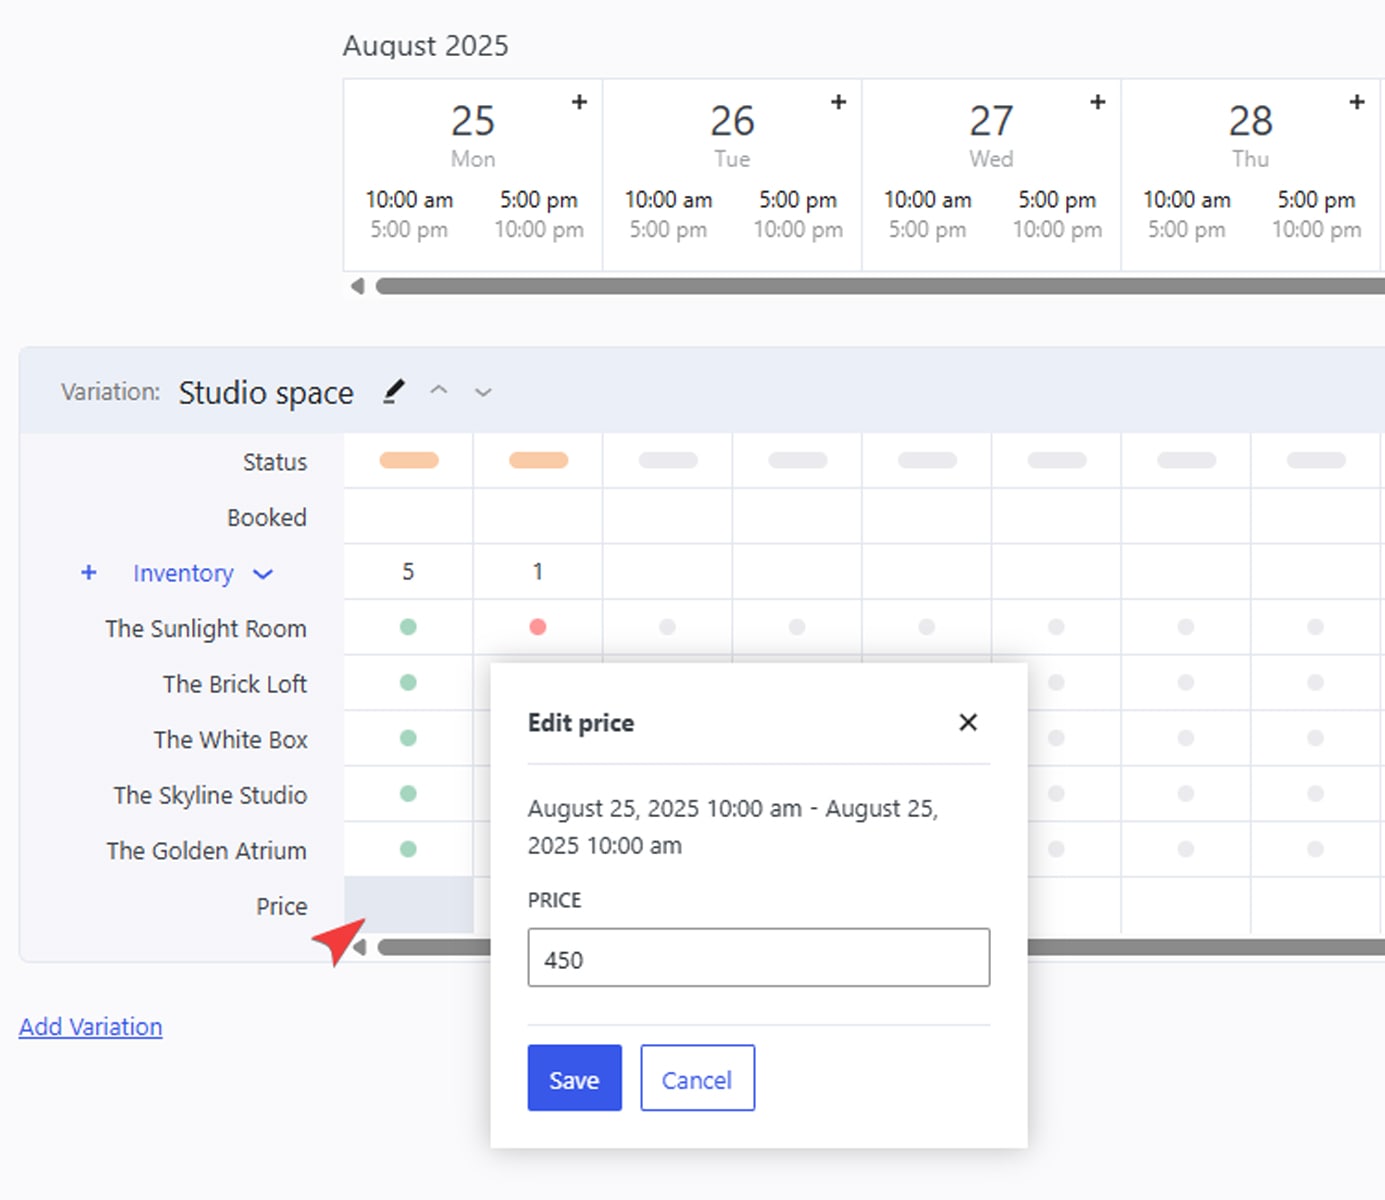
- Don’t forget to set the price of each item by choosing the empty grid element across the “Price” line for the desired timeslot. You can set different prices for various timeslots.
Step 5. Bulk Editing
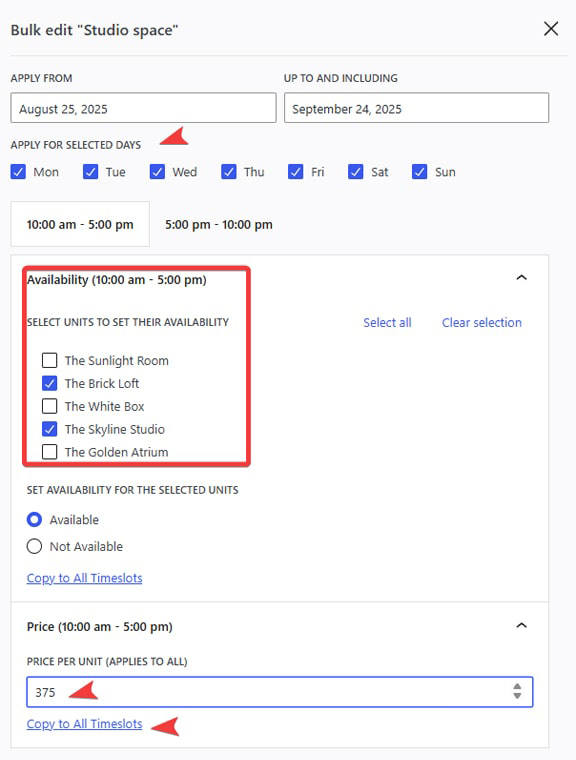 To avoid manual editing, press “Bulk Edit” in the upper right corner of the Variation section. With the help of this feature, you can:
- Set availability for selected days;
- Set price based on the chosen timeslot;
- Change calendar availability settings for a single, several, or all bookable units;
- Copy price to all timeslots in one click.
Rent Out Vehicles and Machinery with Daily Bookings
 As you see, in just a few steps, you can set up the hourly booking calendar and add the required inventory for it. However, the WordPress availability calendar has a lot more to offer. For example, you can add a calendar for the daily bookings. It can be done the same way as described in Step 1 above – by pressing the “Add Calendar” button and choosing the Daily booking type for your calendar. This type of booking is suitable for rentals of :
- Cars;
- Tours and excursions;
- Machinery and tools;
- Party and event equipment;
- Cleaning services.
Similar to daily bookings, this type of calendar allows for easy inventory and booking management just by adding rentable items through the variation section as described above. However, as it is intended to be used for daily rentals, it doesn’t have an option for providing timeslots, as daily rentals don’t rely on such functionality. Instead, you can use the same calendar section to efficiently manage bookings and available inventory, plan pricing options, and view accepted booking requests.
Nightly Bookings: Best for Hotels and Vacation Rentals
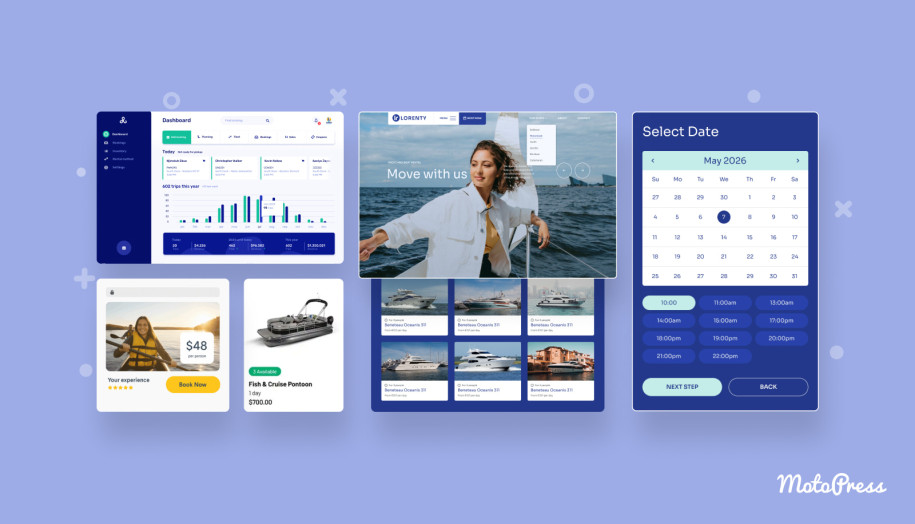
 Another option provided by the WordPress availability calendar is connected with nightly bookings. This is a fitting choice if you are renting out something overnight or for multiple nights. Such an option makes this plugin truly multipurpose, allowing you to not only rent out equipment or vehicles but also offer accommodation services and facilities. Here are some use cases that may be suitable for this type of booking:
- Hotels;
- Bed & breakfasts;
- Villa rentals;
- Vacation rentals;
- Camping sites.
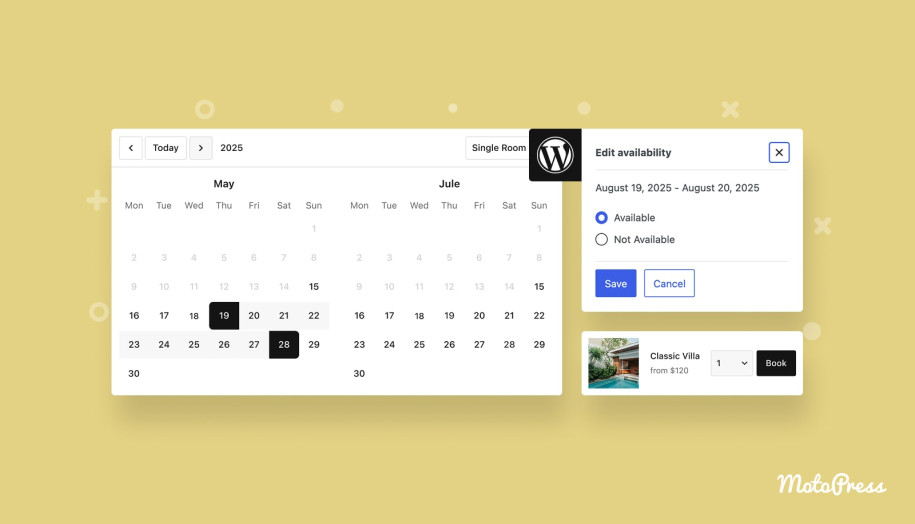
After creating the calendar via the “Calendars” dashboard tab and picking Nightly as a booking type, you access the calendar that may look the same as previous ones at first sight. However, this type of calendar allows for changeover days, meaning that if you receive a room booking for two dates next to each other, this will be counted as a single booking for one bookable item. Additionally, the calendar allows for customizable availability with a simple click on the variation section grid as well as bulk editing, as mentioned in previous booking types.
Adding the Calendar to Your Website
 After you finish adding necessary timeslots, inventory items, and prices for them, it’s time to add the WordPress availability calendar to your website. Thanks to the included Gutenberg block for the WordPress Booking Calendar, it can be done in a few simple steps:
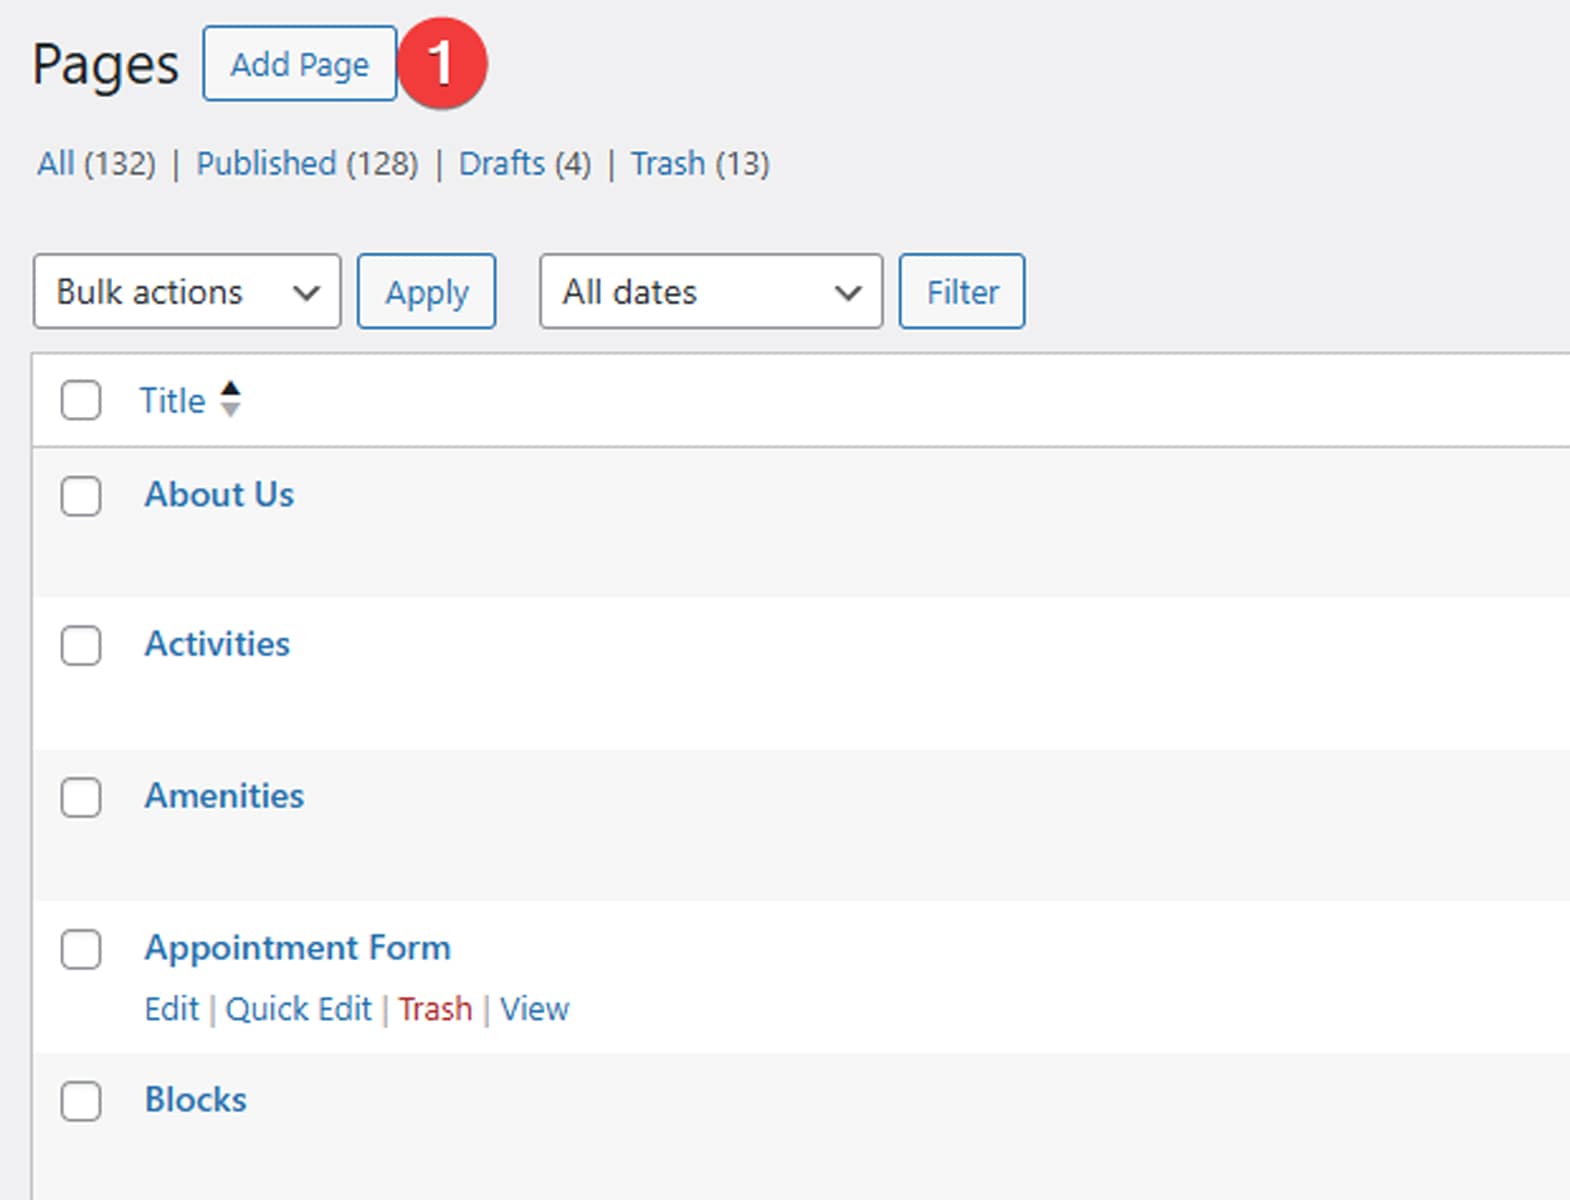
- Open the Pages tab in the WordPress dashboard and press the “Add Page” button at the top of the page.
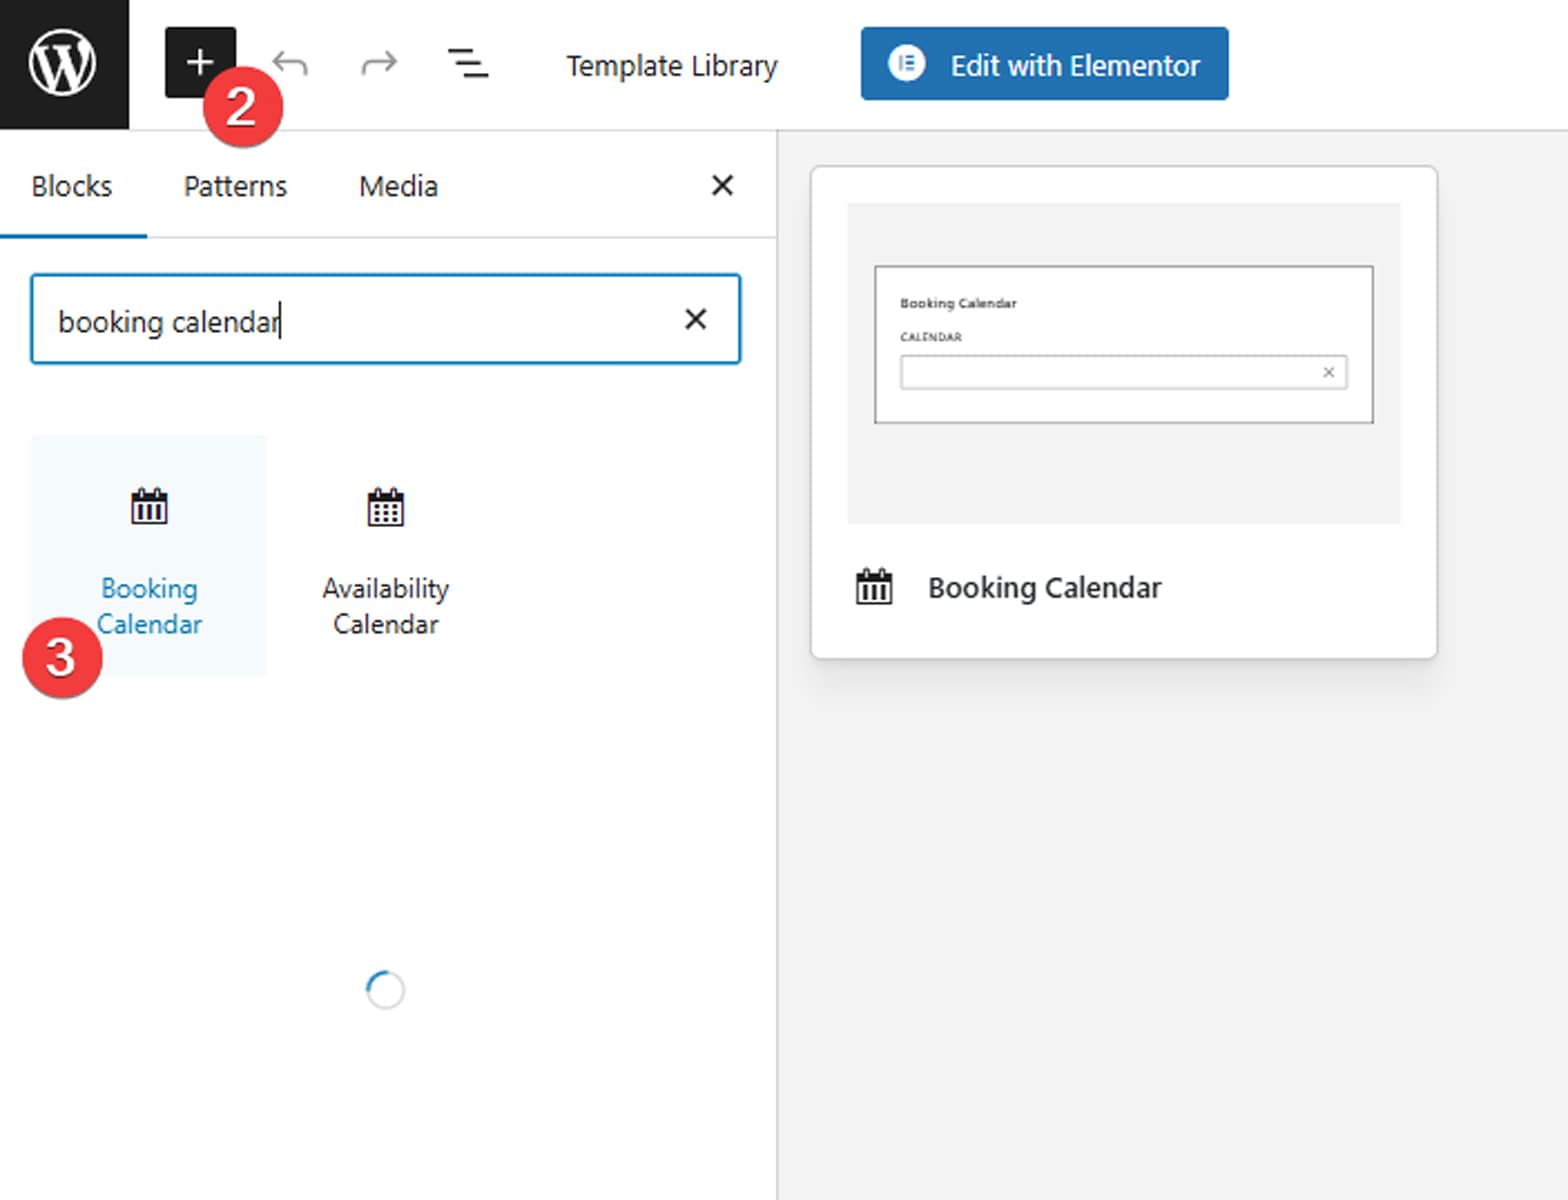
- Press the blue plus button in the top left corner of the Gutenberg editor and search for “booking calendar”.
- Choose or drag the block to add it to your Gutenberg page.
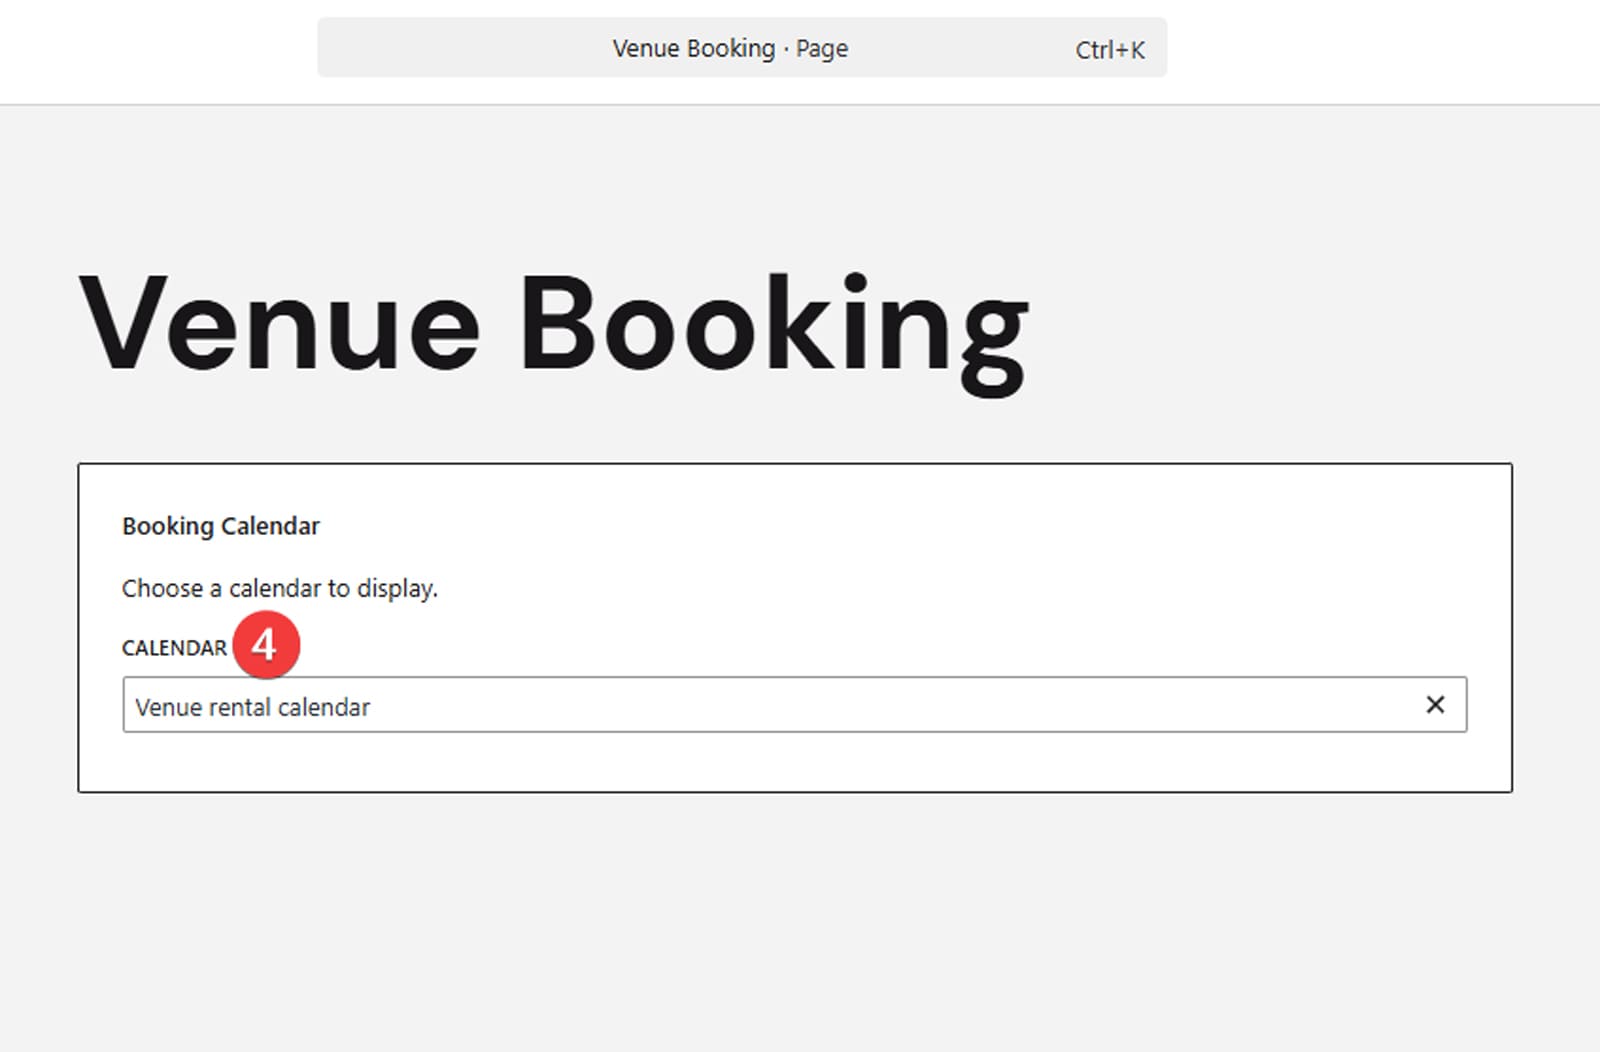
- In the “Calendar” dropdown list, choose which calendar will be displayed. Depending on the calendar type you configured earlier, the look and functionality of frontend calendars may differ slightly.
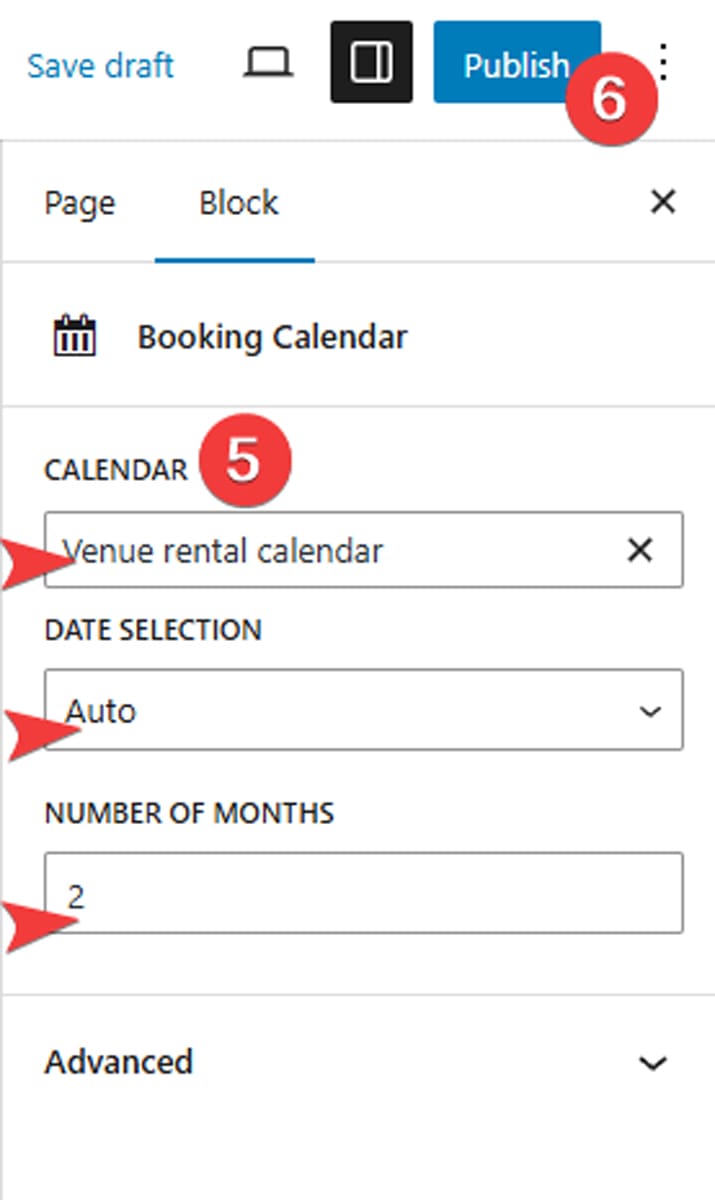
- Modify any necessary settings on the right sidebar. They include:
- Selected calendar;
- Date selection mode (Auto, Range, Multiple, Single);
- Number of displayed months.
- Save the changes you made by pressing the “Save draft” button or the “Publish” button if you are ready to make the calendar page public.
Creating and Adding the Booking Form
While you can accept bookings just by using the best WordPress calendar plugin, you may want to gather the personal data of your customers to confirm the rental booking faster. This can be done with the booking form builder that is integrated with this WordPress availability calendar plugin. To add the form and connect it to the calendar you plan to show on your website, follow these steps:
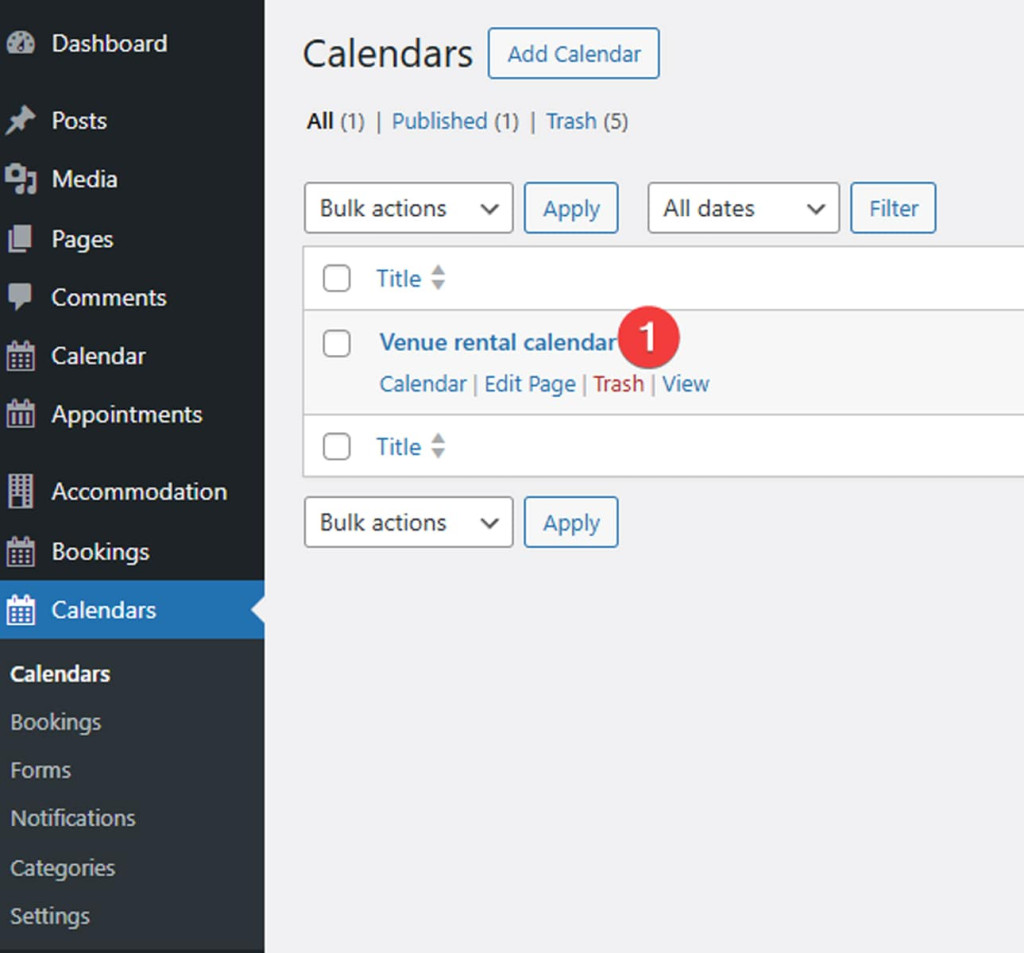
- Navigate to the Calendars tab of your dashboard and choose the calendar you want to create a booking form for.
- In the top right corner, press the “Add New Form” link. The form builder will open, where you can use the default form layout or edit it if necessary.
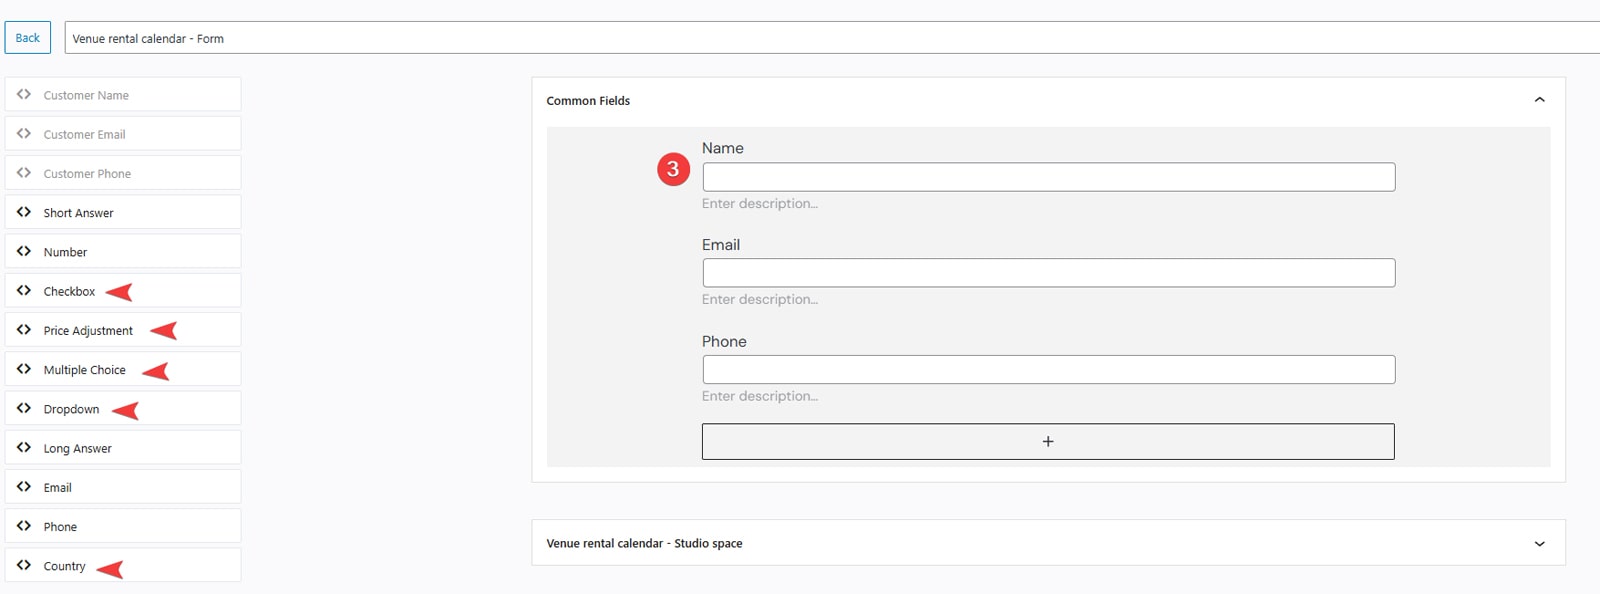
- By default, there are 3 fields provided (Name, Email, and Phone) that allow you to gather basic information about your customers during a booking with the availability calendar WordPress plugin. You can add any extra fields you find necessary by dragging them into the form builder. Some of the fields the plugin provides include:
- Price adjustment (for including information about extra fees or taxes);
- Multiple choice & Dropdown (best for choosing one of the service packages from several listed options);
- Checkbox (perfect for choosing several bookable service options during booking);
- Country dropdown (for easier country selection).
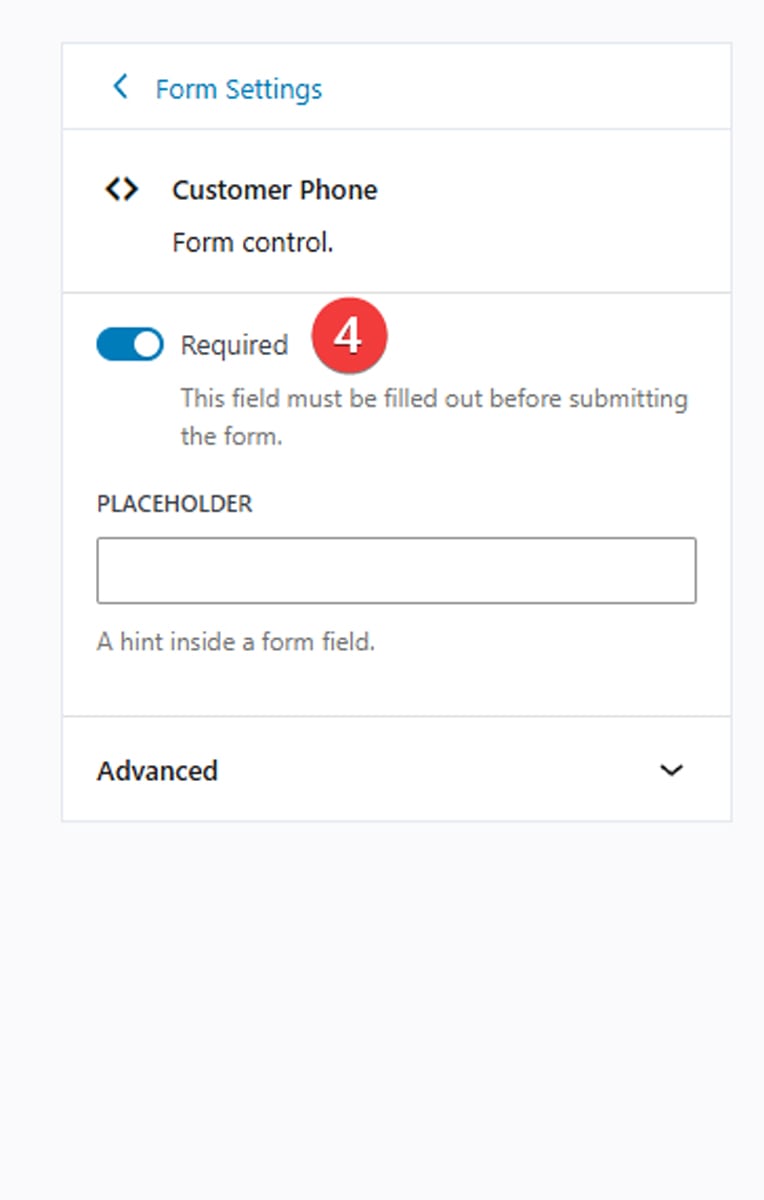
- You can make any or all fields of your booking form required for filling in by clicking the “Required” switch in the right sidebar.
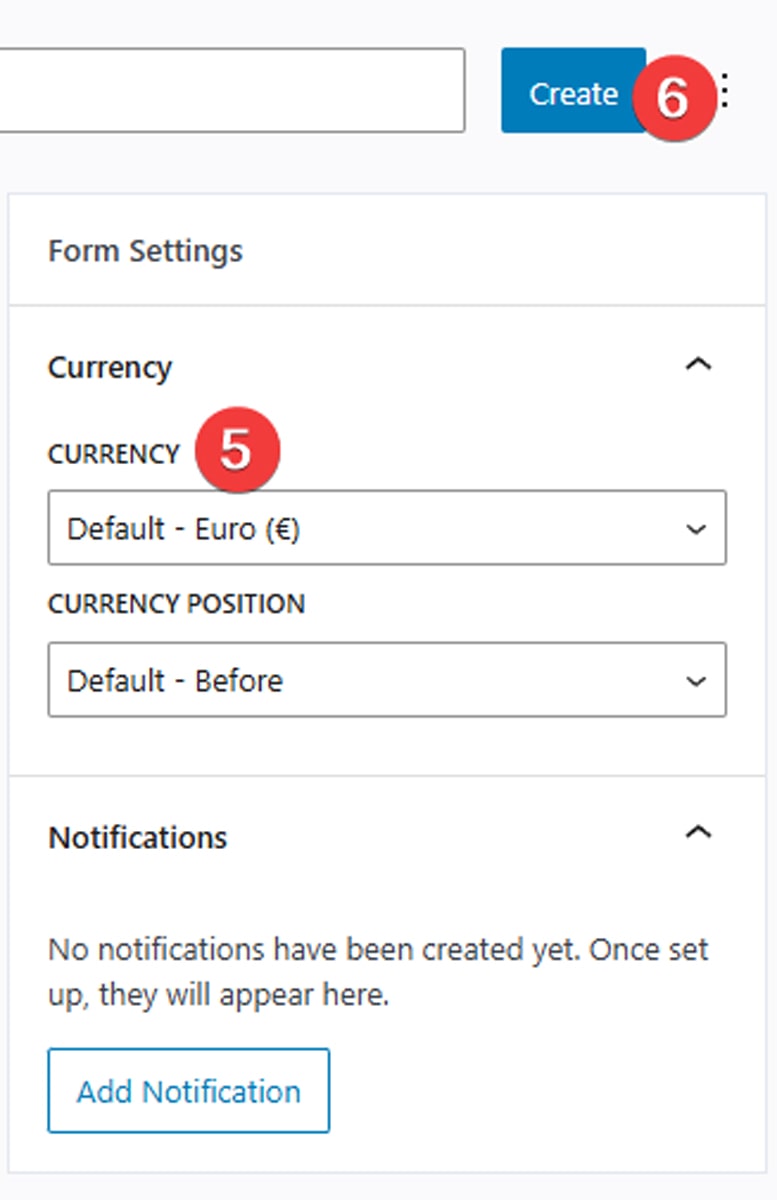
- In the general form settings in the same sidebar, you can also edit the currency displayed on your website and the currency position.
- After making the necessary changes to the form, press “Create” to save it.
Adding Email Notifications
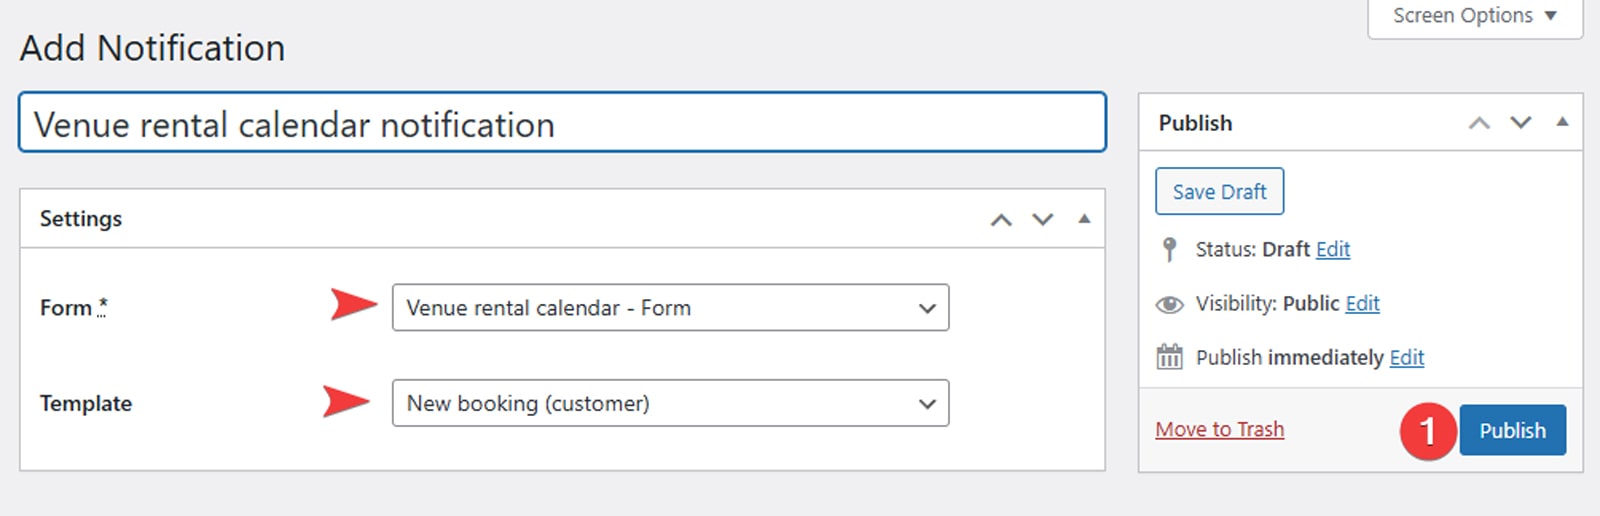 Don’t forget to create the email notification for the created form by pressing the “Add Notification” button in the right sidebar of the form builder page. A new page will open where you’ll need to specify the form this notification connects to and the template you want to use. This functionality is common to many WordPress calendar plugins with booking functionality. However, it also has some distinctive advantages, like the predefined templates. There are 4 templates included that inform either administrators or customers about placed and cancelled bookings. To continue with notifications, do the following:
- After choosing the template and the form you create this notification for, press the “Create” button on the right.
- A page will be updated, allowing you to set up the notification in detail.
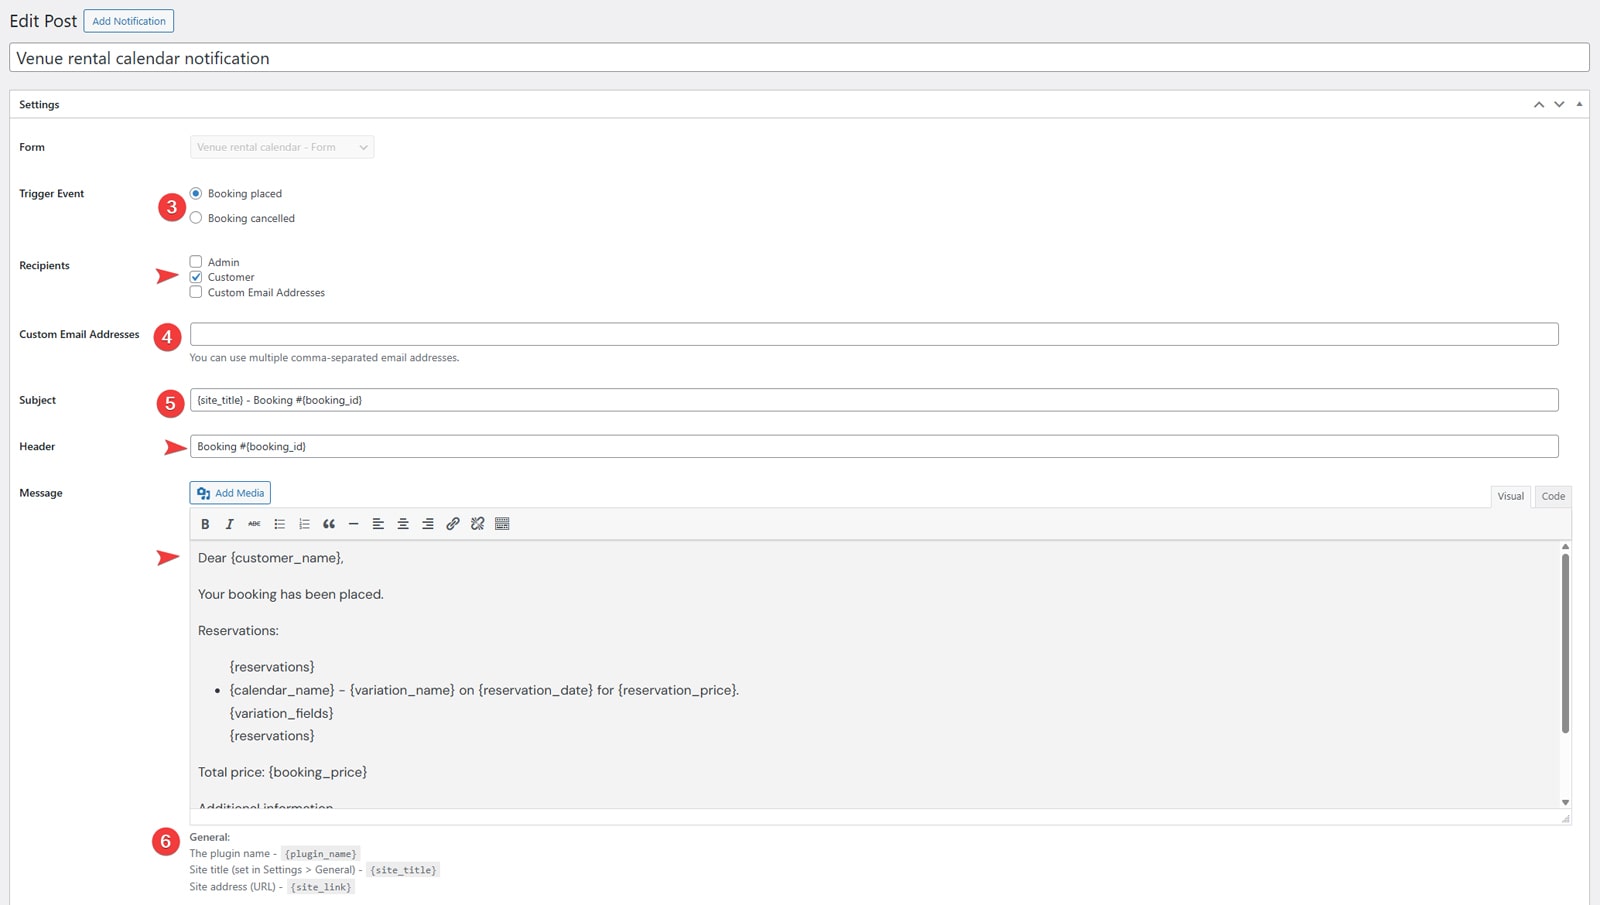
 Ensure the right trigger is selected. For example, if you chose the “New booking (customer)” template before, the “Trigger Event” and “Recipients” elements should have “Booking placed” and “Customer” selected by default. However, you can freely change it to customize the notification type.
- If you want to send a notification not only to customers but also to other addresses, choose the Custom email addresses checkbox and provide the addresses in the respective field below.
- Finally, use the “Subject”, “Header”, and “Message” fields to edit how your notification will look. The “Message” field has built-in formatting tools to help you make your notification look more than just plain text. By default, it will also include a pre-written template that you can edit or extend if necessary using this WordPress calendar plugin.
- Here, you can also use tags to provide certain data to a customer automatically without writing the notification manually each time.
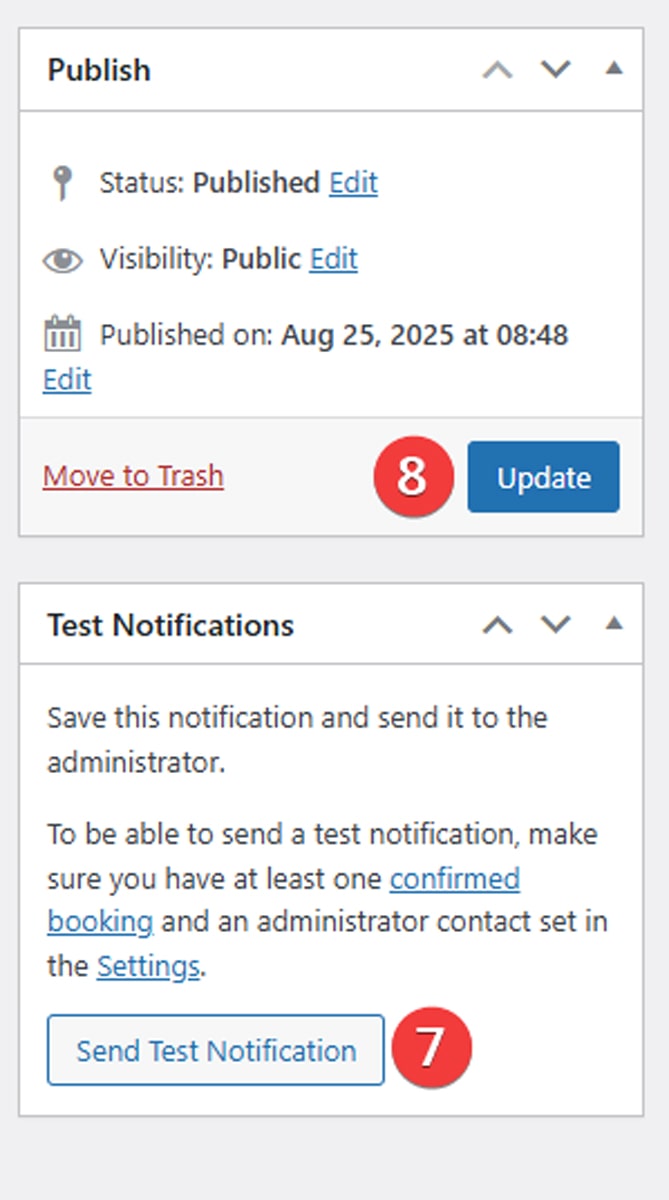
 In the right sidebar, you can also test the notification you created by pressing the “Send Test Notification” button.
- Finally, press the “Update” button to save the changes you made.
Conclusion
 We hope this overview of WordPress availability calendar plugin and how to get the most out of it for your business was useful to you. Needless to say that modern WordPress plugins aimed at rentals are necessary if you want to build an online presence that is user-friendly and helpful for your business. The mentioned WordPress Booking Calendar plugin is one of the few solutions available on the market, but also quite affordable. This makes it a perfect choice for small and medium rental businesses or individual ventures. If you’re still unsure if such a tool can help you build a successful online rental business, here are some benefits to consider:
- Real-time availability: One of the main advantages that WordPress calendar plugins have is that they provide automatic availability updates that help you avoid double bookings. With such a tool, you don’t always have to be available personally, as the plugin can do the scheduling and communication work for you, while also providing direct booking functionality.
- Inventory management: When running a rental business, you also need to take care of inventory. Modern WordPress event calendar solutions, including availability calendar WordPress options, allow for managing unlimited equipment and property items. Most of these tools also allow for providing individual descriptions, pricing, and images regarding your inventory.
- Dynamic pricing: Solutions like WordPress Booking Calendar by MotoPress also support dynamic pricing, allowing you to customize the rate of rented items depending on the season and other conditions.
- Customizable booking rules: One more benefit that you get with such calendar plugins is connected with setting the availability and booking rules according to your needsFrom recurring rentals to buffer days between bookings, WordPress calendar plugin providers add a variety of options for setting the booking rules the way you need.