How To Build a Mega Menu in WordPress with Elementor
Table of Contents
How good is the default WordPress menu? It allows you to use pages, posts, categories, and URLs as menu and submenu items. Even more so, a straightforward single-column drop-down is the only submenu type you can have.
This means the default WordPress menu has limits for adding and customizing items. Since the navigation menu is a central part of your website, it’s important to make sure it really helps you get the most out of your online presence.
Especially this applies to different types of sites, like e-сommerce stores and blogs, where you might want to highlight specific products or posts using visually rich submenus with a mega menu builder.
This is when mega menu plugins for WordPress come into play.
So we’ve prepared this article to guide you through a mega menu WordPress tutorial, tips, best mega menus plugins, and mega navigation examples. The good thing is that you don’t even need the Elementor pro mega menu version.
What is a mega menu?
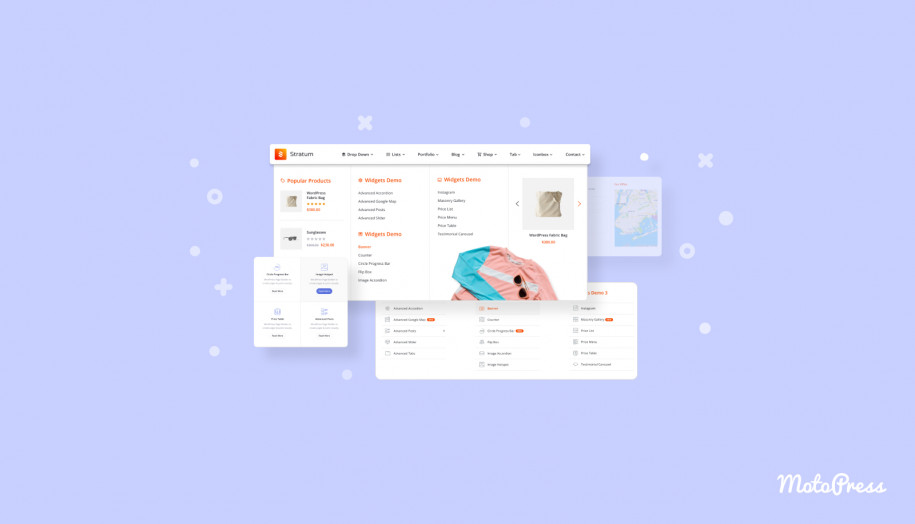
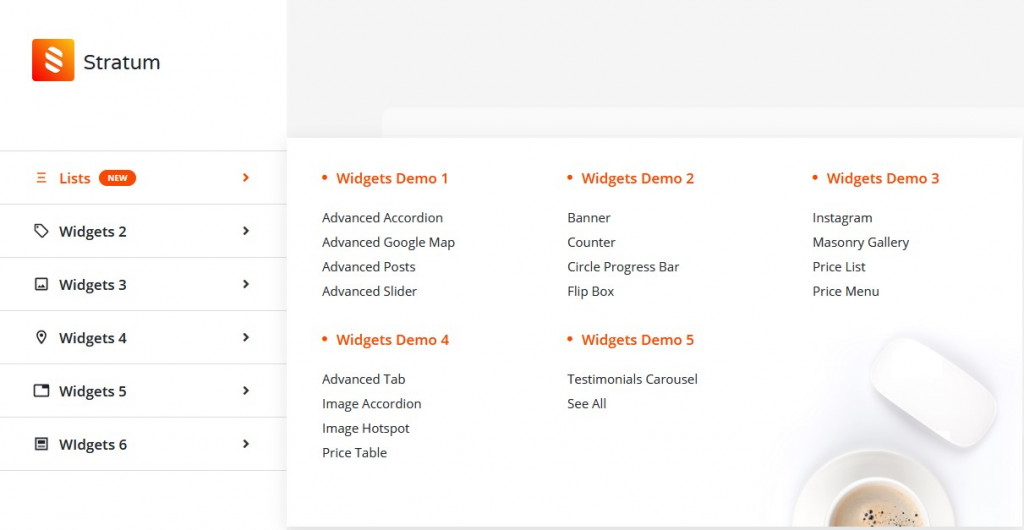
What is a mega menu in WordPress? As its name suggests, a mega menu is a more powerful version of the traditional submenu, offering users a lot of categorized information in a single drop-down menu.
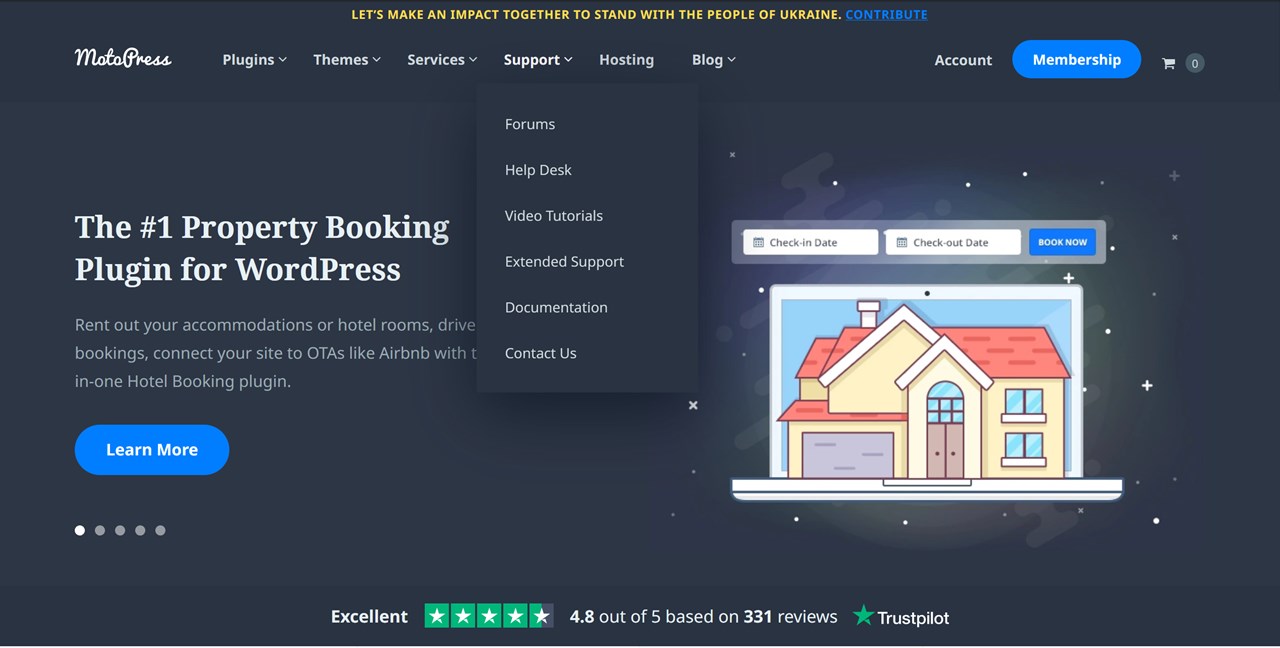
For you to compare, here is a traditional, one-column drop-down menu, which is pretty straightforward:
On the contrary, typically a mega menu consists of multiple columns. It may include any multimedia element like images, videos, and icons. All these help you enhance the user experience and better visualize information on your website.
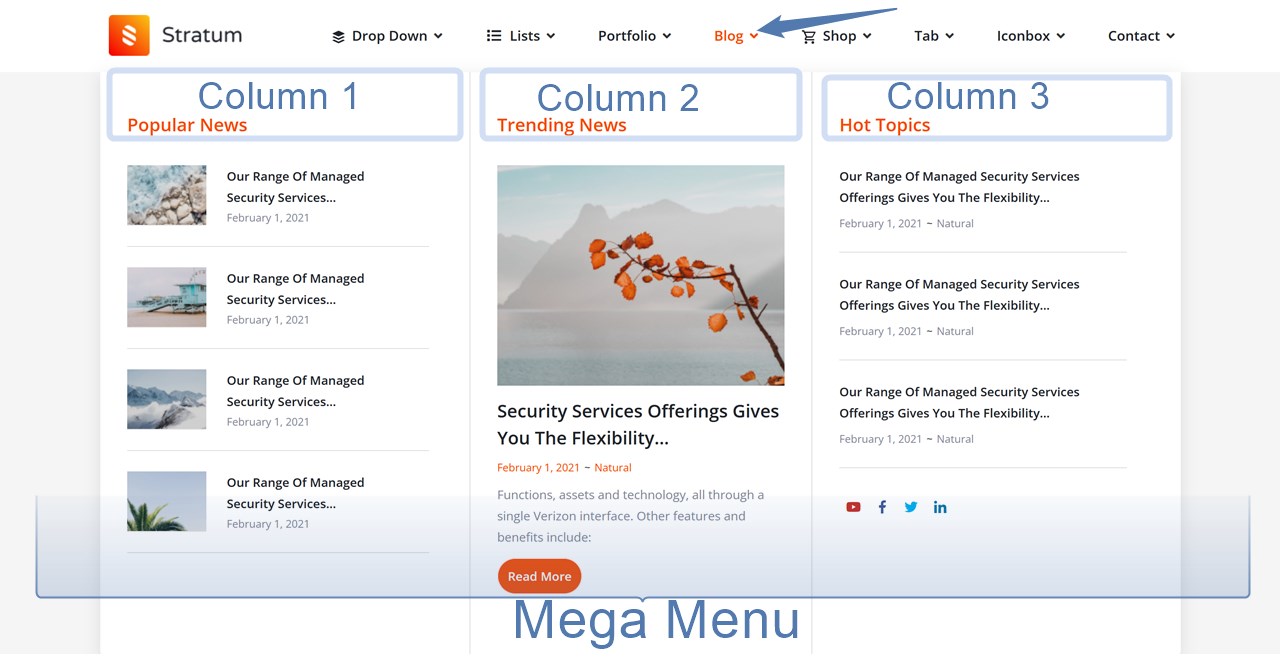
Not only can they add more diverse content types to your submenus, but these megamenu plugins are also quite handy for making small customization tweaks in the main menu. For example, adding custom badges and tags, changing background colors, etc.
The whole thing with a mega menu is to give you more freedom as to what your menu can contain and how it can look.
How do I add a mega menu to my website?
What are easy methods to add a mega menu to your site? You either need to use custom code or a specific plugin. A plugin is, no doubt, an easier way, and there are a lot of solutions.
However, it’s important to keep in mind that not all plugins are created equal. As a rule, each one is tailored to work with a specific content builder, whether it’s Elementor, the block editor/classic WordPress, Divi, Avada or something else entirely. Typically such extensions include tutorials to help users get started and work with them.
That’s why it’s crucial to start your research by identifying which content builder you’re currently using, and then searching for compatible extensions. For example, an Elementor mega menu or Avada mega menu. This approach ensures that you’ll be able to seamlessly integrate your mega menu with your existing design.
What is the best mega menu WordPress?
Are there good WordPress plugins? As we’ve just mentioned, each WordPress mega menu plugin offers a set of options based on what builder it is optimized for. This leads us to believe that it’s most logical to compare the solutions among their closest counterparts.
That said, here are a few popular WordPress mega menu plugins for various cases.
- The Max Mega Menu plugin incorporates directly into the native system of the classic WordPress menus, automatically turning your menu into a mega menu. It’s one the most flexible and popular plugins you can download for free. It supports WooCommerce, EasyDigitalDownloads, and is really lightweight.
| Mega Menu Plugin | Installations/Sales | Made for |
|---|---|---|
| Max Mega Menu | 400K+ | Classic WordPress, supports Elementor |
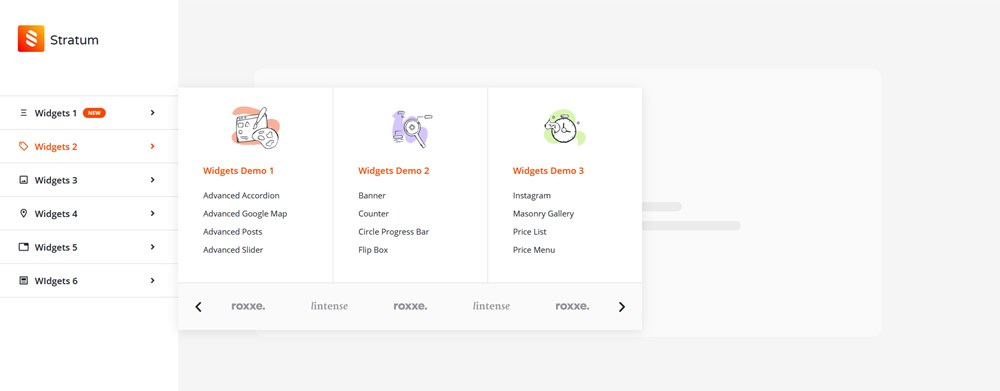
2. Stratum Mega Menu is a premium addon for creating a powerful submenu using Elementor widgets. If you have a WooCommerce shop, it will help you build a great menu featuring products in the submenu.
| Mega Menu Plugin | Installations/Sales | Made for |
|---|---|---|
| Stratum Mega Menu | 500+ | Elementor |
3. The WordPress Mega Menu block is a beta version of the mega menu for the block editor. You can use it for adding a menu to the post, page or even test it in the full-site editing.
| Mega Menu Plugin | Installations/Sales | Made for |
|---|---|---|
| Mega Menu block | 500+ | Block editor |
4. HT Menu Lite is a mega menu WordPress plugin extension to Elementor crafted specifically for the menu and mega menu building needs.
| Mega Menu Plugin | Installations/Sales | Made for |
|---|---|---|
| HT Menu Lite | 2K+ | Elementor |
5. As a premium plugin, Uber Menu gives you the full-featured toolkit for building and customizing any type of mega menu. It makes it really easy to edit every item of your menu.
| Mega Menu Plugin | Installations/Sales | Made for |
|---|---|---|
| Uber Menu | 87K+ | Classic WordPress |
WordPress mega menu addon by Stratum: Step-by-step guide
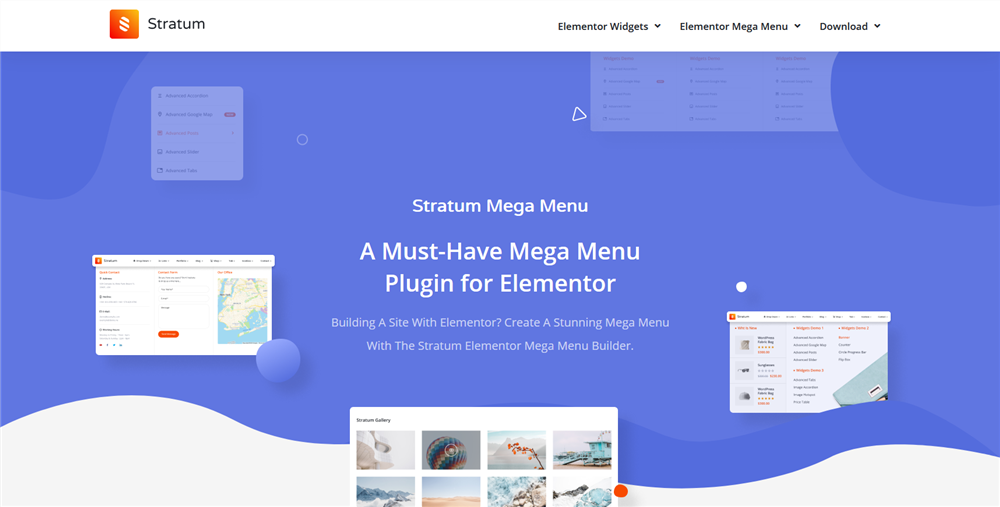
So in this post, we’re going through the process of creating a WP navigation menu with the Stratum Mega Menu addon for Elementor, our WordPress mega menu plugin for creating a content-rich menu using Elementor widgets and advanced customization tools.
Well, pretty much like any other mega menu WordPress Elementor addon, this one opens up many opportunities as to ‘hacking’ into your default WordPress menu.
In particular, this Elementor menu plugin helps you:
- Display any Elementor widget with your content in submenus, including in columnized layouts.
- Add custom tags and icons to the top-level menu.
- Change the visual styling of your top-level menu and submenus.
- Create both vertical and horizontal navigation menus.
- Tweak the responsive menu for mobile devices.
- Make your submenu appear with different animation effects.
Since it’s a premium Elementor megamenu solution, it’ll cost you at least $39 at the moment; at the same time, the Mega Menu plugin free download is possible for the MotoPress Club members.
Now let’s see how it works in real-life examples and go through our WordPress mega menu tutorial.
You can also watch a video tutorial of the following guide:
To build a mega menu in WordPress, only the core Elementor plugin and (best mega menu for Elementor!) the Stratum Mega Menu addon are required.
Step 1. Create or select a menu
To start working with the plugin, Elementor must be already installed and activated.
First off, install and activate the Stratum Mega Menu plugin.
There is a short mega menu tutorial that you can always have at hand: head to Dashboard > Appearance > Mega Menu to see it.
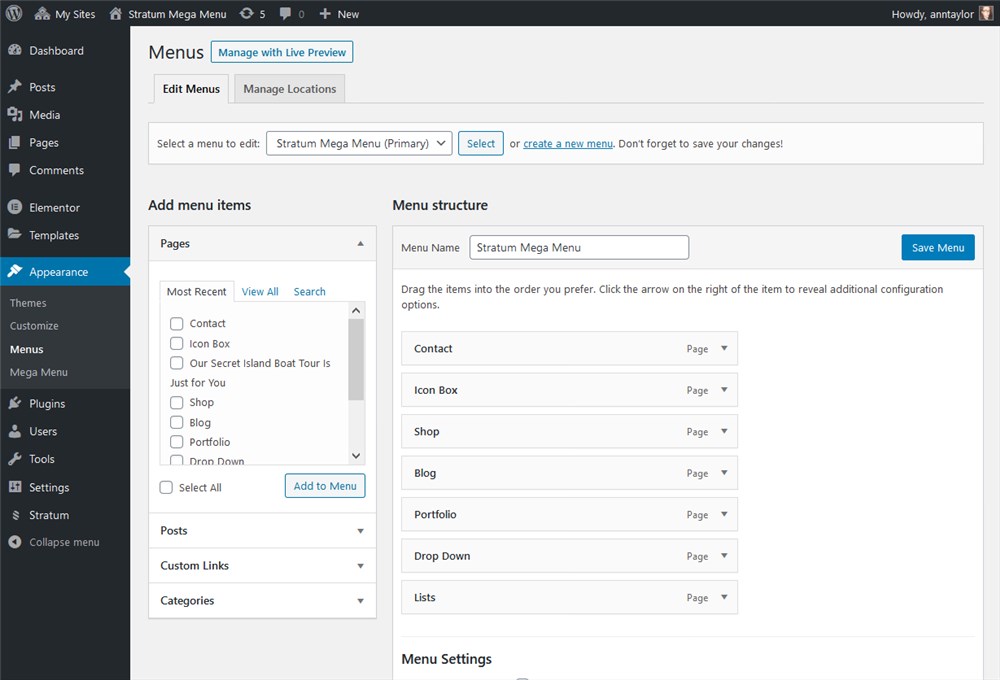
The first step of this tutorial asks you to go to your Dashboard > Appearance > Menus.
In Menu, you need to select the current menu (in case you have a working site and menu) or build a new one using default WordPress tools, that is, by adding menu items. Make sure to remember the name of your menu!
Step 2. Customize your top-level Elementor menu
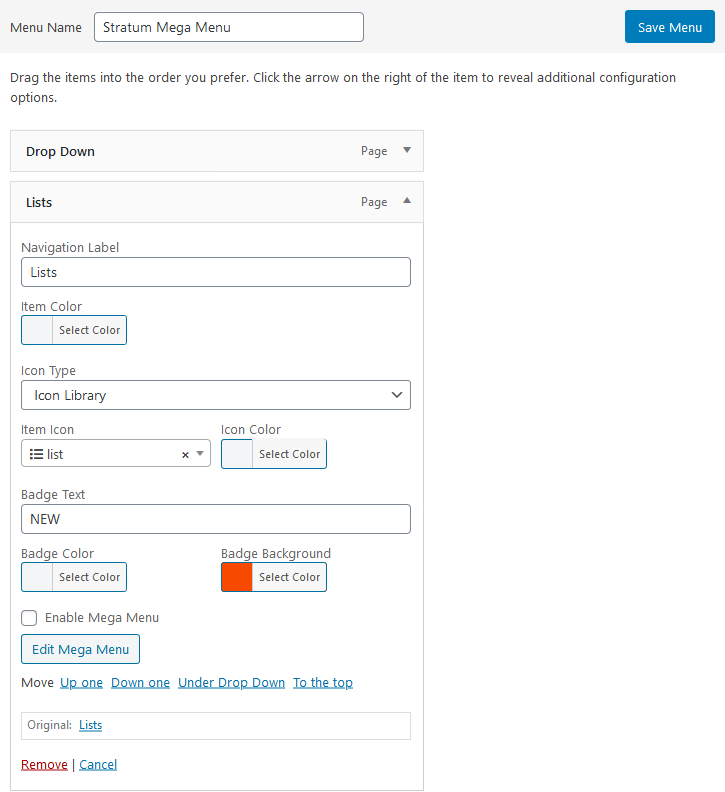
For each menu item, you’ll see the ability to add icons and badges.
Icons
As for icons, you can either upload your custom SVG icons or choose one from the library. You’ll be able to set an icon color as well.
![]()
Badges
For badges, it’s easy to add your custom text, apply text and background colors.
Of course, you may not add any of those if you are looking to improve only the submenus.
Step 3. Create mega menus for the chosen menu items
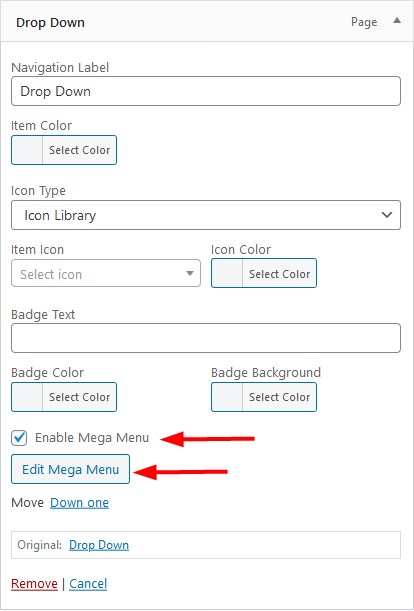
If you want to build a content-rich drop-down menu, make sure to click on the Enable Mega Menu box and click the Edit Mega Menu button:
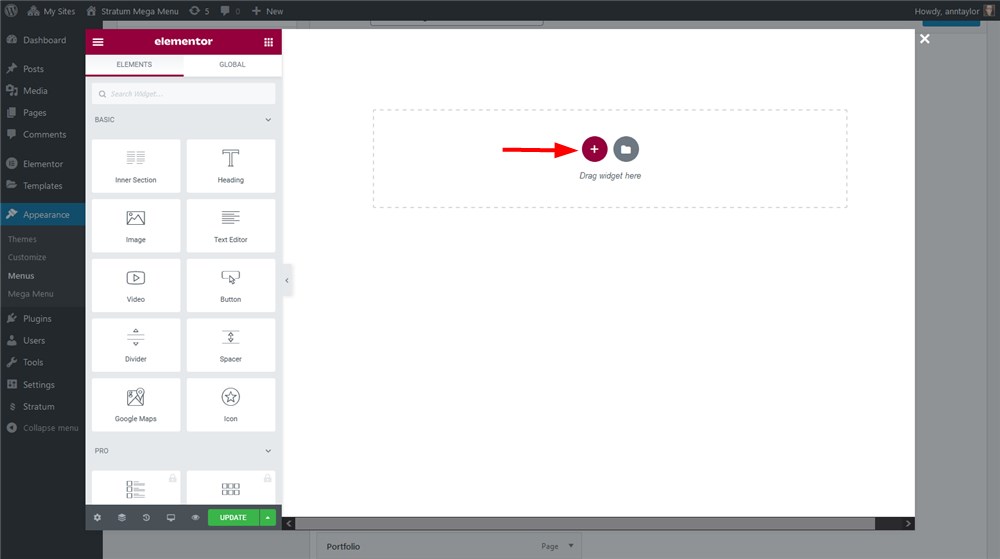
The default Elementor visual builder interface will open. Here you’ll be able to create a submenu for the menu item you chose.
- Start with adding a section.
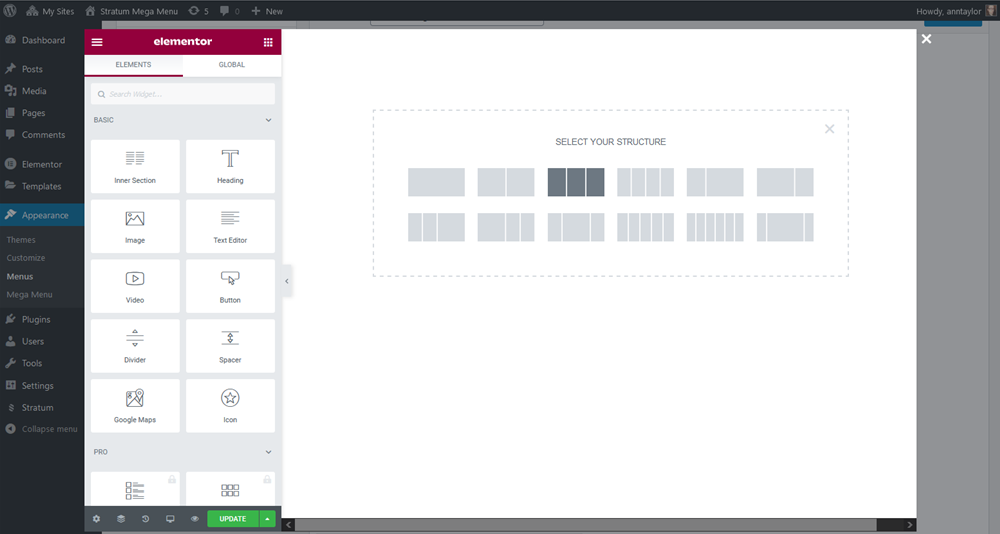
2. Organize columns (if needed). For example, you might need columns if you want to showcase many items/pages/products/images in the submenu.
3. Apply the needed background color (if needed).
4. Add the needed Elementor widgets into the columns/column and customize the look of those widgets via Elementor’s style tab.
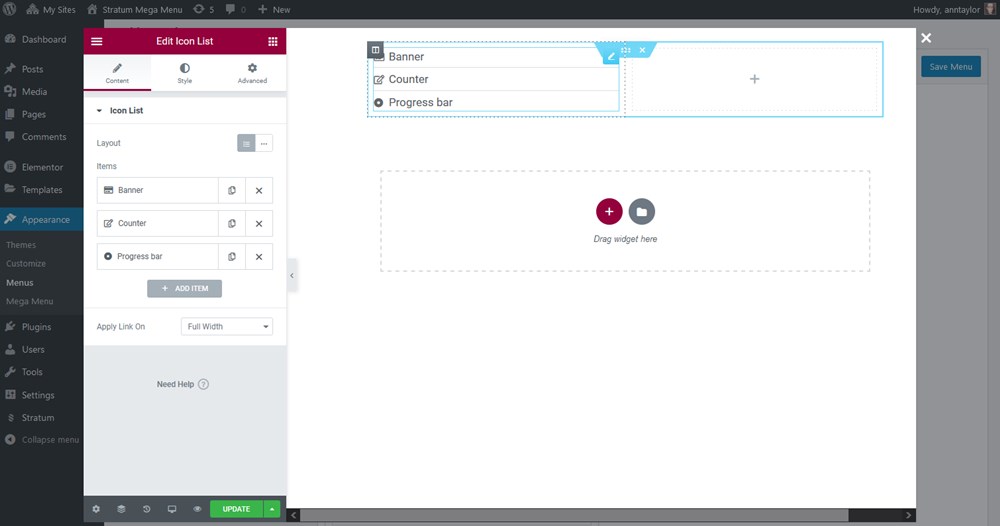
Each widget has its own styling settings depending on its type.
You can create a mega menu with Elementor for any menu item you choose – as well as design it and style it the way you want.
Once done, update the page in Elementor > get back to the Menu in WordPress > Save menu.
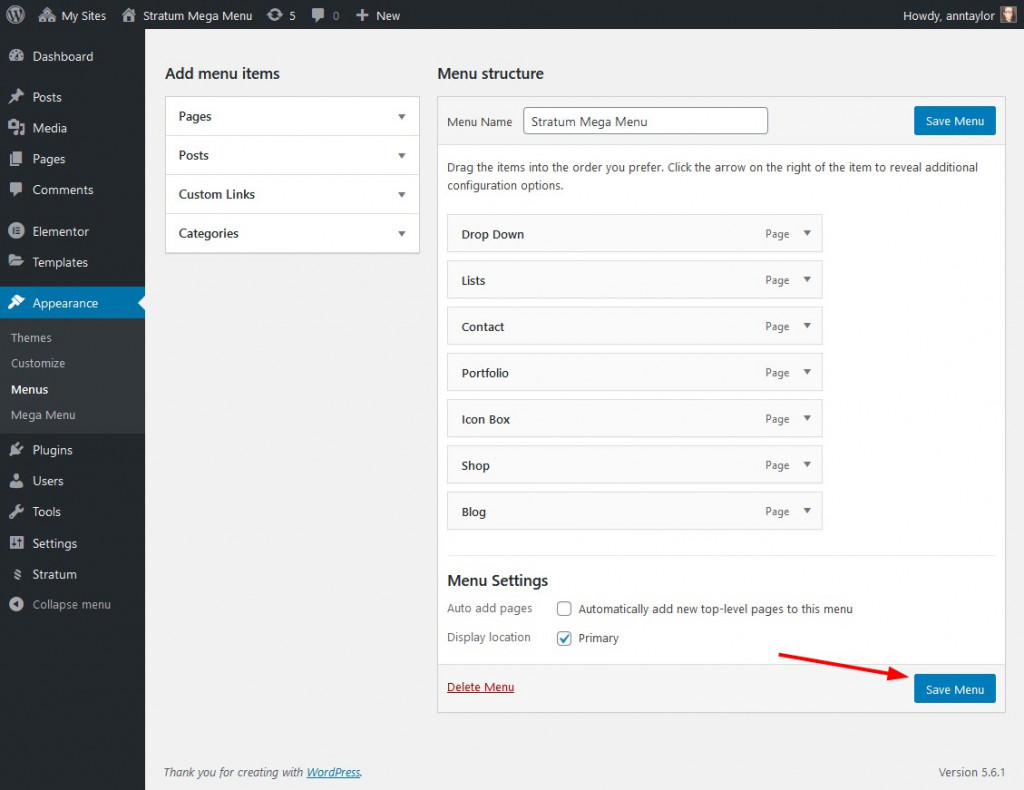
For example, let’s go through a few examples we created with Stratum’s mega menu plugin for demo purposes. There are different Elementor widgets and columns used in the submenu:
- One-columned submenu: the Icon list widget with adjusted icons and links:
![]()
And a three-column layout with a few more adjustments:
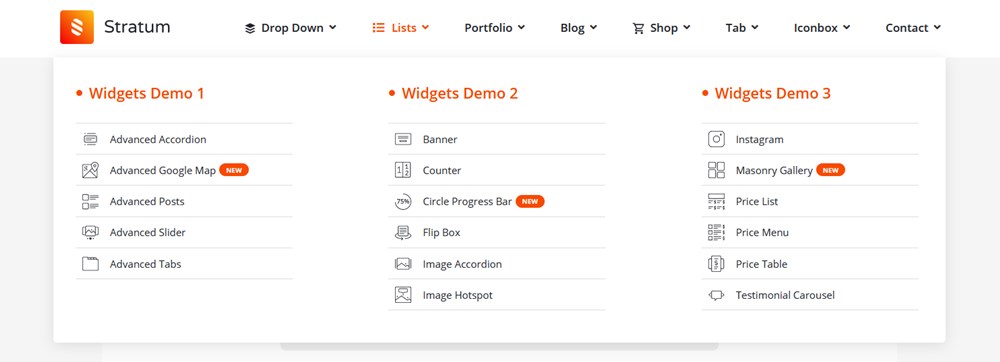
- A gallery widget:
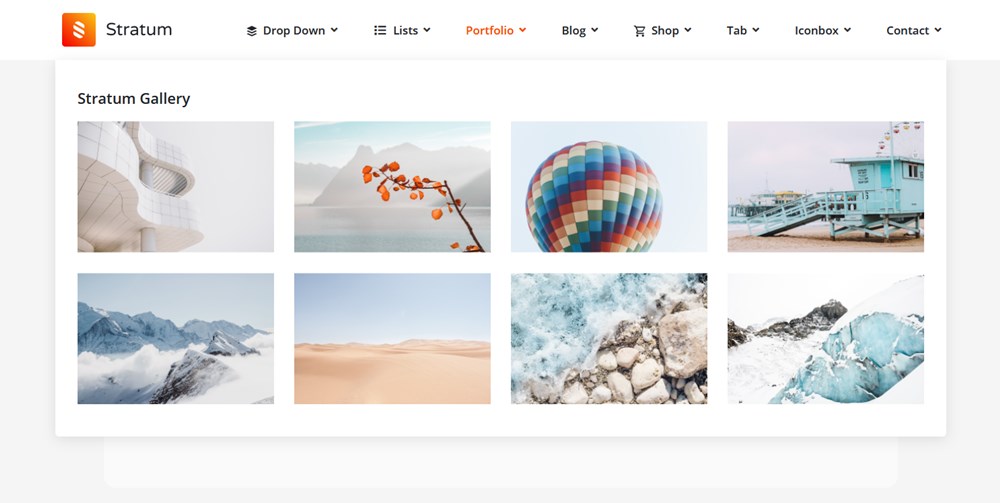
With Stratum’s Masonry gallery widget, you can give your galleries a truly fancy and nifty look.
- Blog posts in submenus powered by different layouts and meta information output:
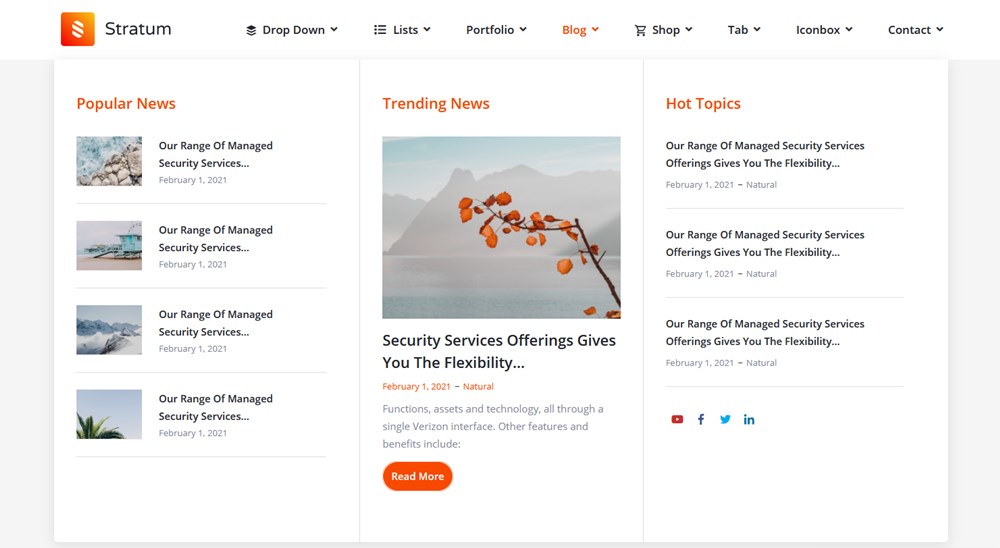
- Shop items and product presentation powered by WooCommerce widgets as well slider widgets:
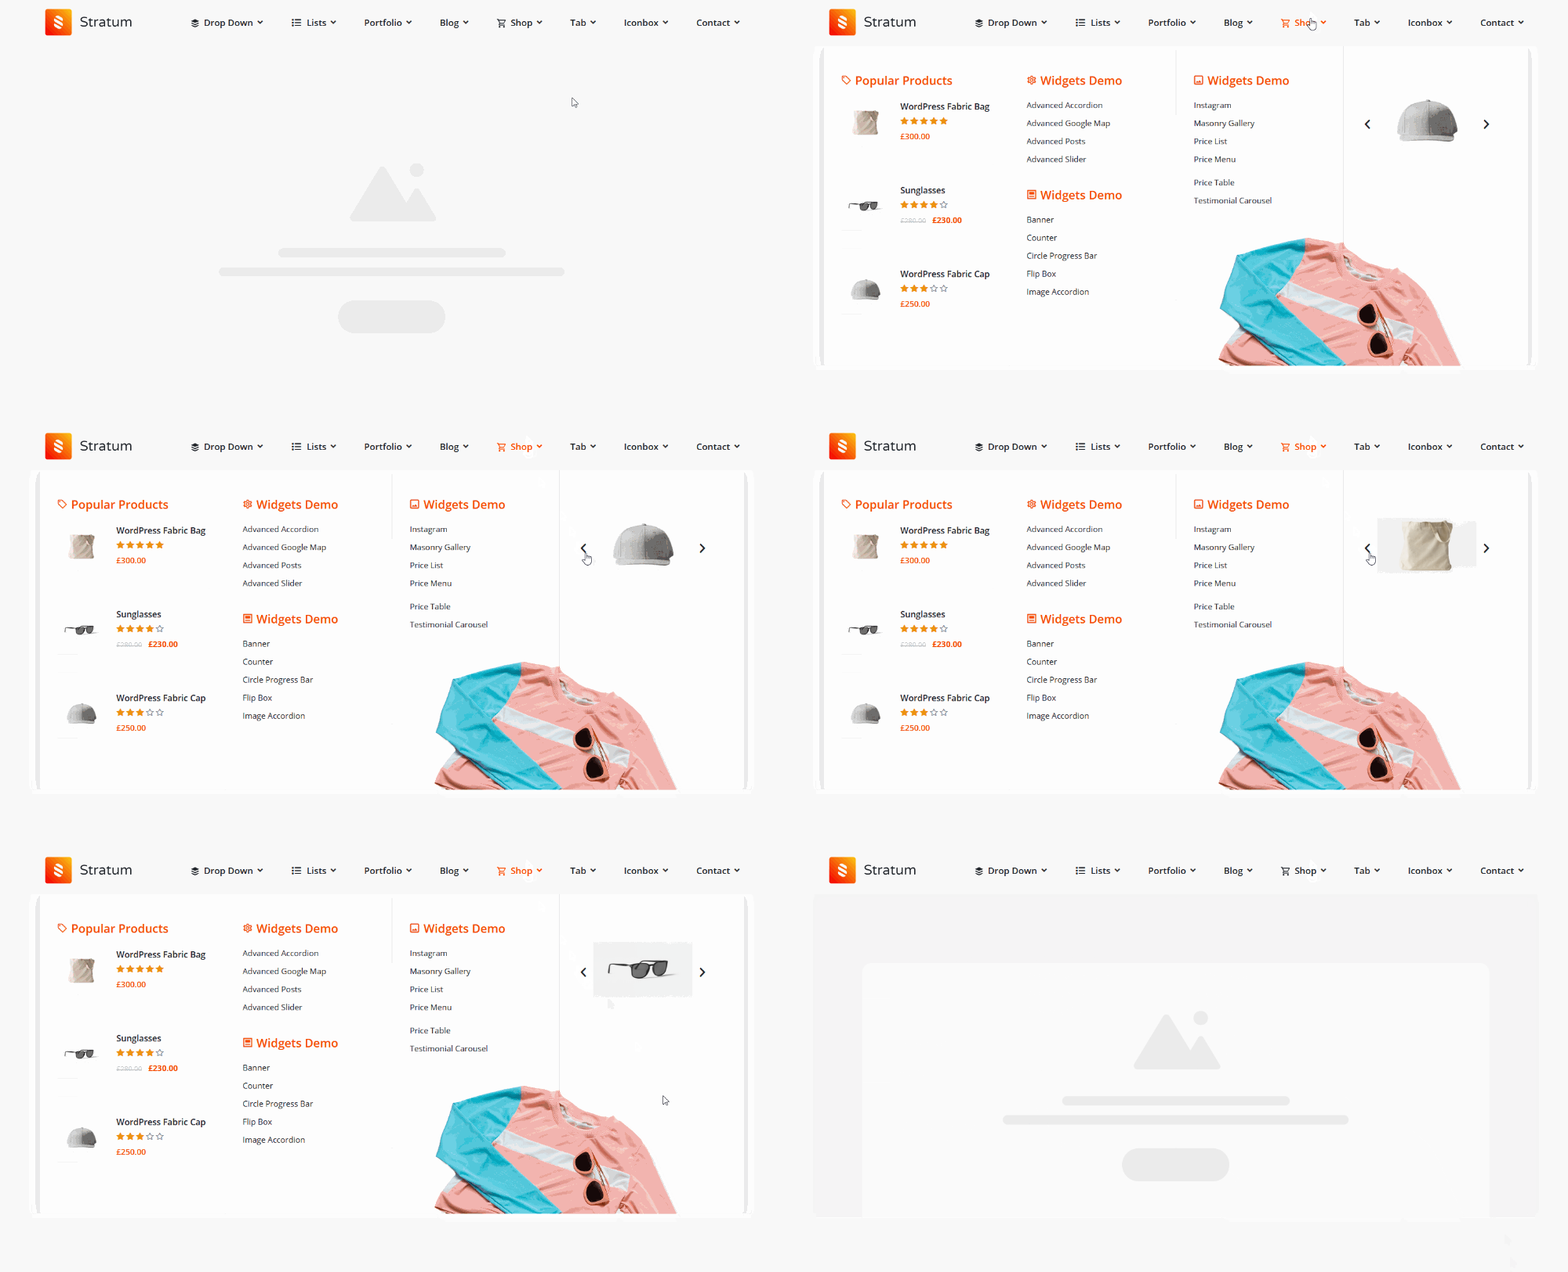
You can see more examples in the WordPress Megamenu demo.
On this stage, the look of your menu depends on how creative you can get with Elementor and what widgets you have access to.
Step 4. Replace the default theme menu with a WordPress mega menu
How to add a menu in Elementor?
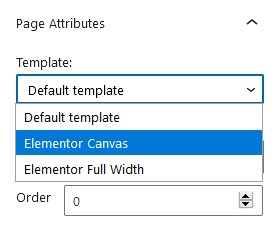
To use the WordPress megamenu you created instead of the default one provided by your WordPress theme, you need to hide the latter. One of the easiest ways to do that is to use an Elementor canvas template that doesn’t use a menu:
After choosing the needed template in the ‘Page attributes’ menu, open the Elementor editor and add a mega menu you created to the page:

Then select the menu you created:
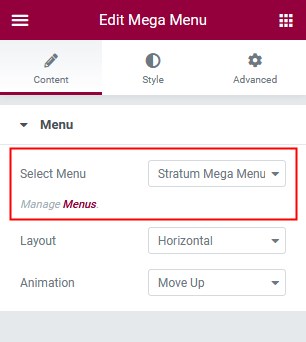
Also, choose whether you want it to be vertical or horizontal:
Horizontal
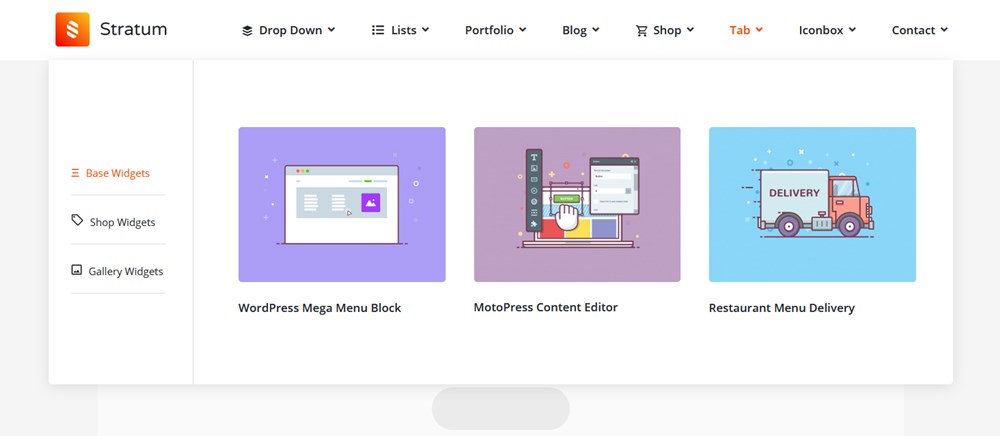
Vertical
You can also apply the default submenu appearance animation effects.
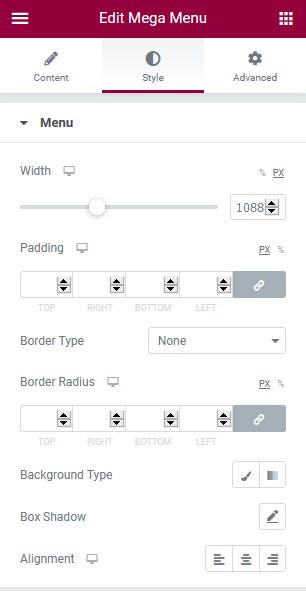
Now you can globally, for the entire menu, customize the styling. The Mega Menu Elementor addon by Stratum is pretty generous here! For example, let’s take a closer look at the Style tab to see what you can alter.
Menu globally
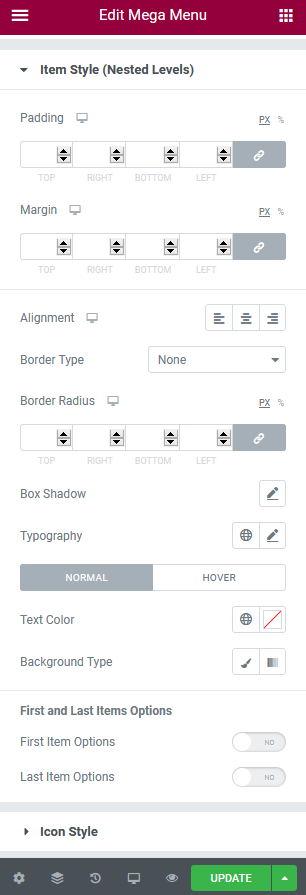
- Width, paddings, borders, background type (classic or gradient)
- Alignments and shadows
Item style (first level and nested levels)
- You can customize the alignments, add borders and apply the needed box shadow
- Change typography, text color, and more.
Icon and arrow style
- Change the spacing, alignment, size, and color.
Badge style (first level and nested levels)
- Customize paddings, margins, box shadow, border type, border radius, typography, background colors, etc.
Dropdown style (first level and nested levels)
- Width options
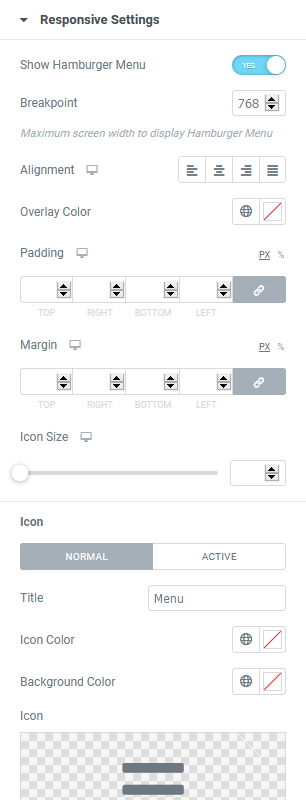
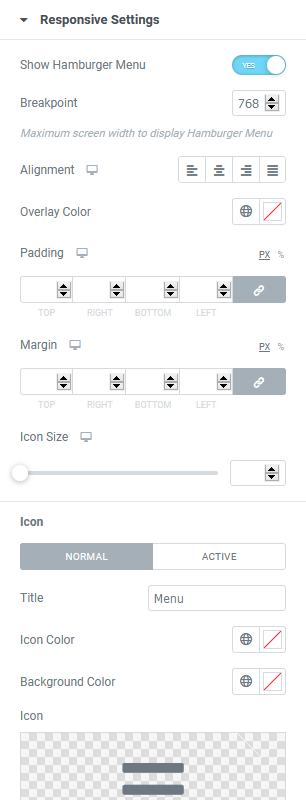
Responsive settings
- Optionally turn on the hamburger menu for mobile devices
- Change the alignment and styling for the menu.
The WP mega menu will be transformed into a handy Elementor hamburger menu on mobile devices:
Once you applied all the needed settings and are satisfied with your menu, simply save the page.
The only hassle of this method is that you’ll need to do one extra procedure – interesting this menu – manually for each page of your site where you want it to appear.
But that also allows you to use different menus on different pages since you can create separate menus. Alternatively, you can create a custom Elementor header with the Elementor’s theme builder and use your custom Elementor menu globally with less effort.
We also have video guides on how to employ this widget for building a menu for an eccommece shop:
How to edit mega menu in WordPress
In this part, we tell you how to add and edit a mega menu in WordPress without Elementor.
However, you can’t get by without an extension in this scenario too if you want to create a flexible navigation menu. At least not at the moment, when the WordPress full-site editing is not released at its full scale. This means there is no native mega menu solution.
You’re also spoiled for choice here too, but for this tutorial, we’ll use our free WordPress mega menu block, which is built and fully optimized for the block editor.
What does this block do? This free mega menu plugin in WordPress provides block-powered integration with the native WP technology. This means you can easily add a mega menu by embracing the power of the block editor in combination with the additional WordPress mega menu block.
For block WordPress themes, you can use this mega menu block right in the Theme Editor. For other themes, it’s okay to use it on regular pages and posts (with a few tricks, you can make it function as a normal menu).
Let’s first understand the basic anatomy of the mega menu block shipped by our plugin.
Once you’ve installed and activated the mega menu block plugin, you’ll see two new dedicated blocks added to your default library of blocks:
- Mega Menu block: allows you to insert any (the power of the blocks system!) WordPress block into the submenu.
- Plain Menu block: enables you to add any plain links into the submenu and build a few levels of submenus.
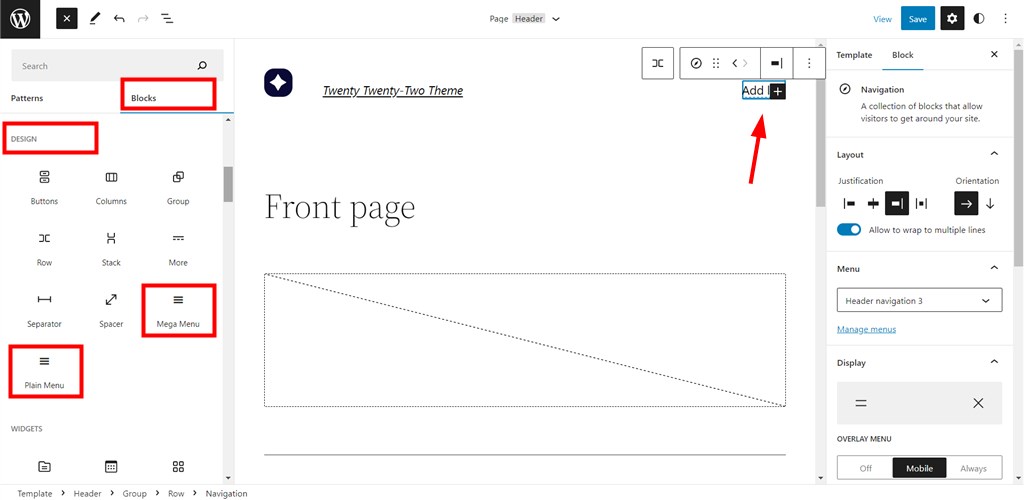
For example, I’m working in the Twenty Twenty-Two theme to exemplify the options of the block.
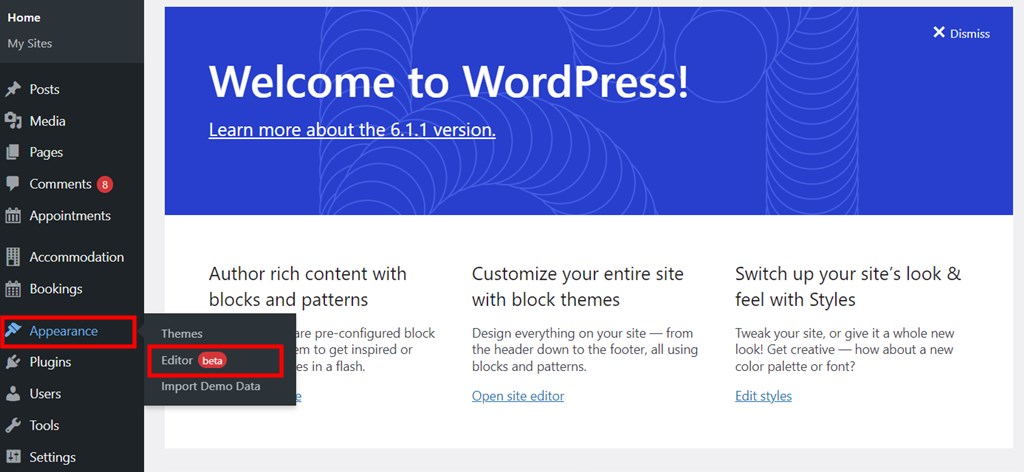
This theme supports a beta version of the full-site editing, which gives me a chance to edit my mega menu block right to the header part of the site.
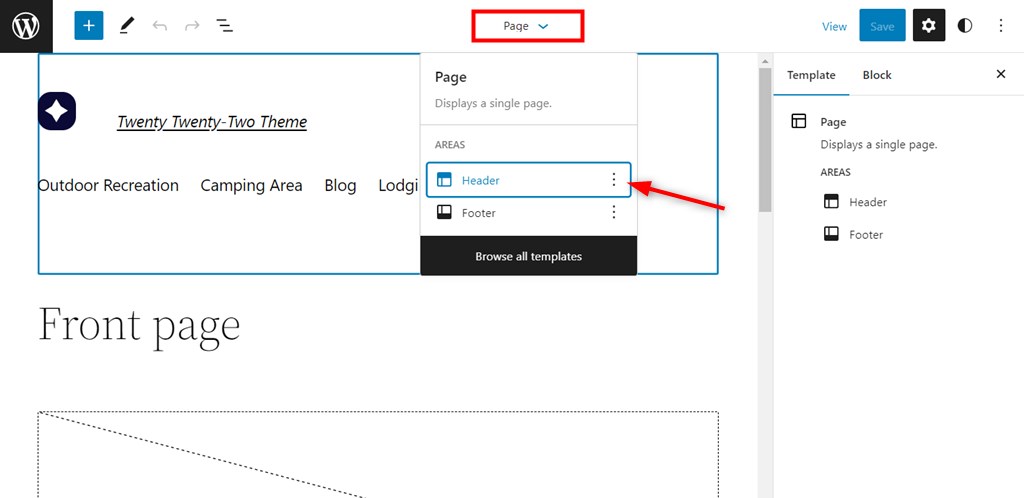
However, I will add a menu directly to the page for two reasons: it will cover more user case scenarios and it works smoother this way (while full-site editing is in beta and our block is not perfectly optimized to it).
Whether you create a menu on the page or in the header area, to create a top-level (the first visible row of links) menu, just add mega menu links one by one:
Step 1. Hit the ‘+’ icon > choose the Mega Menu block > add it to the page > give it a title and add a link.
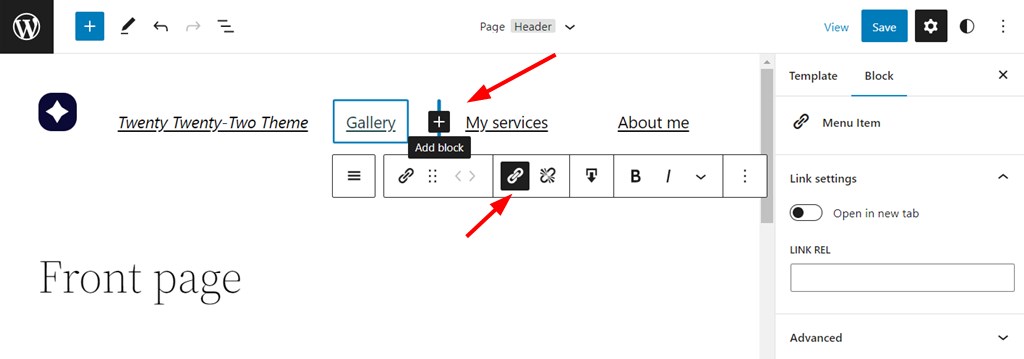
This way you have normal website links in the navigation menu.
Step 2. To add more complex submenus to the top-level menu, first select the menu link > then click ‘Add submenu’.
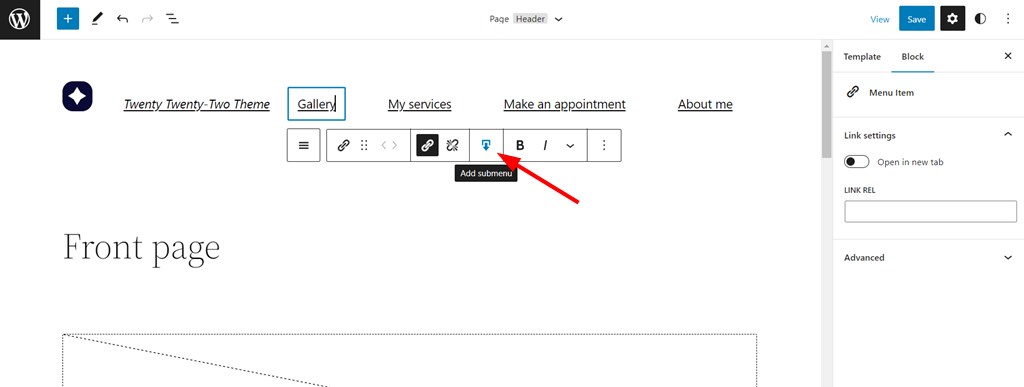
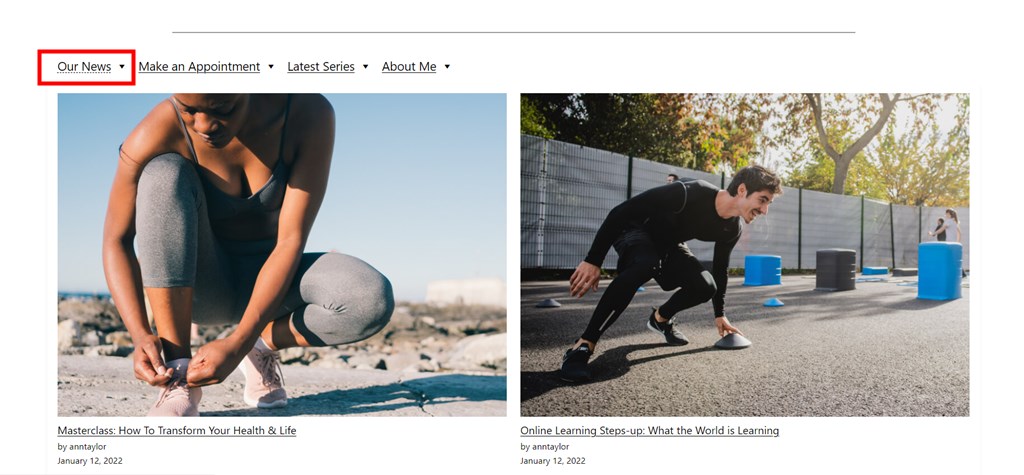
Step 3. Add any available blocks to the menu, from simple images and galleries to booking widgets. For example:
- I’ve added the latest posts block as a submenu, which might be suitable for mega menus for blogs and magazine sites.
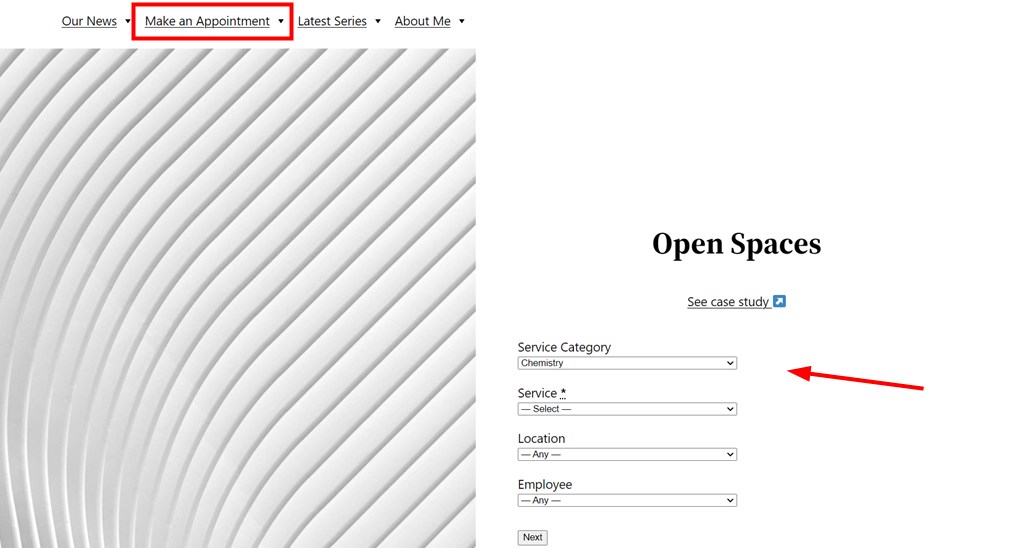
- An appointment form booking widget sourced by the WordPress appointment scheduler plugin (since it’s not styled for this theme specifically, it looks rather too default). I nested this widget inside another default WordPress design patten.
- I’ve also inserted an entire page section from the default WordPress patterns so it’s opened in the menu.
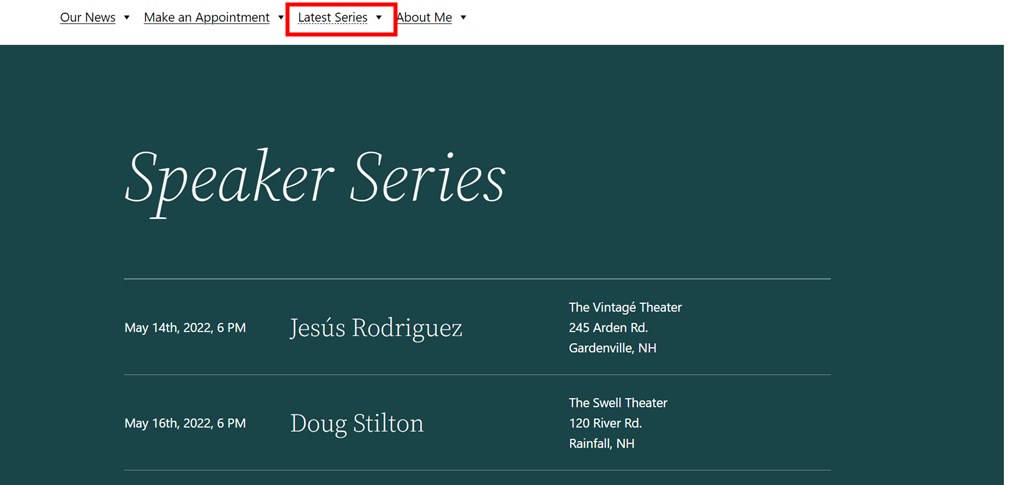
If you want to put multiple columns into the submenu, simply add the default Columns block to the submenu using this mega menu plugin for WordPress, and then instert the needed blocks inside columns.
Note that you might also need to use a canvas/blank template if you need to use this type of menu so that it can replace the default menu of your WordPress theme.
How do I style a mega menu in WordPress
To style the menu you created with the mega menu block, you can use both things: global settings of the menu and individual settings for every block you put into the submenu.
To apply global settings, click on the menu right in the editor > get the settings panel from the right.
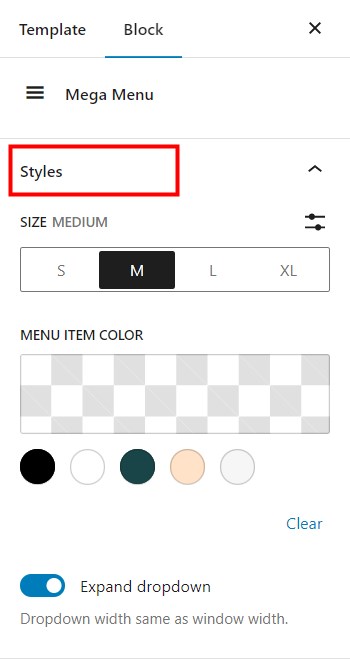
Styles tab
- Pick the size of the menu icons, such as small, medium, etc.
- Pick a color, they are usually sourced from your registered main theme colors.
- Optionally make the width of the drop-down menu content to fit the width of the device.
How to style individual blocks in the submenu? Simply choose the needed block and edit its parts via the right-hand menu. The settings panel will depend on the block type itself.
How do I make my mega menu full width
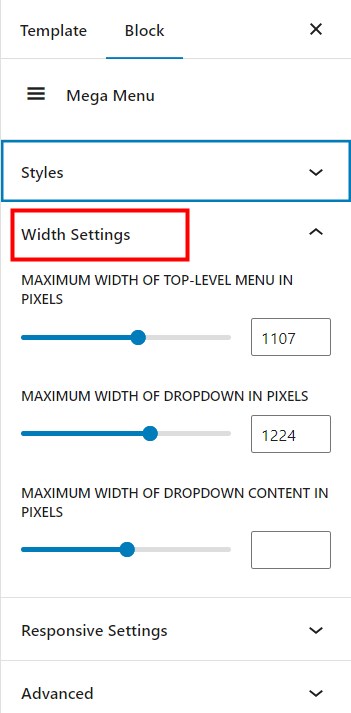
How to make the menu fill the width of your screen? To edit the width of your menu, navigate to the width setting panel of the menu block.
Using this settings panel, you can select the width for the top-level (always visible) navigation menu as well as submenu (drop-down).
In particular, you can specify in pixels a desirable width for the site menu:
- Max width of the top-level menu.
- Max width of the drop-down menu.
- Max width of the drop-down content.
To set the proper numbers, you should check default settings of the width container of the WordPress theme you use so that the menu fits it if you need to set a full-width for it.
How do I make my mega menu responsive?
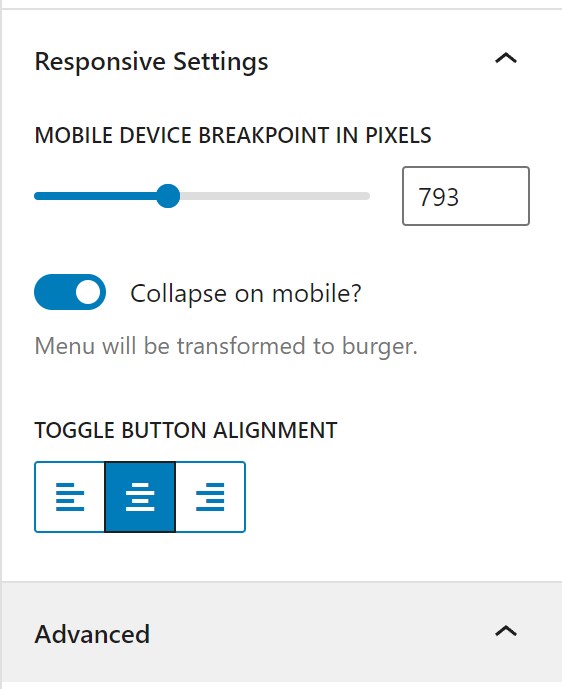
How do you make a mega menu responsive delivering the best user experiences across devices? Use the Responsive settings for this in the right-hand customization panel of the mega menu block.
You need to set so-called ‘breakpoints’ for responsive design in pixels. A breakpoint refers to the point at which a website’s content and design adjust to fit a specific screen size.
Once the responsive design (in our case, a mega menu) reaches the pixel values you have set, the transformation becomes visible so that the menu is easily viewable on any viewport.
You can also choose to ‘collapse’ the menu on mobile phones. This means it will turn into a hamburger menu icon you’ve surely seen on multiple sites. In the block settings, you can specify the menu icon’s location (left, right, or middle).
Responsive mega menus are significant to the user experiences as well as SEO.
How to import a mega menu into WordPress
Where do you want to import a mega menu into WordPress from? You can import it from another WordPress installation, as well as Blogger, LiveJournal or other platforms.
Your menu must be preferably saved in a page, post or custom post type to be importable to WordPress.
If you have your menu saved to your device from the source platform, go to your WordPress > Tools > Import > choose your platform > Run Importer and follow the steps.
Note:
- If you import your menu from another WordPress site, you might need to install extra plugins you used for building that mega menu. Otherwise it might not function properly.
- Different plugins might provide different solutions for importing mega menus and the default import feature might not work perfectly for every scenario.
Even more so, to import a menu within the same WordPress installation, use the editor’s default functionality. We can think only of a turnaround, though.
To import a mega menu to another WordPress page or post on the current installation, we need to make the menu blog reusable.
The mega menu for WordPress we use in this post falls short of this feature at the moment, so let’s use a turnaround:
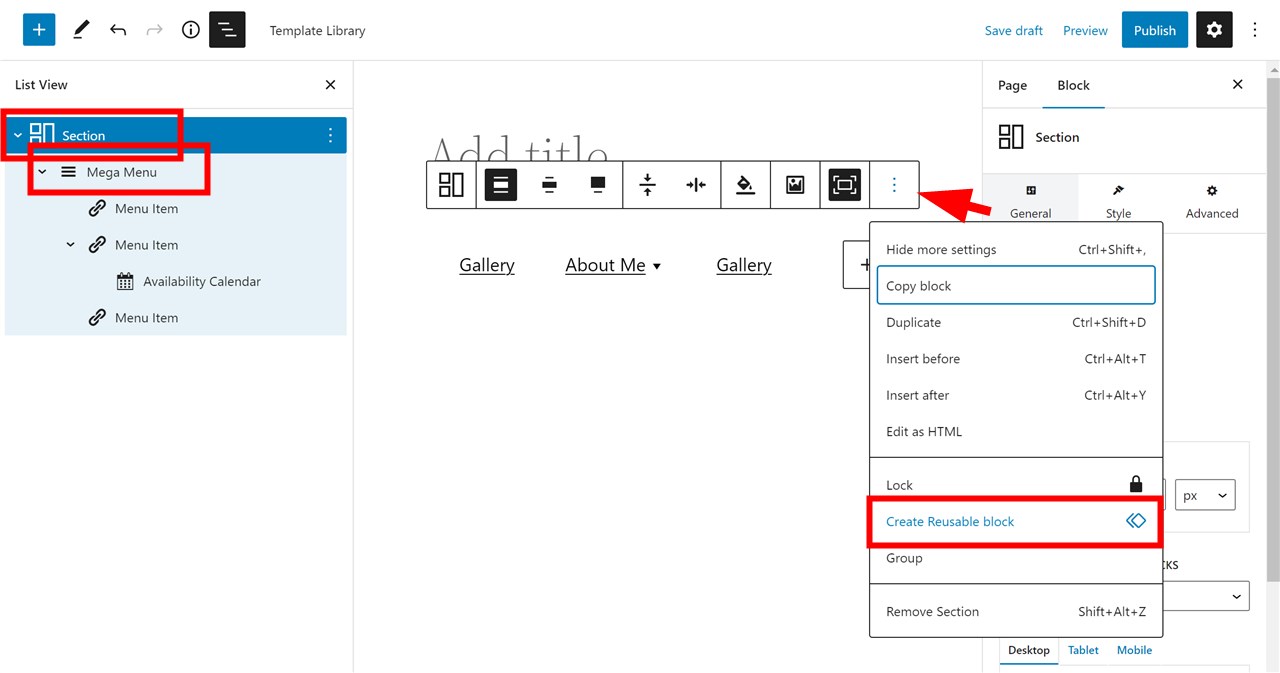
- Add the Section block (a container block by the Getwid plugin that can nest any other block).
- Place the mega menu block inside Section.
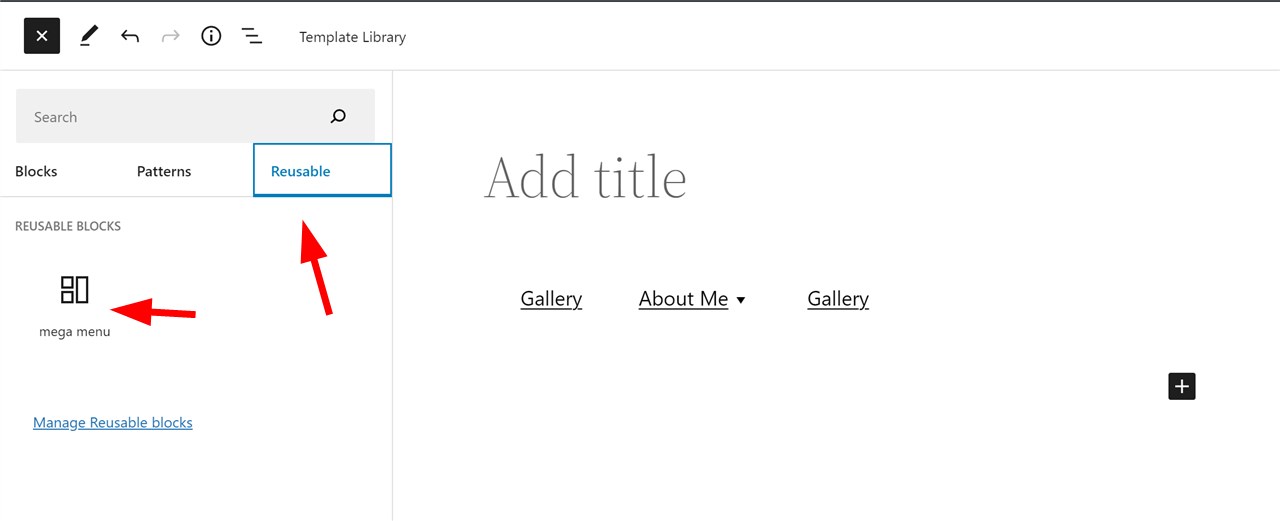
- And finally, save the block as reusable.
4. Add it to the needed page.
What is the purpose of mega menu?
Why do so many world-popular websites, including CMS platforms like Squarespace or Wix, choose to use mega menus on their websites?
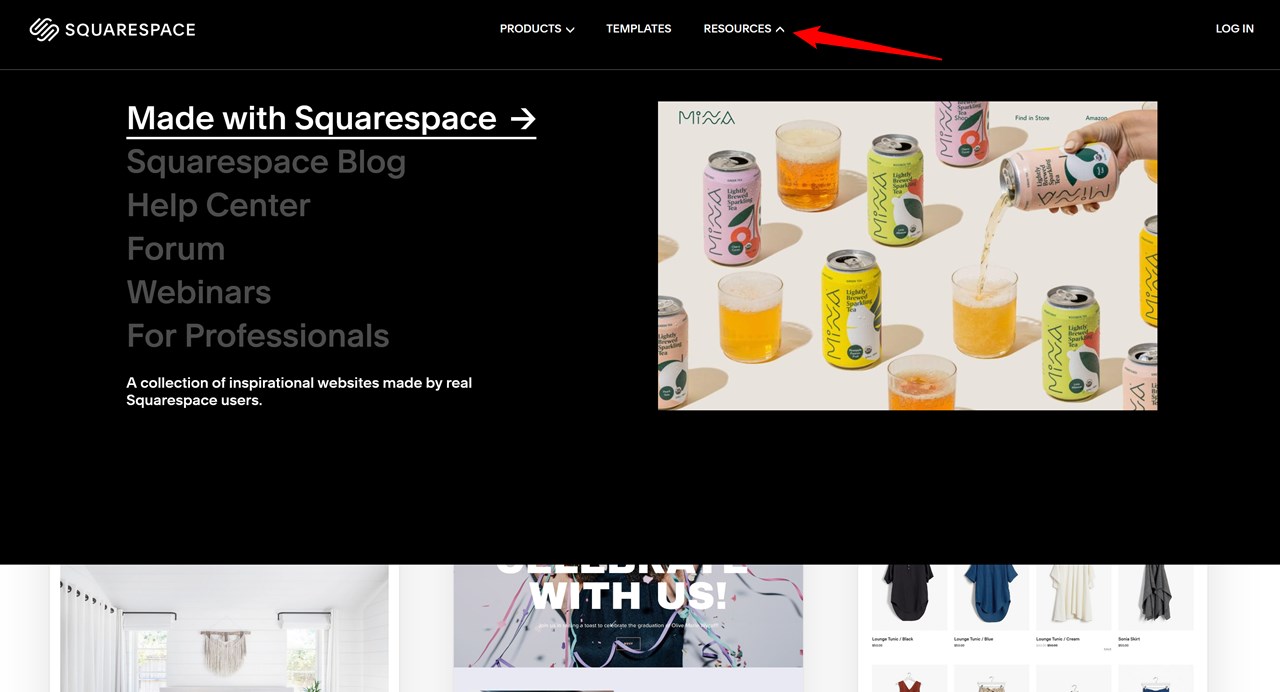
There are a few key reasons why your site might need a mega menu:
- Enhance website browsing experience for visitors, especially on large-scale websites.
- Enable people to see all key website pages and offertings at once.
- Minimize the chances of clients becoming lost and frustrated.
- Streamline the process of exploring products for buyers.
- Make the search on your website faster and more comfortable.
- Make your website menu look more professional and visually appealing.
- Boost SEO rankings with better data structure and keywords.
Is Mega menu good for SEO?
Is a mega menu good for SEO? If done right, there’s no doubt it’s beneficial for SEO. The key benefit is that it contributes to how people experience and navigate your site, how long they stay, engage with it, etc. And those are surely signals Google can take into account.
Even more so, by incorporating submenus and subcategories, you signal Google and other search engines that your site has a proper structure and give more information about your products or services. By including keywords wisely (avoiding keyword stuffing) in your mega menu, they can be detected by Google crawlers, which is also a win-win.
If you want your menu to be good for people and SEO bots, don’t add too many submenus and optimize it for various devices.
Are mega menus accessible?
Can we call mega menus accessible? Let’s define the term accessibility to answer this question. Accessible code makes it possible for people with disabilities to use and access content on the internet.
To ensure accessibility, the code for your mega menu (HTML, CSS and Jquery), whether generated by a plugin or crafted manually, must comply with the WordPress Accessibility Coding Standards.
If you can’t assess the code or user experiences yourself, here are a few things you can do:
- Ask a plugin provider if their solution meets standards of the Web Content Accessibility Guidelines (or study their docs).
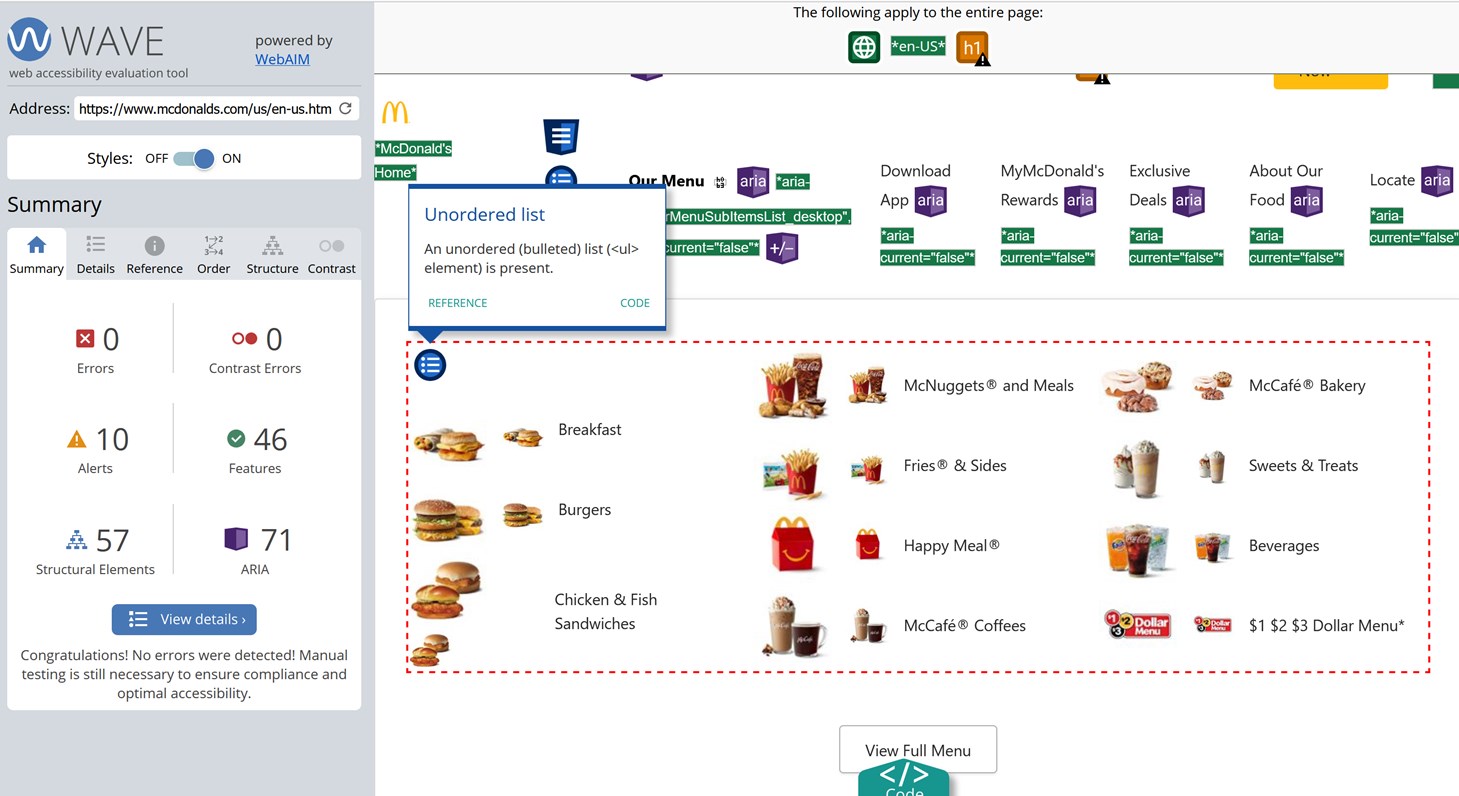
- Use accessibility evaluation tools, such as Wave or Lighthouse (Google’s Chrome DevTools).
- Ask an expert.
Best mega menu examples
Are you looking to see some of the best mega menu examples? As we’ve already found out, mega menus are particularly beneficial for websites that have complex structures, such as e-commerce, educational, magazine, and creative sites.
Some of them require a good level of categorization, others just need more space for featuring sliders, images, videos, and icons.
Now, let’s take a look at how various types of websites tackle this challenge by exploring responsive mega menus examples. And let’s take a few world-known websites (yes, they do use mega menus!).
Education: Coursera
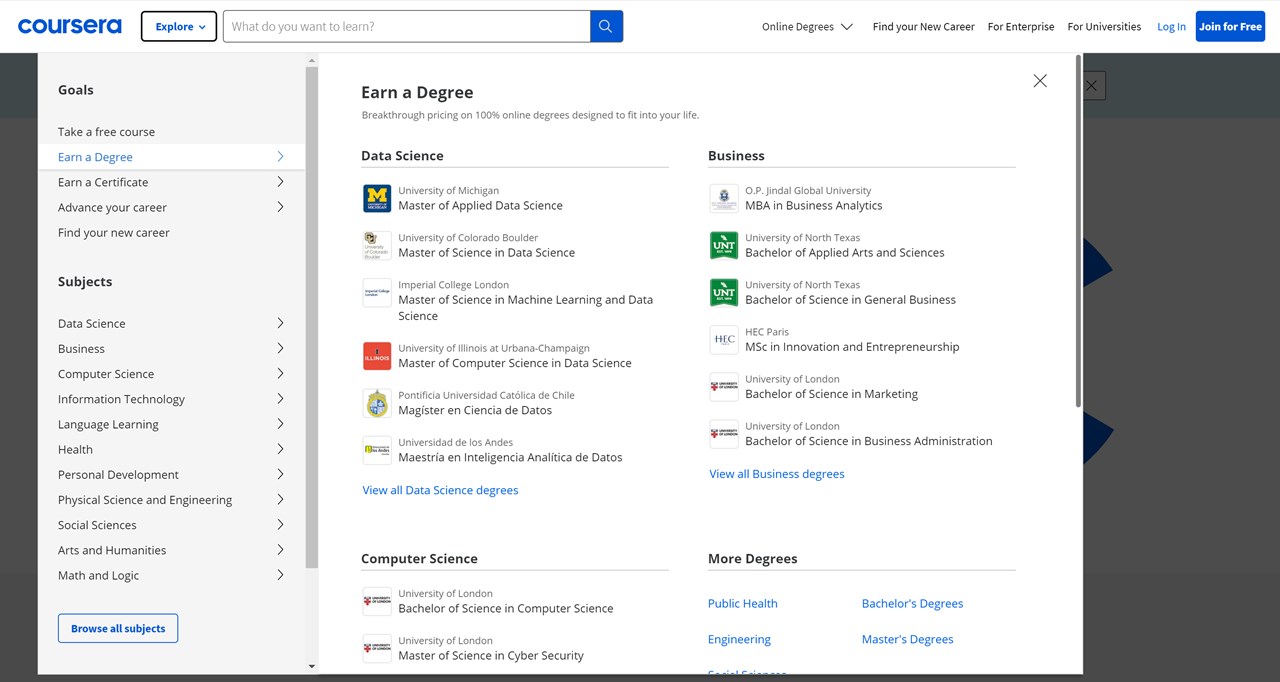
The Coursera website cleverly uses both horizontal and vertical mega menus to create two distinct types of focus for its users. The vertical menu in particular is a standout feature, offering an extensive and carefully categorized mega menu complete with eye-catching icons for improved visualization, as well as multiple columns.
E-commerce: H&M
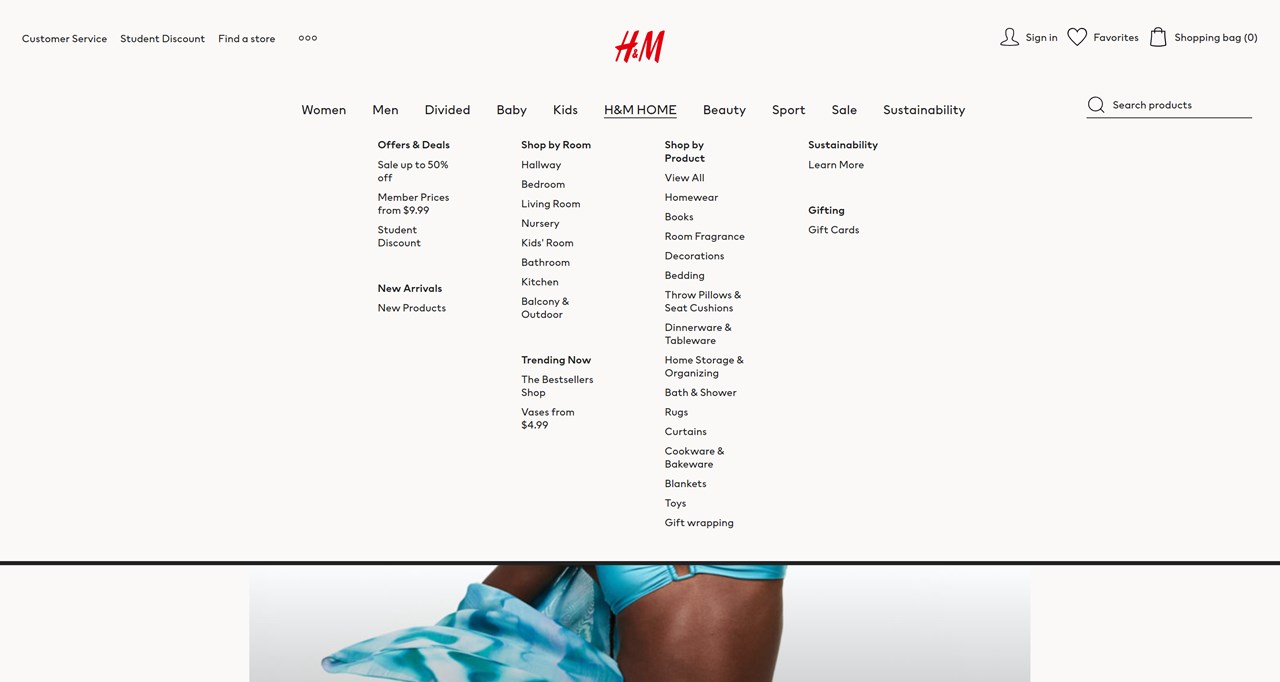
H&M’s e-commerce website takes a refreshingly simplified approach by sticking to just text content in columns within its mega menus. This design decision ensures that shoppers can easily navigate through H&M’s extensive inventory of trendy and affordable fashion finds.
Art broker: Sotheby’s
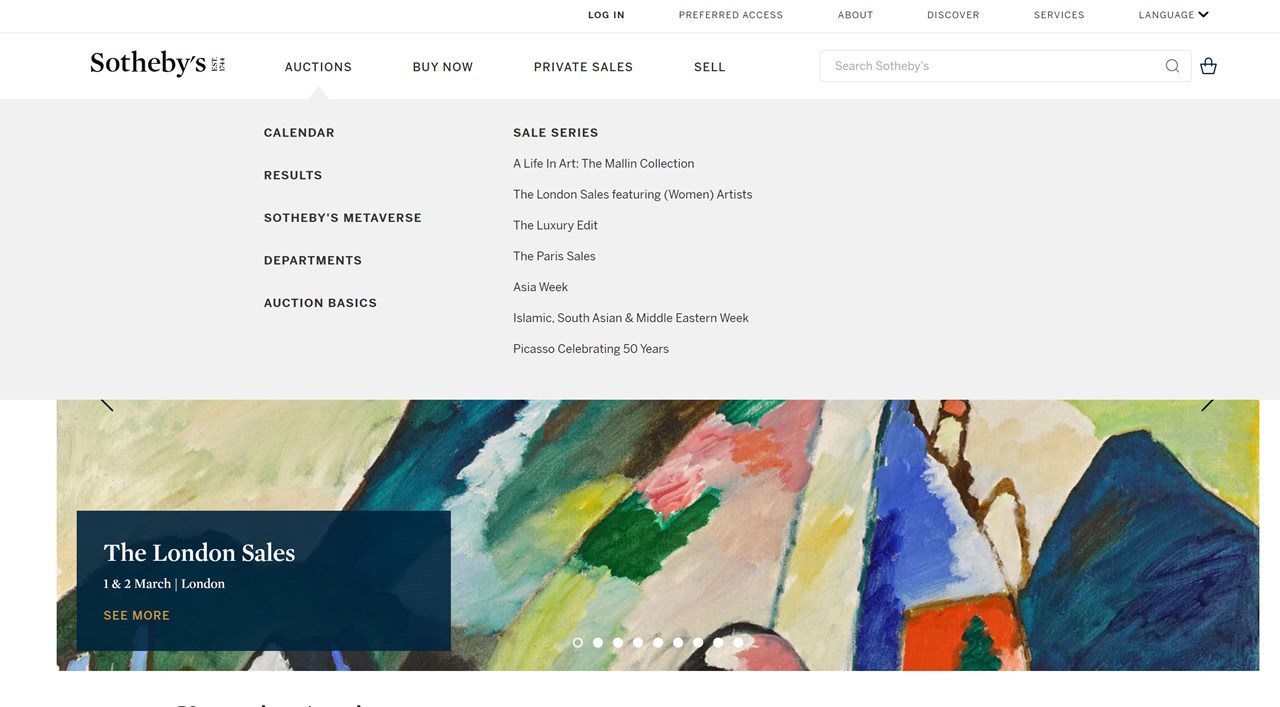
In contrast to other auction websites, Sotheby’s mega menu example has opted for a refreshingly minimalistic submenu that forgoes images altogether.
Magazine: Süddeutsche Zeitung
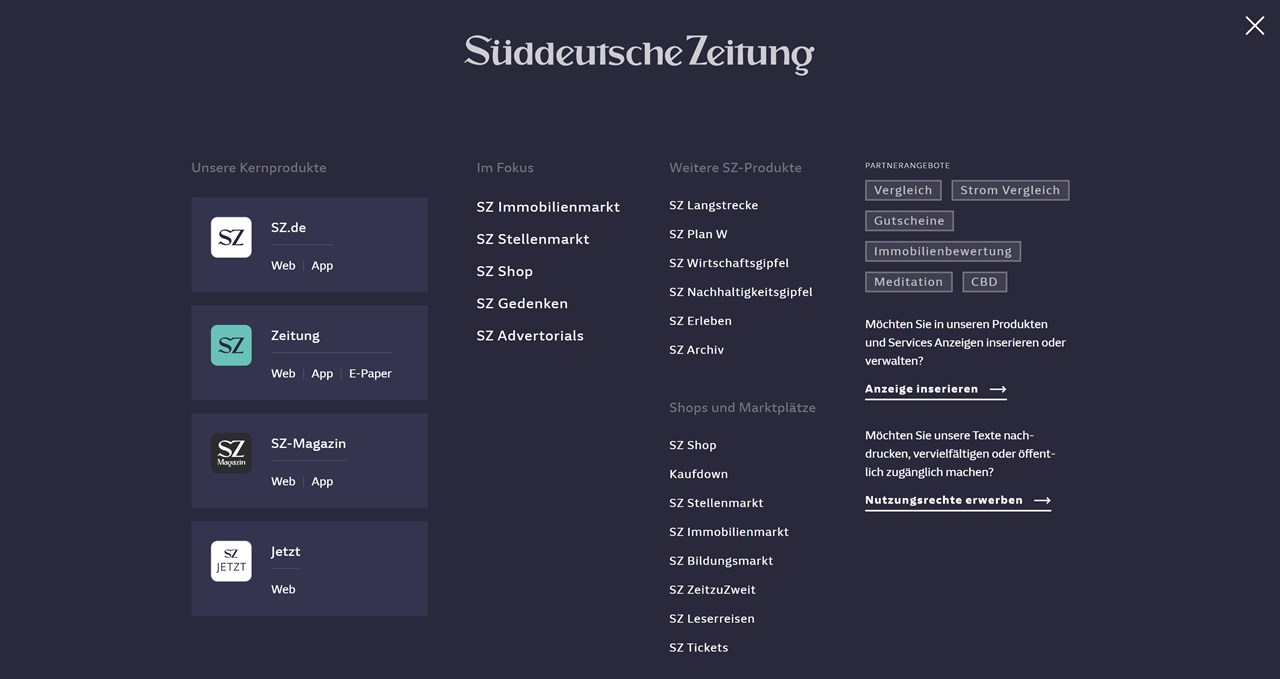
A very interesting megamenu example. While most categories on the site boast a standard submenu, there are a few notable exceptions that really push the envelope. For select menu items, a full-screen mega menu pops up, offering users an immersive experience complete with multiple categories and detailed information.
Restaurants: McDonald’s
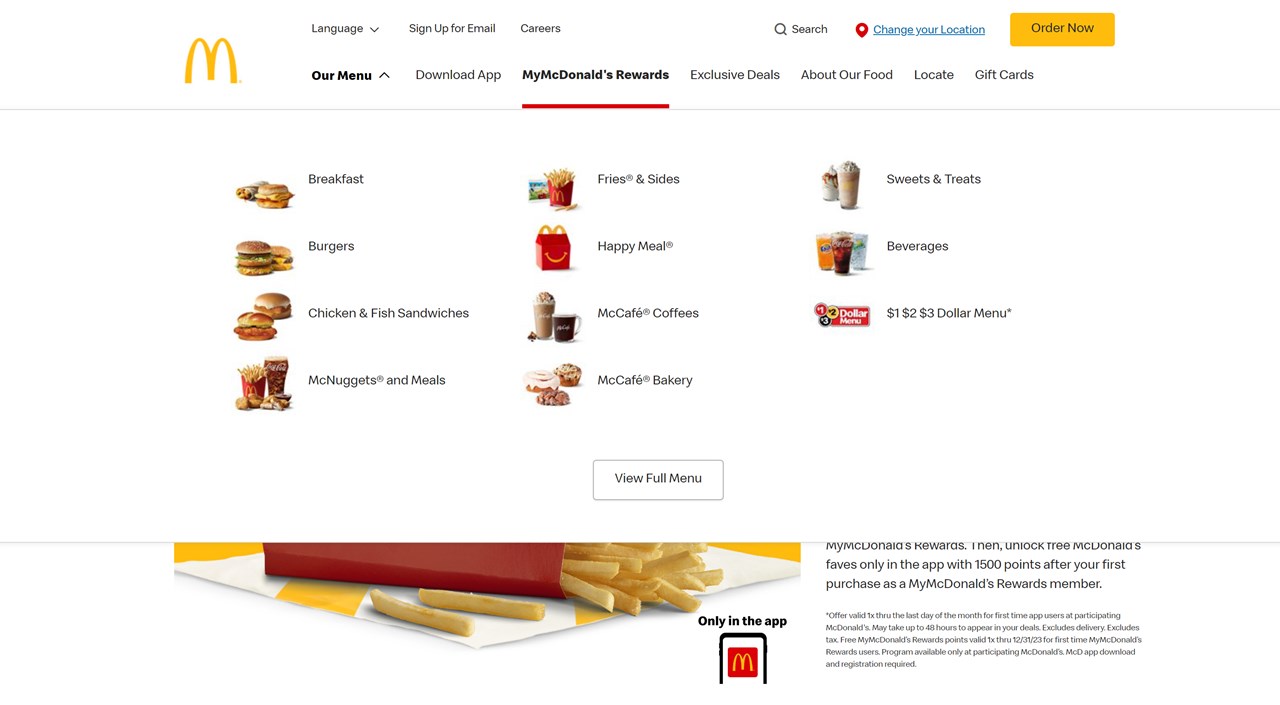
When it comes to menu and product design, McDonald’s is famous for avoiding text in favor of eye-catching images and icons. It’s no surprise, then, that their website menu follows a similar strategy, with a mega menu that’s bursting with delicious-looking imagery.
Technology: GoDaddy

The mega menu design on GoDaddy’s website features just the right mix of eye-catching visuals and helpful text, making it easy for users to find exactly what they’re looking for.
Hopefully, these examples of mega menus will help you get inspired for creating your own. For more, check out our collection of the best WordPress mega menu examples.
Final remarks
Don’t lock you down with the default theme menu styling. If you want to create a custom Elementor menu without the need to involve technical experts, the Stratum Mega Menu addon is a go-to solution. It’s relatively affordable, still very powerful, and feature-rich. It provides unlimited customization features for literally every part of your menu, helps you improve a top-level navigation menu, and build fantastic submenus presenting any content in the best light.
When you need to work with the classic WordPress, the Max Mega Menu is another great solution. To create a mega menu with blocks, you can use the WordPress mega menu block, although it might be limited at certain aspects.
Disclosure: this article may contain affiliate links for third-party products. If you click a link and later make a purchase, we may earn an affiliate commission that doesn’t result in additional charges to you.
FAQ
How do I create a custom mega menu?
Can I use elementor mega menu without plugin?
How do I create a mega menu in WooCommerce?
How do I add a mega menu to my website?
How do I create a mega menu in WordPress without plugins?
